
A Preloader which is also known as a loader is a simple or complex animation or GIF that keeps running on the page while the other content of the page is loading.

It is quite important to keep your users entertained for the short amount of time that your website takes in order to load the content. It not only helps retain a lot of users but also allows to create a lasting presence in the users' minds. In this tutorial, we will understand how to create Preloaders using Elementor.
How To Create A Preloader Using Elementor
Elementor is filled with options that allow you to represent your website on a completely distinct level. Similarly, it also allows you to create Preloaders using which you can catch on the users that are quick to bounce off your website.

To begin, make sure that you create Preloaders only for pages that actually need a few moments to load the content and is an important aspect of your website.
Create Amazing Websites
With the best free page builder Elementor
Start NowOnce you have decided what page you are going to place the Preloader at, find an SVG or a GIF that suits your website and that particular page. Icons8 is a really famous source for Preloaders animation.
If you don't know how to import SVG Format files on Elementor, go ahead and check out our tutorial.
Next, there are two ways to use Preloaders on your website, either by using it for a particular page or using it for the whole website.
- If you want to use the Preloader for the whole website, create a new section in the Header Template.
- If you want to use the Preloader for a particular page, create a new section at the top of the page.
While in both of these cases, make sure to change the section's settings to No Gap.
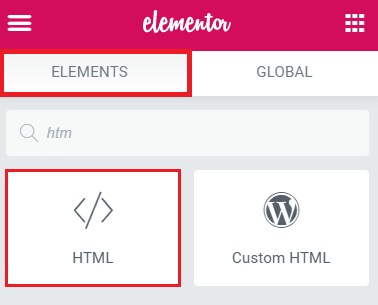
Altogether, when you are done with the settings, head over to the Elements tab at the left of your screen and choose HTML.
In the HTML field, add the following code while making sure to change the Preloader URL with your own.
<div class="loader" ></div>
<script>
document.addEventListener('DOMContentLoaded', function() {
jQuery(function($){
$('.loader').fadeOut('slow');
}); });
</script>
<style>
.loader {
position: fixed;
left: 0px;
top: 0px;
width: 100%;
height: 100%;
z-index: 9999;
background: url('/wp-content/uploads/images/loader.svg') 50% 50% no-repeat #fff; /* Change the #fff here to your background color of choice for the preloader fullscreen section */
}
.elementor-editor-active .loader{
display: none;
}
</style>
The coding has a commentary explanation for the beginners to make some sort of changes if there is a need.
Finally, go ahead and publish your Preloader and check if it works perfectly. This is how you can create a Preloader with Elementor on your WordPress website.
We hope that this tutorial will assist you in retaining users of your website and also making it look much more professional. That's all from us for this tutorial. Make sure to join us on our Twitter and Facebook to stay updated about our content.


