
CloudWays is a popular cloud-based platform that provides managed hosting services for a variety of websites and applications. It offers a range of benefits to its users, including scalability, reliability, and ease of use. However, there may be times when you need to change the server location of your website or application on CloudWays, for various reasons such as performance optimization or compliance requirements.
One solution to changing the server location on CloudWays is to clone the server. Cloning is a process of copying all the data, settings, and configurations from an existing server to a new server in a different location. This allows you to quickly and easily transfer your website or application to a new environment without having to manually recreate it from scratch.
In this article, we will be discussing how to change server location on CloudWays by cloning the server. We will cover everything you need to know, from preparing for the cloning process to the final steps of changing the server location. By the end of this article, you should have a good understanding of how to clone a server on CloudWays and change its location.
Before You Begin
Before you begin the process of cloning your CloudWays server to change its location, there are a few important pieces of information and considerations that you should have in hand. Firstly, it's important to have the credentials for both the source server and the destination server (if it has already been created). You'll also want to make sure that any custom configurations or settings are compatible with the destination server and that you have a backup of all important data and files.
Create Amazing Websites
With the best free page builder Elementor
Start NowIt's important to be aware of the potential risks and drawbacks of cloning a server, such as possible data loss or corruption during the process, downtime for the source server, and potential compatibility issues with the destination server. To minimize these risks, it's recommended to take a backup of all important data and files, check the compatibility of any custom configurations or settings with the destination server, verify that both the source and destination servers have enough resources to handle the cloning process and schedule the cloning process during a low-traffic time.
By following these recommendations and being mindful of the potential risks, you can ensure a smooth and successful cloning process that allows you to change the location of your CloudWays server with confidence.
Change Cloudways Server Location
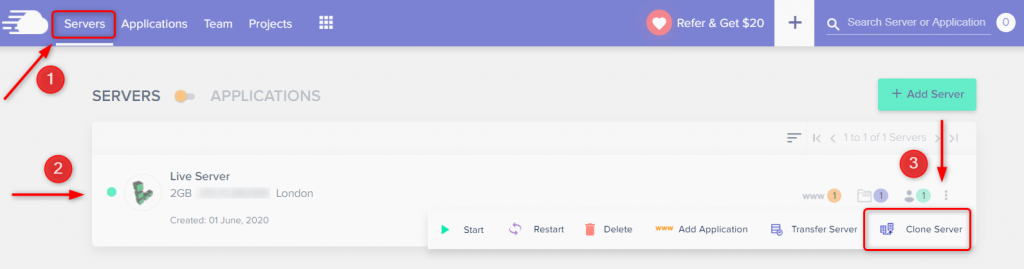
To get started with cloning your CloudWays server, the first thing you'll need to do is log into your CloudWays platform using your email address and password. Once you're logged in, navigate to the top menu bar and open the "Servers" section. From there, select the server that you'd like to clone.
Once you've selected the server, take a look at the options available to you and click on the "⋮" symbol. From the dropdown menu, you'll see the option to "Clone Server". Simply click on it and you'll be on your way to cloning your server and changing its location.
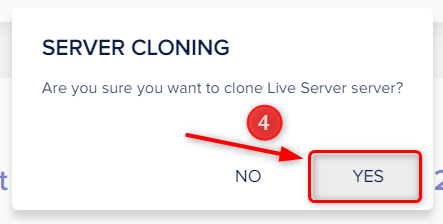
For the cloning procedure, you will receive a prompt. Select Yes.
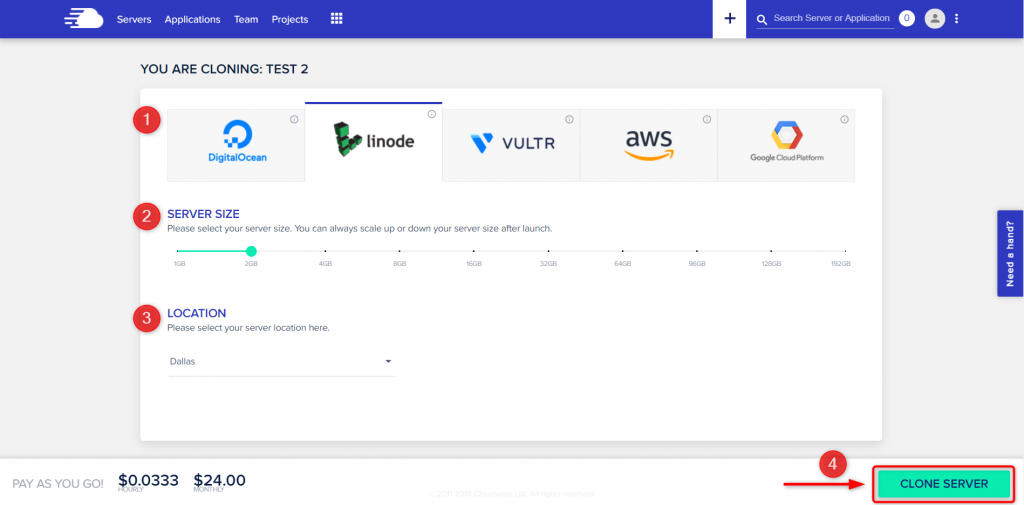
Okay, now it's time to start the server cloning process! To get started, you'll need to provide a few pieces of information. First, you'll need to choose your infrastructure provider, whether that's AWS or GCP. Next, you'll need to select the size of your server, so make sure you choose a size that's appropriate for your needs. After that, you'll need to select the location of your server - this is where your server will be physically located, so choose a location that makes the most sense for your needs.
Finally, once you've made all of your selections, it's time to click the "Clone Server" button. This will start the cloning process, and in a short amount of time, you'll have a brand new server in the location of your choice!
If you're going with AWS or GCP instances, there are a few extra steps you'll need to take. You'll need to select the storage size for your web application files and database. This is important, so make sure you choose a storage size that's appropriate for your needs. You'll also see the monthly and hourly charges based on your selected instance, so you'll know exactly what you're paying for. With this information in hand, you're ready to start the server cloning process!
Good news! Your cloned instance should be ready to go in no time. Just keep in mind that the amount of time it takes for the cloning process to complete will depend on how much data needs to be copied.
It's important to remember that the cloning process simply creates an exact copy of your sites and their contents. Any previous configurations or settings made through the platform won't be included in the clone. Once the cloning process is done, you'll need to map your domains and update your DNS records so your sites can go live. And don't worry, you can always add an SSL certificate later on if you need to.
Wrapping Up
In conclusion, changing server location on Cloudways via cloning it is a simple and straightforward process that can help improve your website's performance and user experience. By following the steps outlined in this guide, you can easily migrate your website to a new server location with minimal downtime.
Remember to choose a server location that is closest to your target audience to ensure faster load times and a better user experience. You can also use Cloudways' server cloning feature to test different server locations and see which one works best for your website.
Overall, Cloudways offers a powerful and user-friendly platform that makes it easy to manage and optimize your website's performance. By taking advantage of the platform's many features and tools, you can ensure that your website is always running at its best.


