WordPress is a well-known platform for developing and managing websites, blogs, and online marketplaces. One of the features provided by WordPress is the ability to change the appearance of your site via the use of themes and plugins. However, there may be instances when you wish to make changes to your site that are not immediately accessible through the WordPress admin, such as the margins.
Margins are the spaces between your site's boundaries and the content area. They can have an impact on how your site appears and feels, as well as how much space you have to display your information. Changing the margins on your site can help you achieve a more balanced and harmonious layout.
How to Change Margins
There are two main ways to change the margins in WordPress: using CSS code or using a plugin. In this blog post, we will explain both methods and show you how to apply them to your site.
Method 1: Using CSS Code
CSS, which stands for Cascading Style Sheets, is a language that governs how HTML elements appear on a web page. By adding some custom rules to your theme's design, you can adjust the margins of your site using a CSS code.css file or the WordPress Customizer's Additional CSS section.
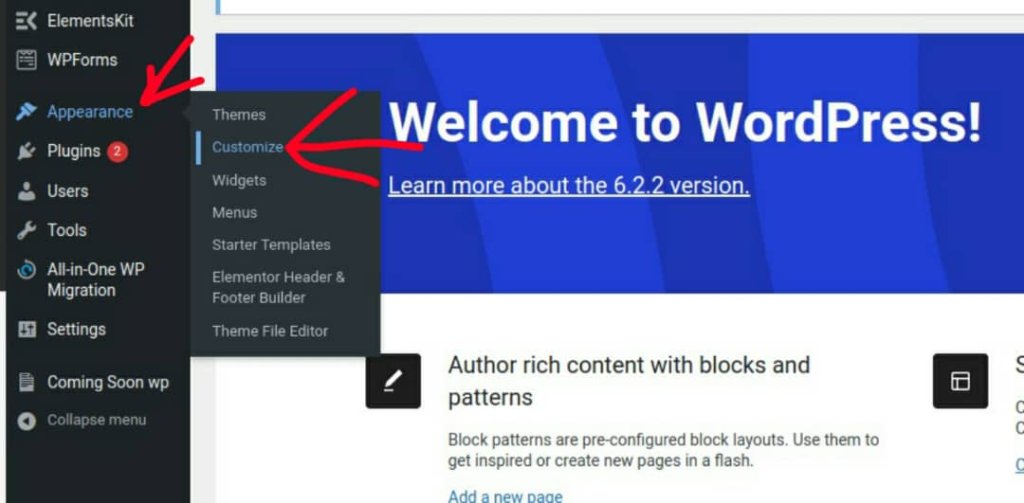
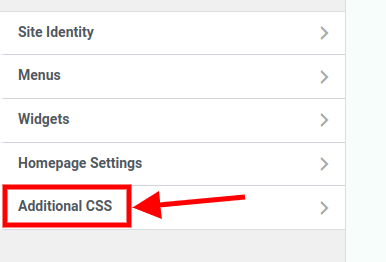
To access the Additional CSS section, go to Appearance > Customize > Additional CSS in your WordPress dashboard. There you will see a box where you can enter your custom CSS code.
You must target the element that includes your content area to adjust the margins of your site. This element's name may differ based on your theme, but it is commonly known as ".container", .content, or ".site-content".
Create Amazing Websites
With the best free page builder Elementor
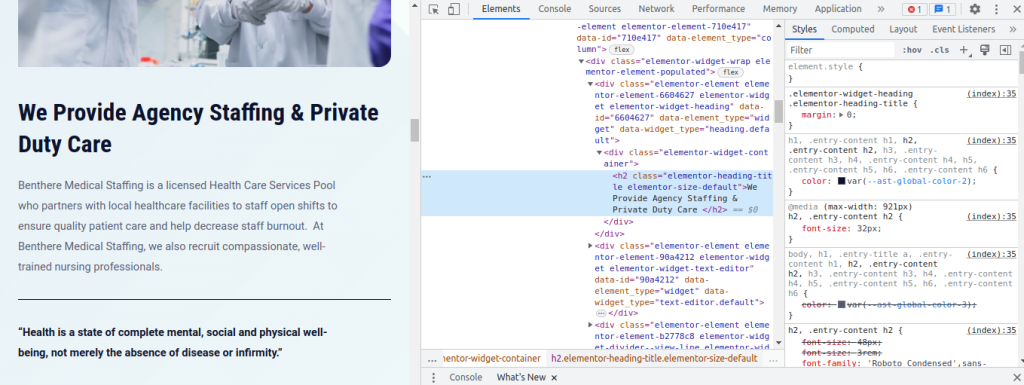
Start NowYou can analyze your site using a browser tool such as Chrome DevTools or Firefox Developer Tools to determine the name of this element.
To access DevTools, press the F12 key or right-click and click on inspect and it will open as a left sidebar window, or at the bottom, depending on the way your browser is customized. The image below is what a DevTool look like:
Once you've determined which element contains your content area, you may adjust its margins using the margin attribute. Depending on how many sides you want to adjust, the margin property can take one, two, three, or four values. As an example:
- margin: 20px; // This will apply a 20px margin to all four sides of the element.
- margin: 20px 10px; // This will apply a 20px margin to the top and bottom sides, and a 10px margin to the left and right sides of the element.
- margin: 20px 10px 15px; // This will apply a 20px margin to the top side, a 10px margin to the left and right sides, and a 15px margin to the bottom side of the element.
- margin: 20px 10px 15px 5px; // This will apply a 20px margin to the top side, a 10px margin to the right side, a 15px margin to the bottom side, and a 5px margin to the left side of the element.
You can optionally specify the margin values in alternative units, such as pixels (px), percentages (%), ems (em), rems (rem), or viewport units (vw or vh). As an example:
- margin: 5%; // This will apply a margin equal to 5% of the parent element's width or height.
- 2em margin; // This will apply a margin equal to double the element's font size.
- 1rem margin; // This will set the margin to the font size of the root element (typically HTML).
- 2vw margin; // A margin of 2% of the viewport width will be applied.
- 2vh margin; // A margin of 2% of the viewport height will be applied.
Here is an example of how you can use CSS code to change the margins of your site:
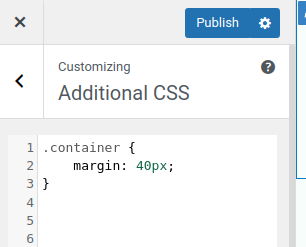
This will apply a 40px margin to all four sides of your content area.
Method 2: Using a Plugin
WordPress has a choice of plugins that make altering margins easier for users that prefer a more user-friendly approach. One common plugin for this is "Simple CSS." Here's how you can put it to use:
Step 1: Install and Activate the Plugin

Navigate to "Plugins" in your WordPress Dashboard and click "Add New." Install the plugin "Simple CSS" by searching for it. Activate it once it has been installed.
Step 2: Access the plugin settings
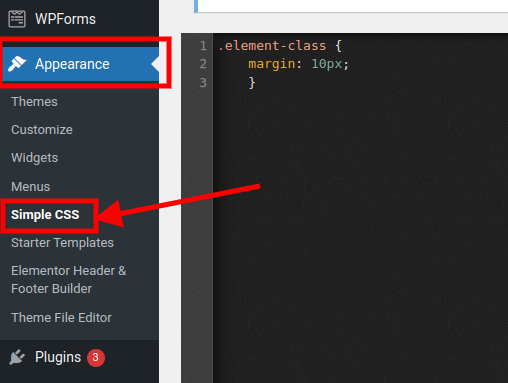
After activating the plugin, find and click on “Appearance” in the left-hand menu. Then, select “Simple CSS.”
Step 3: Add margin style
You can add your custom CSS code as below to change the margin.
Step 4: Save changes
Click on the Save button as soon as you are done adjusting the margins.
Implementing Media Queries
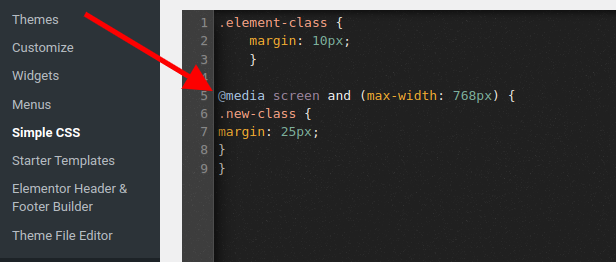
You may also use CSS media queries to adjust the margins for different screen sizes and devices. This function is extremely beneficial for responsive design and margin optimization.
Final Word
We covered how to modify margins in WordPress using several approaches in this blog post. We've seen how to modify the spacing around your content using custom CSS and plugins.
Changing the margins on your website can help you improve the layout and style, as well as the readability and user experience. We hope you found this advice useful and that you chose the best solution for your needs.


