
Have you ever wondered how to enhance your website's functionality and create a seamless browsing experience for your visitors? One way to achieve this is by creating subdomains for your main domain. Not only do subdomains allow you to organize your website's content more efficiently, but they also offer several benefits that can take your online presence to the next level.

By creating a subdomain, you're essentially extending the reach of your main domain, and search engines treat it as a separate website. This means that you can create specific sections of your website dedicated to certain topics or events without cluttering up your primary site with irrelevant content.
Creating a subdomain may seem like a daunting task, but it's actually relatively straightforward, and the benefits are well worth the effort. For example, you can use subdomains to conduct Google ranking experiments, test new plugins and themes, or simply organize your content in a more user-friendly way.
In this post, we'll be diving into the benefits of subdomains and providing a step-by-step guide for adding subdomains to your Cloudways hosting account. Whether you're a seasoned website owner or just getting started, subdomains are an invaluable tool for taking your online presence to the next level. So let's get started and explore the world of subdomains together.
Create Amazing Websites
With the best free page builder Elementor
Start NowBenefits Of Creating Subdomains
Subdomains are a simple and cost-effective way to organize a website's content, and they offer numerous benefits. By using subdomains, you can increase your site's crawl rate and improve its search engine ranking through topical authority. Additionally, structuring your site's content with subdomains can make it more appealing to visitors and help establish your brand identity.
Subdomains are also useful for targeting specific geographic locations and reaching a wider, international audience. They can be used to launch an eCommerce store or a mobile site, and they allow you to test the performance of plugins and themes without affecting the primary site.
One of the key advantages of subdomains is that they provide a level of protection from Google penalties. If one subdomain is penalized, it won't impact the other subdomains or the main site. Subdomains are also ideal for collaborative work, as they allow team members to access specific sub-sites without sharing login credentials for the main site. This makes it easy to delegate tasks such as content editing, writing, and testing third-party tools.
Finally, subdomains are a valuable resource for learning and experimentation. You can use them to gain a better understanding of search engine algorithms and test new strategies without affecting the main site. Overall, subdomains are a powerful tool for organizing and optimizing a website's content, improving search engine rankings, and facilitating collaborative work.
How To Create Subdomain In Cloudways Hosting
Cloudways is a managed hosting solution that offers lightning-fast speeds for businesses and bloggers looking to optimize their web assets for the latest technological trends and to meet core web vital assessments. If you've had experience with this top-rated cloud hosting platform, we'd love to hear about it!
Now, let's get down to the nitty-gritty of creating a subdomain on Cloudways. It's a straightforward process that can be completed in just a few minutes by following these simple steps:
Step 1: First, log in to your Cloudways account and head over to the Admin Panel section.
Step 2: Once you're in the Admin Panel, click on the "Applications" tab on the top menu, followed by "Add Applications." From there, select the main server you wish to add the application to, and then click "Add Application."

Step 3: First, select the application settings and choose the version of WordPress that you want to use. Give a name to your subdomain and under "Select your Project," pick your main domain. After that, click "Add Application."

Step 4: Once your subdomain has been installed, a message will appear indicating that the installation is complete. Go to "Applications" and find the newly created subdomain. You'll be able to see the default "WordPress Admin Panel URL" that was created by Cloudways hosting.

Step 5: Click on that URL, and a new tab will open with your subdomain. However, you'll need to point your subdomain to the domain that is registered on your website.
Step 6: To do this, you'll need to copy your Cloudways public IP and then visit the website where your domain is registered (such as GoDaddy or Namecheap).
Step 7: If you're using GoDaddy, start by logging into your account and heading to the "My Products" section. From there, find the "Domains" tab and select "Manage DNS" to begin adding your records.

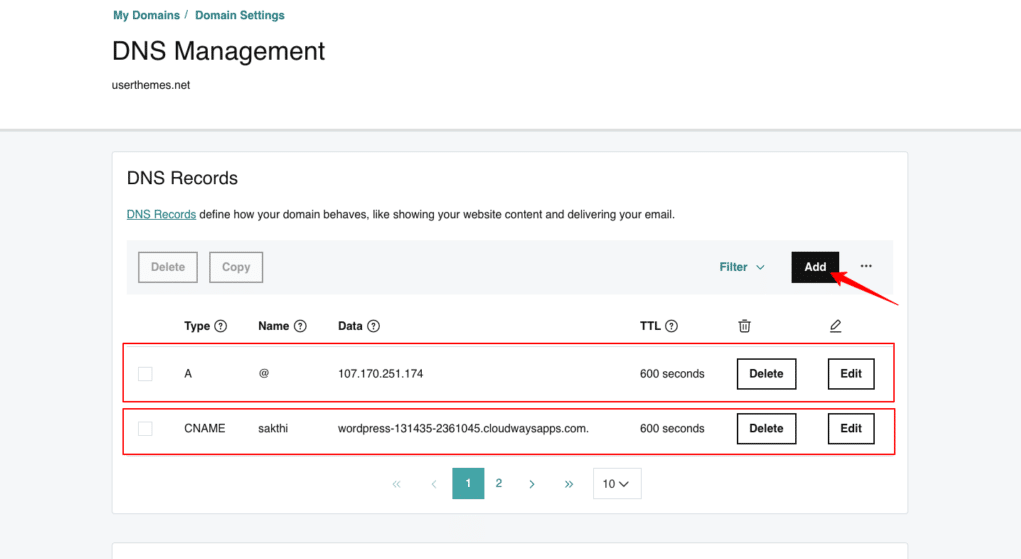
Step 8: Click the "Add" button and enter four pieces of information: Type, Name, Value, and TTL. For Type, select "A." For Name, enter "@." For Value, paste the public IP address that you copied from your Cloudways admin panel. Finally, set TTL to "Custom" and enter "600 seconds." Click "Add Record" to finish this step.
Step 9: After adding the "A" record, it's time to include the "CName" record. Follow the same steps as before by clicking "Add" and entering Type, Name, Value, and TTL. For Type, select "CName." For Name, enter your desired subdomain name. For Value, paste the default WordPress admin panel URL that you can find in your Cloudways dashboard. Set TTL to "Custom" and enter "600 seconds." Once again, hit "Add Record."
With the records now added to your domain registration site, you've successfully pointed to your subdomain.
Step 10: The final step is to head to the Cloudways Admin settings and click on "Domain Management." Here, you'll want to give your subdomain a name by entering "SUBDOMAIN NAME.MAINDOMAIN.COM" in the Primary domain field. After you've done this, click "Save Changes" to update your subdomain.

Step 11: Once you have created your subdomain on Cloudways hosting, it is important to also install an SSL certificate to ensure the security of the site. To do this, go to the "SSL Certificate" section and enter your email address and the name of the subdomain. After clicking "Install Certificate," the SSL will be installed in just a few seconds, and you will receive a message confirming its successful installation. Save your changes before proceeding.

Step 12: Next, navigate to the "Access Details" section and locate the updated URL for your newly created subdomain. This URL will also be reflected in your WordPress dashboard under "Settings" and "General," where both the "WordPress Address" and "Site Address" will be the same. To verify that the URL has been updated, simply click on the admin panel URL provided in the "Access Details" section and confirm that it reflects the correct subdomain.

Wrapping Up
In conclusion, creating a subdomain in Cloudways hosting can provide a number of benefits for your website, including improved organization, enhanced user experience, and increased SEO potential. By following the steps outlined in this guide, you can easily create a subdomain on your Cloudways account, customize its settings to fit your specific needs, and take advantage of the many features and tools that Cloudways has to offer. Whether you are a seasoned website owner or just starting out, incorporating subdomains into your hosting strategy can help take your online presence to the next level.


