
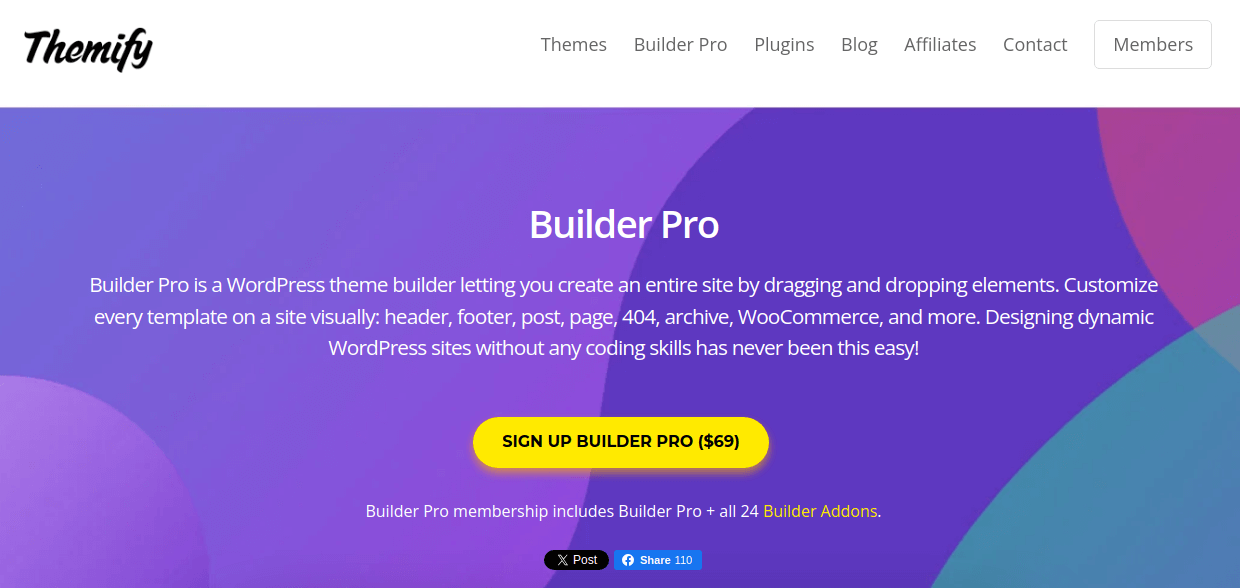
Do you want to create stunning and responsive websites with WordPress without coding skills? If yes, try Themify Builder, one of the most powerful and easy-to-use page designers and builders for WordPress.

In this blog post, I will show you how to use Themify Builder for WordPress in 2024 and why it is the best solution for your WordPress needs.
What is Themify Builder?
With simple drag-and-drop editing, Themify is a flexible page builder that offers an easy way for any user to create their website. It works with every theme that Themify has created. It can be used with different themes as well.
There are two versions of the Themify builder available: a free version with restricted functionality and a paid version with unique unlocked features that enhance the page-creating experience.
Create Amazing Websites
With the best free page builder Elementor
Start NowUsers may drag and drop text and image elements to any region of their screen and alter them to suit their needs using this drag-and-drop website builder.
Why Use Themify Builder for WordPress?
Using a drag-and-drop interface, Themify Builder lets you create any kind of layout you can think of, complete with a live preview. Without knowing a single line of code, you can just pick, drag, and drop elements to see your stunning website come to life.
Themify Builder supports multi-site networks, is translatable, SEO friendly, and works with any WordPress theme or plugin. Additionally, Themify Builder has a built-in cache system that speeds up page processing and uses fewer server resources.
Several features set Themify Builder apart from other page builders. Among them are:
- Responsive across all resolutions.
- Includes all modules (Text, Video, Accordion, Gallery, Post, Widgetized, Widget, Menu, Button, Slider, Map, Icon, Feature, etc.)
- Custom styling – Google fonts, background color, padding, margin, and border.
- Undo/Redo Builder modifications as you edit.
- Copy/Paste modules, rows, and columns.
- Import/Export specific modules, rows, and columns from one computer to another.
- Easily duplicate any module or row.
- Row and column layout pre-set grids.
- Rows and columns can be nested in sub-rows or columns.
- Draggable column widths.
- 60+ predesigned Builder layouts.
- 60+ animation effects.
- Responsive Styling.
- Background – slider, video, parallax scrolling, and gradient.
- Revisions – allows you to save your Builder layout with unlimited versions.
- Visibility control, where you can set whether a module or row is visible on a specific device.
- Layout parts – re-usable parts that can be included in the Builder.
- Custom CSS
With all these features, you can create any type of website you want, such as a blog, a portfolio, a landing page, an e-commerce site, a business site, and more.
How to Use Themify Builder for WordPress?
Using Themify Builder for WordPress is very easy and intuitive. You can either use the frontend live preview editing or the compact backend Builder editing.
Here are the steps to use Themify Builder for WordPress:
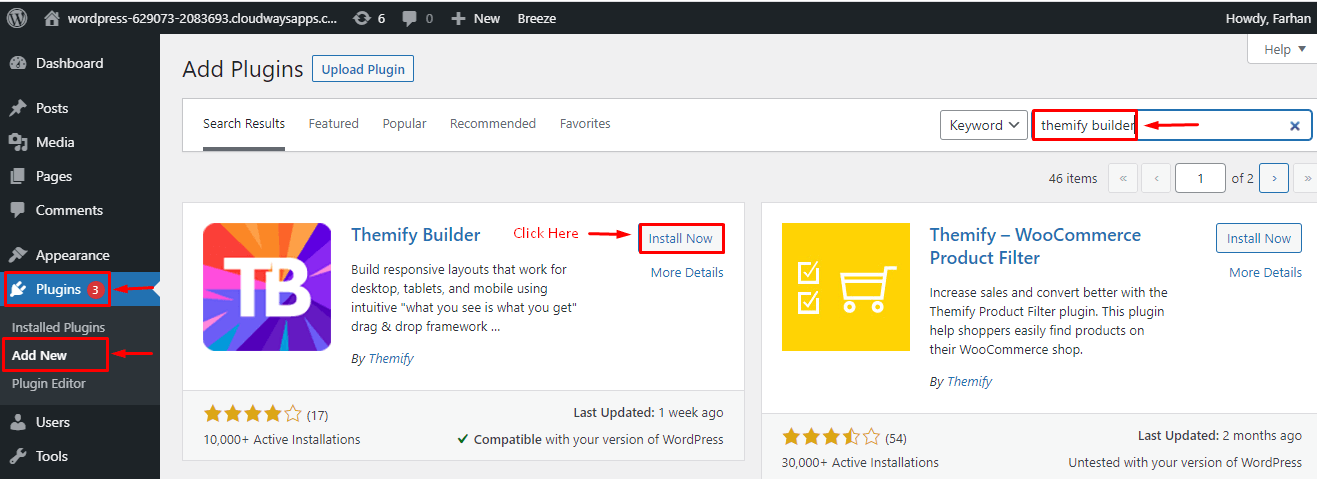
Step 1: Install and Activate the Plugin
Because it is also free, installing it from the WordPress repository only takes a few clicks, much like installing any other plugin.
Let's get started with the installation procedure now! Open the WordPress Dashboard, Plugins > Add New > type Themify Builder > click Install and Activate.
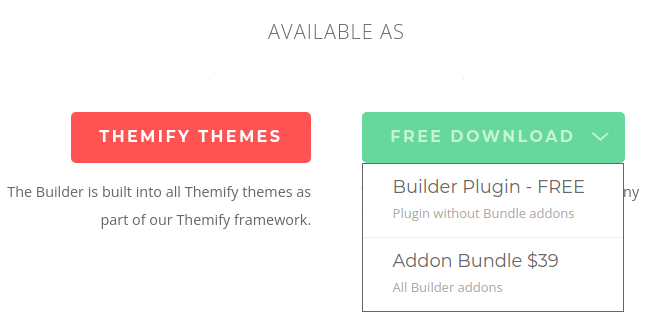
You can also install the Themify builder manually by downloading the zip file from the Themify site.
Go to their official site and click Free Download > Builder Plugin – Free.
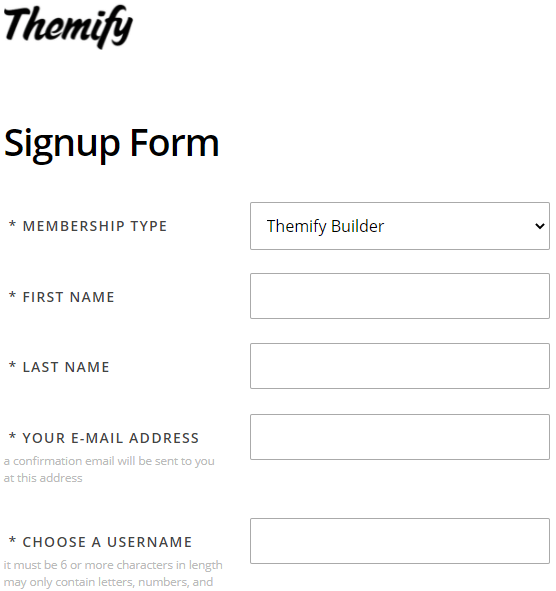
Next, fill in the signup form and create a new Themify account.
Now, go to Themify Dashboard and click Plugin: Themify Builder to download the plugin zip file.
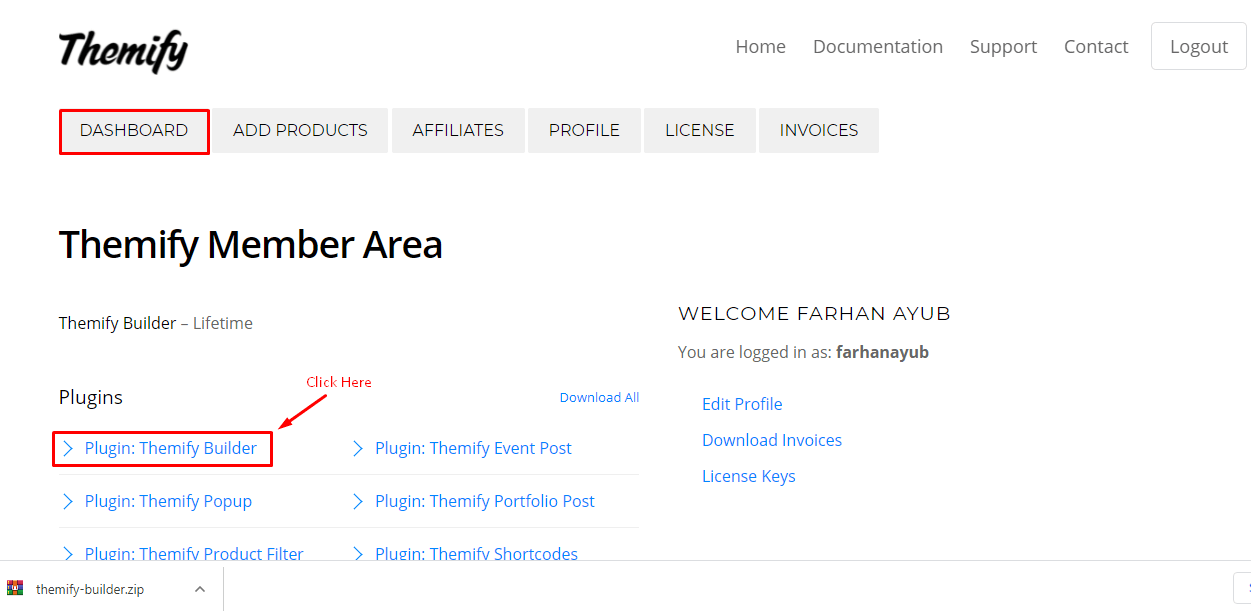
The next thing now is to upload the plugin in your plugin area on your WordPress dashboard.
To do that, go to Plugin > Add New > Upload Plugin > Choose File > Install Now, and select the required zip file to upload from the location in your local PC where you saved the zip file.

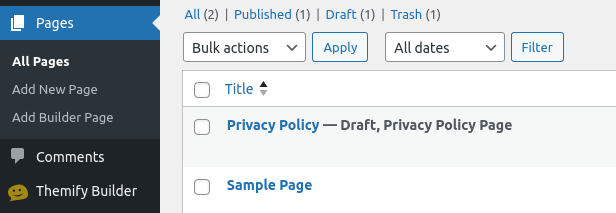
Step 2: Create a New Page or Edit an Existing One
You can choose to create a new page or edit an existing one.
To add a new page, go to Pages > Add New Page.
To go to an existing page, proceed to Pages > All Pages.
Step 3: Customize Your Page
Once you enter to add a new page, you will see a toolbar will appear as shown below.
Note: This is the backend editor
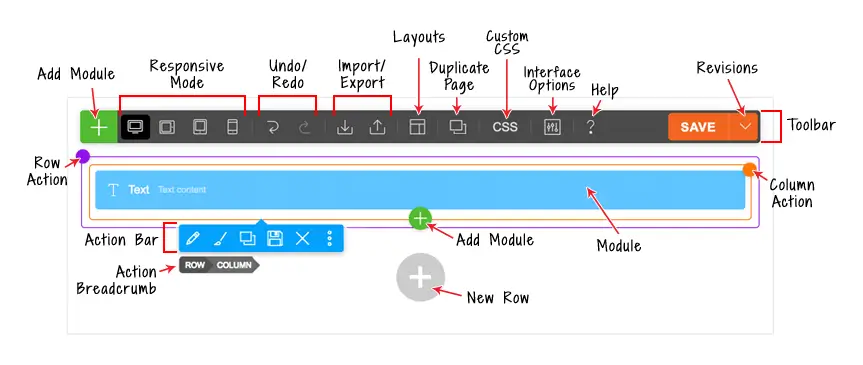
You will find these buttons on the toolbar:
- Plus Button = To open module panel.
- Responsive Styling = Customize styling on Desktop, Tablet Landscape, Tablet Portrait, or Mobile.
- Undo/Redo = Undo/redo (you can use keyboard shortcuts Cmd+Z and Cmd+Shift+Z).
- Import = Import Builder content from a data file, existing posts, or pages.
- Export = Export the Builder content (export will generate a ZIP file which can be imported later using the import option).
- Layouts:
- Load Layout = Import pre-designed Builder Layouts to the current page.
- Save as layout = Save the current layout to use on another page.
- Duplicate This Page = duplicate the page along with the Builder content.
- Page Custom CSS = Allows you to add custom CSS to the page.
- Interface Options = Choose your interface options such as enable hover mode and right-click menu.
- Help = Click to open the Builder Tutorial video lightbox and view the keyboard shortcuts.
- Save = Save the Builder content.
- Revisions = Revisions allow you to back up and restore your previous layout. To access revisions, click on the arrow button beside the Save button. You can select to save or load a revision.
Adding Modules
- Click on the plus (+) icon found on either the top left of the toolbar or in the last row, to open the module panel.
- To add modules, you can drag & drop modules to the canvas area or click on the green plus (+) button in the top right corner.
Front-End Editor Mode
With the exception of offering a live preview, the frontend edit mode functions similarly to the backend mode.
- See any post or page on the front end (NOTE: in order to use the Builder on a homepage, you must first create a static front page because WordPress' default homepage is actually a blog archive page).
- Click "Turn On Builder" from the top admin bar on the front end (make sure your WP Admin Toolbar is enabled).
- The Builder toolbar will be shown at the top.
- To access the module container, click the green (+) symbol in the upper left corner or the last row.
- To add a module to the grid or column, either click the green (+) button or drag and drop it.
- On the front end, you can dock the panel to either the left or right side by dragging the panel to the left/right edge of the screen.

Builder Shortcuts:
Below are some Builder shortcuts that can improve your productivity and save you time:
- Double-click = Double-clicking on a row, column, or a dropped module will bring up the options lightbox
- Cmd + S (PC: Ctrl+S) = Save (if a lightbox is open, it will save changes made in the lightbox, otherwise it will save changes made with the Builder)
- Escape = When the module/row option lightbox is open, press the escape key to cancel/close the lightbox
- Cmd + Z (PC: Ctrl+Z) = Undo
- Cmd + Shift + Z (PC: Ctrl+Shift+Z) = Redo
- Cmd + C (PC: Ctrl+C) = Click on a module to select it, then press Cmd + C to copy the selected module
- Cmd + V (PC: Ctrl+V) = Click on a module to select it, then press Cmd + V to paste data in the selected module
- Cmd + Shift + V (PC: Ctrl+Shift+V) = Click on a module to select it, then press Cmd + Shift + V to paste styling data in the selected module
- Cmd + Up (PC: Ctrl+Up) = Click on a module to select it, then press the Cmd + Up arrow key to move the module up
- Cmd + Down (PC: Ctrl+Down) = Click on a module to select it, then press the Cmd + Down arrow key to move the module down
You can also add pre-designed layouts to your page from the Themify builder edit options.

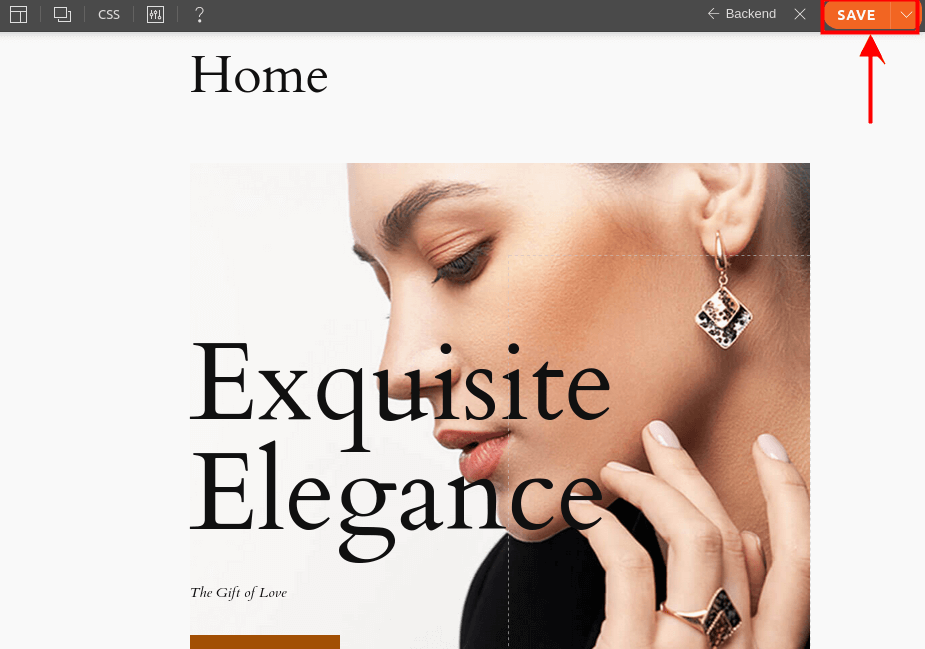
Step 4: Save Your Page
Once you are done customizing, click on the SAVE button at the top right of your screen on the Themify editor toolbar.
That's it! You have successfully used Themify Builder for WordPress to create a stunning and responsive website.
Themify Builder: Pros & Cons
Themify's builder makes the claim to be an efficient and potent tool for creating web pages. We have determined its advantages and disadvantages after trying out its features.
Pros:
- It has every advanced feature needed for a seamless webpage creation process.
- Connects to all of the top platforms.
- Utilizing the front-end and back-end builders for responsive editing.
- Large selection of layouts and themes.
- Code page available in HTML and CSS.
Cons:
- It does not have a user-friendly interface.
- not a separate editor for the header and footer.
- It has no elements that develop a theme.
Is Themify Worth a Try?
Any novice can be intimidated by the thought of building and developing a website. Nonetheless, ease of use for anyone attempting to create a website has been brought about by page builders such as Themify.
If you're searching for a responsive and user-friendly WordPress page builder, Themify is a solid choice. Since Themify is free to use, it is worth a try. If the user is at ease, they can upgrade to the pro version for more features and enhanced functionality.
Conclusion
Themify Builder for WordPress is a powerful and easy-to-use page designer and builder that allows you to create any layout imaginable with live preview and without any coding skills.
It has many features that make it the best solution for your WordPress needs, such as responsive design, custom styling, animation effects, layout parts, revisions, visibility control, and more.
You can use Themify Builder for WordPress with any WordPress theme and plugin, and it is SEO-friendly, translatable, and supports multi-site networks. You can also download it for free from the Themify website or the WordPress plugin repository.
In this blog post, I have shown you how to use Themify Builder for WordPress in 2024 and why it is the best solution for your WordPress needs. I hope you have found this blog post helpful and informative.


