
Laravel Reverb is a package for Laravel, a PHP web application framework, that facilitates real-time, event-driven communication. It typically uses WebSockets to provide real-time updates and interactions in web applications. This is useful for applications that require instant data updates, such as chat applications, live notifications, and real-time dashboards.
On the Laravel documentation, there is are instructions on how to use it on a test environment and on production using Nginx as server. However, there is no clear instructions on how to make it run on Apache2. Before diving into how to make it work on Apache, we need to understand first how Laravel Reverb works.
Working Principle
While you might think Laravel Reverb handles back-and-forth communication through Websocket, diving into the configuration will outline that there is a need for HTTP/HTTPS communication as well. Based on our observation, Laravel Reverb helps the frontend to receive in real-time events dispatched on the backend (Laravel). There is no clear guide on how from the frontend you can use the opened channel to send messages to the backend. To do it, you need to send an HTTP request to the backend. The same logic applies to Laravel which wants to dispatch events to the WebSocket server.

Consider this scenario of an eCommerce website where a user add products to the card and we want the cart icon to increase the number of items on the cart.
Create Amazing Websites
With the best free page builder Elementor
Start Now- The first step will be to connect to the WebSocket server using Laravel Echo (refer to broadcasting on laravel for further details) and listen to a specific channel.
- From the backend, we'll dispatch an event when the cart product has increased
- Laravel will trigger a POST request to the WebSocket server, which in return will send a message to your front end connected to a channel.
Based on this scenario, just configuring the WebSocket is not enough to make it work, as we also need to enable support for HTTP request.
Configuring The WebSocket
Laravel Reverb makes use of Node.js for handling WebSocket communication. During the process of installing Laravel Reverb, you'll notice node js somehow involved. By reading the documentation of Laravel, you'll understand better the basic configuration need for initial configuration of Laravel reverb.
By using:
php artisan install:broadcastingYou'll have default settings added to your .env file. For example, your : REVERB_APP_ID, REVERB_APP_KEY, and REVERB_APP_SECRET will be configured with default custom values. The part you'll need to configure is the location of the WebSocket server and how Laravel communicates with it.
Deploying WebSocket On Subdomain
Ideally, you'll need to create a subdomain. While it's true you can still host everything on the same domain, you might end up with a bloated Apache configuration. However, splitting things will help you spotting quickly where might be the issue (that's my opinion, you can do as you like).
Let's first make sure our .env file is ready for what we want to achieve:
- REVERB_SERVER_HOST: 127.0.0.1
- REVERB_SERVER_PORT: 8080
- REVERB_HOST: ws.codewatchers.com
- REVERB_PORT: 443
- REVERB_SCHEME: https
We'll decide to create a subdomain named "ws.codewatchers.com" where we'll deploy our WebSocket server. In your situation, change ws.codewatchers.com to the domain of your liking.
<VirtualHost *:443>
        ServerName ws.codewatchers.com
        ServerAlias ws.codewatchers.com

        ErrorLog ${APACHE_LOG_DIR}/ws.codewatchers.com-error.log
        CustomLog ${APACHE_LOG_DIR}/ws.codewatchers.com-access.log combined

        SSLEngine on
        SSLProxyEngine on
        SSLCertificateFile /path/to/certificate/local.crt
        SSLCertificateKeyFile /path/to/certificate/local.key

        ProxyPass /app "ws://127.0.0.1:8080/app"
        ProxyPassReverse /app "ws://127.0.0.1:8080/app"
</VirtualHost>
Note that we're using SSL here, so you might need to have a certificate issued for your subdomain. You can use Certbot for that (Bing Copilot will help you for that).
Adding Support For HTTP/S
As said above, the Laravel Reverb server also need to support regular HTTP request. For that, we've forwarded via proxy all requests having /app to "ws://127.0.0.1:8080/app". It's the URL segment used for sockets. Additionally, Laravel uses /apps for sending POST requests, so we'll add a new configuration to the Apache configuration we have above:
ProxyPass / "http://127.0.0.1:8080/"
ProxyPassReverse / "http://127.0.0.1:8080"
Here, we want other requests not having "/app" (strictly) to be forwarded through regular HTTP requests.
Once you're done with this, don't forget to reload Apache configuration using this:
sudo service apache2 reloadConfiguring Supervisor
Supervisor is an important part of this, as we'll instruct it to execute the reverb server for us. The good part here is that it will restart it whenever it fails executing. we're therefore sure the WebSocket will always (or almost) be running. Laravel has a shortly detailed section for Supervisor, but we'll go deep and give an example:
[program:laravel-reverb]
command=php artisan reverb:start
directory=/path/to/your/laravel/project
autostart=true
autorestart=true
stderr_logfile=/path/to/desired/logfile.log
stdout_logfile=/path/to/desired/logfile-out.log
user=ubuntu
We'll assume that you're executing it on Ubuntu as the user "ubuntu". You'll adjust those parameters as desired.
Queues And Task Scheduling
If you have queues being executed asynchronously (database or redis), you need to make sure it's well configured and running. In fact, events that are broadcasted are executed as jobs.

You might need to refer to the Laravel documentation to configure Task Scheduling. Optionally you'll install Laravel Telescope, to monitor your jobs and inspect how it's triggered.
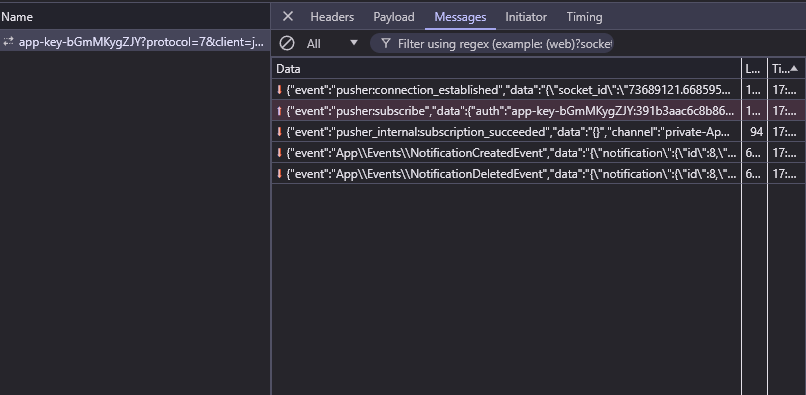
You might also use the browser console to check how your WebSocket is working.
We hope this tutorial was helpful for you, if you had any issues while reading this, let us know.


