
Having a form on your website where your visitors can get in touch with you can have some benefits. A form on a website can have various types, such as a contact form, newsletter signup form, or maybe a survey form to check the user experience.

There are many plugins available on the internet that will get you a contact form on your website. Some of them are free and usually are limited in terms of features. On the other hand, premium plugins like Gravity form allow you to personalize your contact forms as you want and manage the user information you have received via that form.
What is Gravity Forms?
Gravity Forms is a well-known WordPress plugin that will allow you to create several forms to place on your website. With Gravity Forms, you can smoothly build contact forms, quizzes, and research forms like surveys for your website. For features like conditional formatting and routing, it is a famous plugin. It automatically displays or covers certain questions that are based on the users' answers to previous questions. Also, It helps the admin to send appropriate content to those who have listed their emails for specific categories.

Gravity Forms is a trusted name in the world of form build-up plugins because for over a decade they have been caring to meet every need of the customer. In today's post, we will learn how to install Gravity form and use it with the help of Elementor.
Create Amazing Websites
With the best free page builder Elementor
Start NowSo, We need the Elementor plugin for customizing the Gravity form, PowerPack Lite Addon to integrate the Gravity Form to the Elementor editor, and last but most importantly, the Gravity Form plugin itself to create forms.
Why use Gravity Form?
There are many benefits to using the Gravity Form. We know that it is possible to gain the trust of website visitors through a form because it plays a significant role in effective marketing. Also, you can invest in a high-quality plugin for maintaining data security and a consistently pleasing experience.
You can supercharge your contact form using it. Gravity form will allow you to visually design your form with fields and configure options. It has a wide variety of form fields, and there is plenty of 3rd party addons like Gravity Wiz, Booking Form, Brilliant Geocoder, Bulk Actions for Gravity Forms, etc.
Gravity form has conditional logic that allows you to configure your form to show and hide different parts of the form, page and even the submit button depend on the user's selection. It will fight spam with Google reCaptcha and Akismet option. It has a multi-device friendly design so that it can be responsive.
You can be sure that the use of Gravity Forms will take the “form” using experience of your website to another level. Each form can be highly customized with a few easy steps. Contact form, email form, sales form, survey form - whatever it is, the Gravity form will make your website form stand out from the usual forms of other websites.
Install Gravity Form on Website
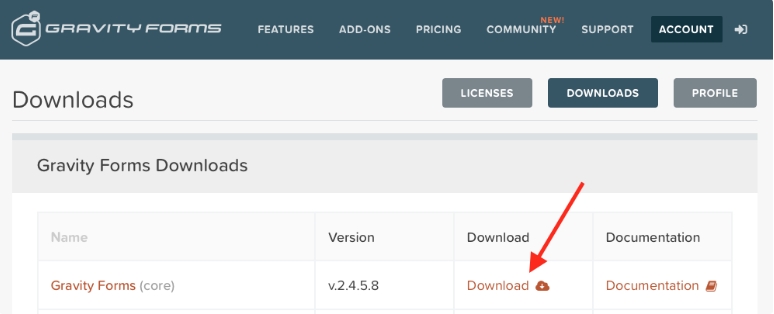
In the beginning, we need to download the Gravity Form. Since this is a premium form plugin, you need to buy a license from its website and be able to download it as a zip file.
Now that you have the premium version of Gravity Forms, select the Upload Plugins option from Plugins> Add New on your WordPress Dashboard without further ado. Upload the zip file there that you have downloaded from Gravity form’s website.

Now zip file uploading is finished, choose Install Now to install the plugin and then, select Activate Plugin.
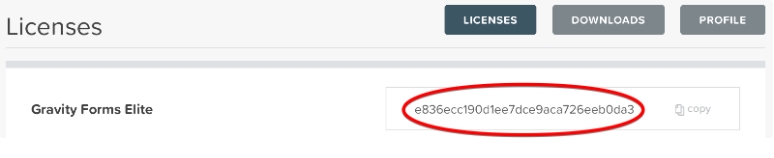
A license key has been given to you to enjoy the full functionality of Gravity forms. Having this license key allows you to enjoy regular updates, special features updates, and any customer support. So, attach the license key to your Gravity Form.
At this point, the Gravity Form setup is finished and ready-to-go with default settings. You can change the settings at your convenience from the General Settings option. Here you can make necessary changes regarding payout currency, error logging, and background updates. Background updates are important because it ensures that the version of Gravity Form you are using is the latest and safest.
Gravity Form setup with Elementor
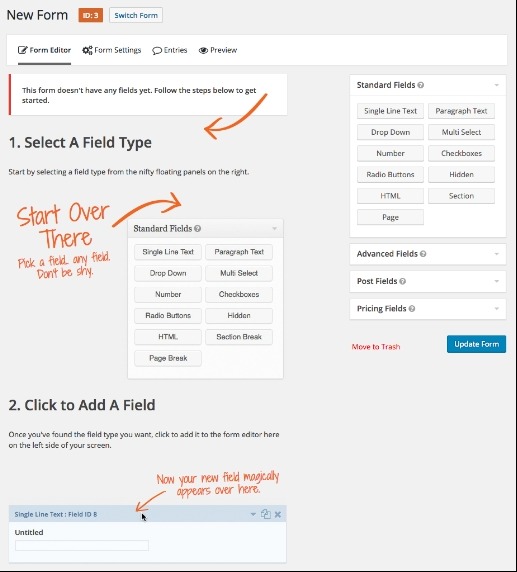
Since you have installed the plugin successfully and changed the settings as you need, you are ready to create your first form on Gravity forms. From the Form page, click Create form and then select Add New. Here you can set the title of your form and add a description to it.Now to build the actual form, enter the Form editor. It's a drag and drop builder where you can easily select fields that you need to be on your form and customize them.
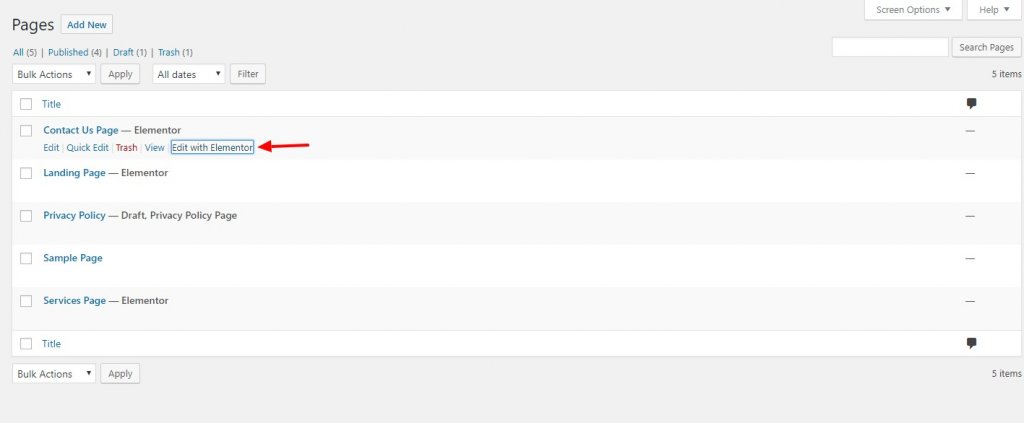
Now that the form has been structured, open the Contact Page from the Dashboard>Pages>All pages section and select edit with Elementor to customize. Once you have hit the Elementor editor, drag and drop the Gravity form widget and start customizing it.
At this point in the tutorial, we will divide the journey ahead into two parts. One is the content section and the other is the style section.
Content Section
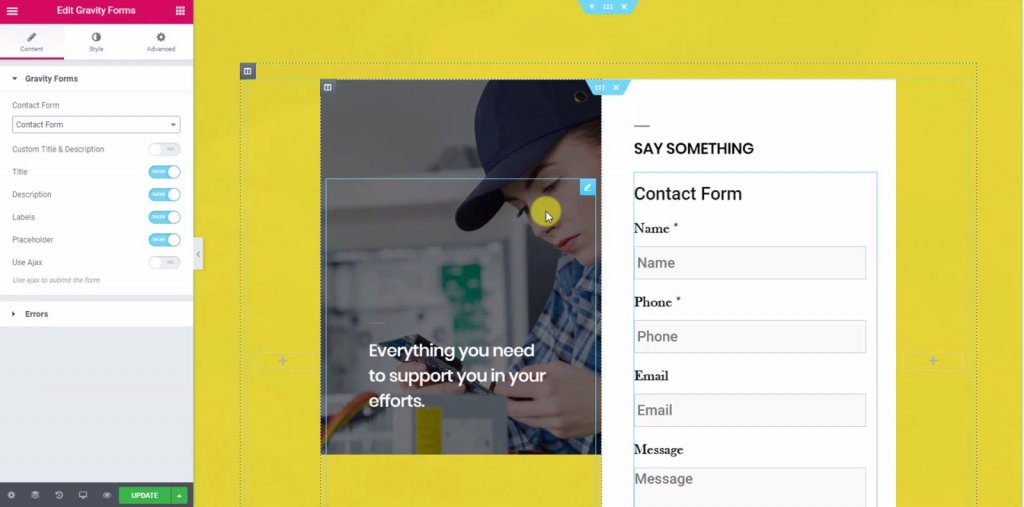
Now, from the drop-down menu, we will select a form. Once we select the form format, we will see that a form will appear in the editor. Now you can enable or disable labels, errors, texts, placeholders, etc. from the content section.
Style Section
From the style section, you can change the design, look, appearance of the form. Also from here text area, labels, radio buttons, checkboxes, submit buttons can be easily customized.

Here I have changed the width of the box and the length of the text. I have changed the color scheme of the button to match the layout of the theme. I did some padding to the components from the setting as the form looked a little compendious.
Here is the final form.

Final Words
Just as Elementor is popular for building pages, Gravity Forms has been one of the best form builders for everyone over the past decade. With over 30 ready-to-use custom fields, it's a powerful but easy-to-use form builder. Hopefully, today's tutorial will come in handy and you will be able to create functional, engaging, and impressive forms.
If you like this tutorial, then one of your shares will be very kind. Make sure to subscribe below to get notified of more Elementor related content, useful tips, and WordPress themes in-depth review. Your support is appreciated. Visit us on Facebook and Twitter.


