
There are numerous benefits to using Elementor as your page builder. Elementor provides a plethora of modification possibilities for most minor aspects of your WordPress site to make it more appealing. One advantage is that you can reveal and hide the element by scrolling down and up.

By scrolling, you can reveal or hide certain items, such as - back to top button, floating call-to-action button, etc. This post will show you how to use Elementor to disclose an element when you scroll down and hide it when you scroll up.
Design Preview
Here is what the design will look like.

Use Elementor to Show an Element on Scroll Down and Hide It on Scroll Up
Before we continue, we'd like to make sure you already have Elementor Pro because we'll require two tools that are only accessible in Elementor Pro: Theme Builder and Custom CSS.
Create Amazing Websites
With the best free page builder Elementor
Start NowOkay, let's get started!
Enter the Elementor editor, then drag & drop the Button widget from the widget panel into the canvas area. Because we will alter the position, you can put the widget wherever on your page. The Button widget is placed at the bottom of the page in this example.
We made the following changes to the settings panel:
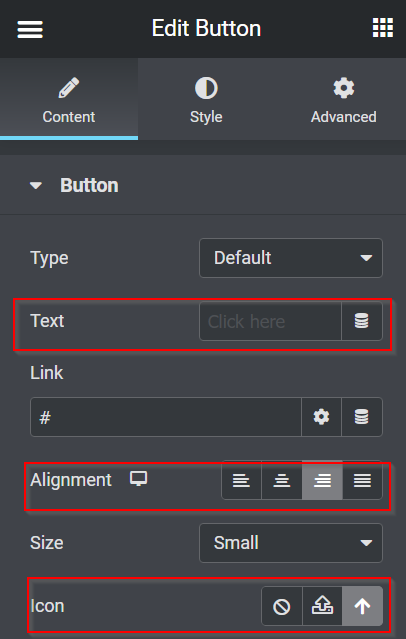
Go to the content tab and do the following changes.
- Text: Remove the text
- Alignment: Right
- Icon: Select the Arrow Up icon from the Icon Library
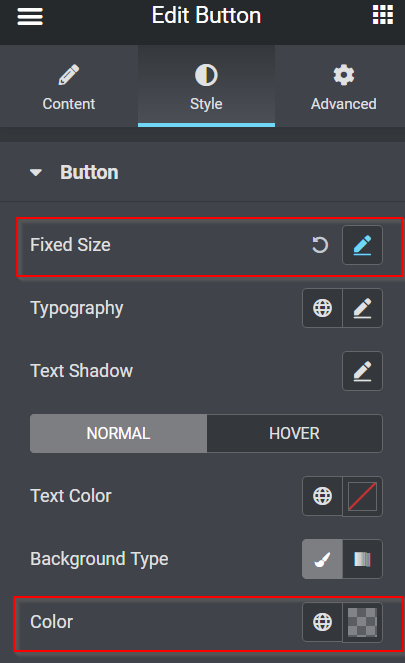
Now move on to the Style Tab, and make the changes.
- Fixed Position: Height - 1, Width - 1
- Background Color: #FFFFFF30
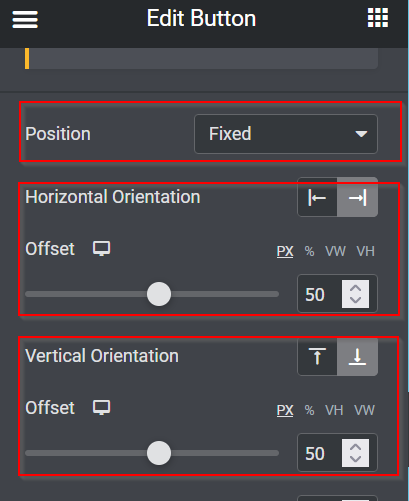
Next, navigate to the Advanced tab and set things up accordingly.
- Position: Fixed
- Horizontal Orientation: Right
- Offset: 50 PX
- Vertical Orientation: Bottom
- Offset: 50 PX
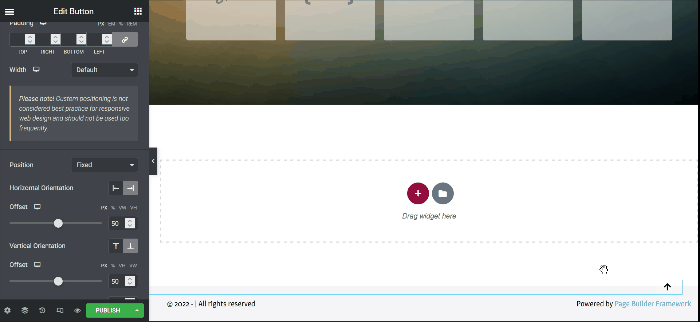
So here are the changes that we have made till yet.

Making the button clickable will come next. Return to the Settings panel's Content tab and begin by filling out the Link field to link the button to the top of the page. To begin, navigate to the top section and select the Edit Section option. Go to the Advanced tab, select CSS ID, enter any id name, and copy it. After you've copied the CSS ID name, return to the Edit Button -> Content tab and paste it into the Link field.
So, no matter where you are on this website, clicking the button takes you to the top.
Hiding and Revealing the Back to Top Button
The button function works properly, as evidenced by the GIF above. However, when you reach the top of the page, you can still see the Back to Top button. As a result, it does not appear to be a positive situation. So, it would be beneficial if you made the button hide when you're on the top portion and appear after you scroll down a few heights. Okay, let's get started!
JavaScript
To make the action happen, you must provide some JavaScript snippets. But don't worry; we've already written the JavaScript code for you; simply copy and paste.
Please add a new section by clicking the plus (+ button), then selecting the HTML widget from the widget panel and dragging and dropping it into the canvas area. In this example, we add the HTML widget from above to the top part.
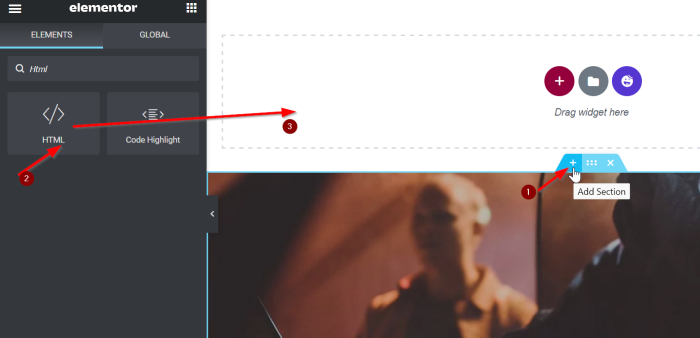
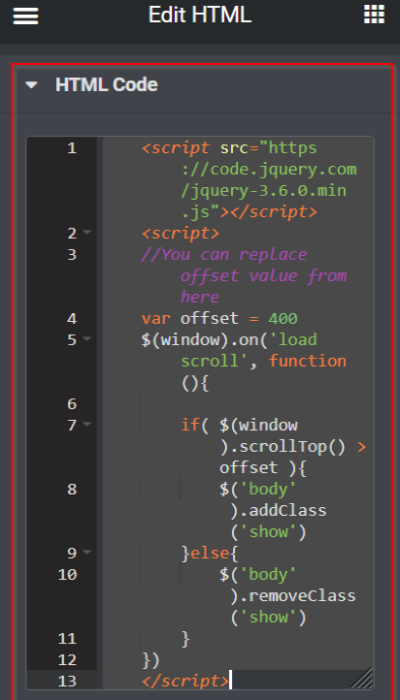
Now add the following code to the box.
        <script src="https://code.jquery.com/jquery-3.6.0.min.js"></script>
    <script>
    var offset = 400
    $(window).on('load scroll', function(){

        if( $(window).scrollTop() > offset ){
            $('body').addClass('show')
        }else{
            $('body').removeClass('show')
        }
    })
    </script>
We'll give you a quick rundown of the JavaScript code above. When you scroll 400 pixels down, the body of a class name is added and displayed, and when you return to the top of your page, the show class name is withdrawn.
Custom CSS
Return to the Button widget settings after you've finished pasting the JavaScript snippet into the HTML field. Open the Custom CSS box on the Advanced tab and paste the following CSS snippet:
selector{
    opacity: 0;
    transition: all 0.3s ease-in-out;
}
body.show selector{
    opacity: 1;
}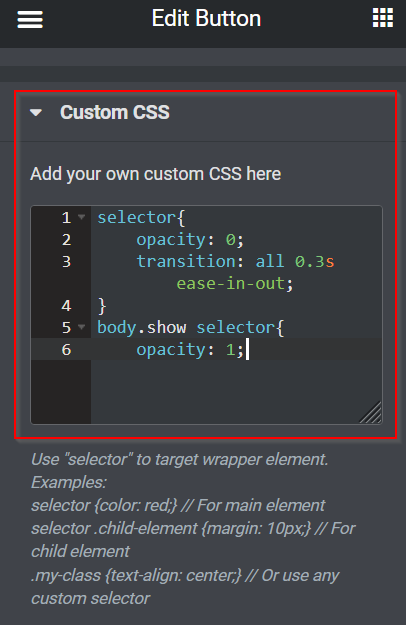
The Back to Top button is now perfectly hidden and revealed. Don't forget to save your changes by clicking the UPDATE or PUBLISH button.

Hiding and Revealing the Call To Action Button
Setting Z-Index and creating a popup are the two approaches for making a floating call to action button in Elementor. In this example, we'll use the first approach, Z-Index.
Create The Call To Action Button
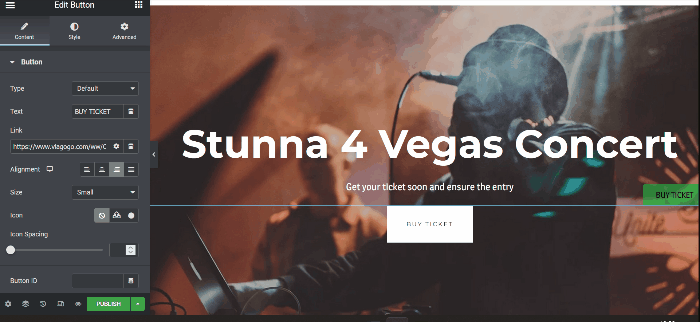
Navigate to your Elementor editor and update existing material (pages, posts, templates) or create new ones. In this example, we will make changes to our current page. Create a new section with a single column first. Drag the Button widget from the widget panel into the canvas area. After that, modify the Text button and the Link. In this example, we'll use the button as a trigger to direct users to the Taylor Swift concert tickets page.
Making The Call To Action Button Hiding & Revealing
As seen in the GIF above, the floating call to action button is still visible at the top of the page. By scrolling down a few heights, you can make the floating call to action button disappear when you're on the top portion and finished. You may do the same thing by hiding and showing the Back to Top button above.
Note: To hide and expose the Back to Top button and Floating Call to Action button on the same page, simply put the CSS snippet into the Custom CSS section.
When you're through with your page, don't forget to click the UPDATE or PUBLISH button to save your work.

Final Words
This article demonstrates how to reveal an element in Elementor by scrolling down and hiding it by scrolling up. Feel free to experiment with the Button widget, try out all of the customization options, and have fun making your WordPress site more interesting. If you feel helped by this tutorial, then you might be interested in checking other elementor tutorials too. Also, feel free to share with your friends.


