
Because of some limitations, Elementor Pro's form widget is the last option for most WP designers and developers to generate forms in WordPress. This Post will show you how to use Dynamic.ooo add-ons to enhance the functionality of the Elementor Form widget.

We will create a form that visitors will use for booking sessions in which users can choose a doctor from a medical database to see for their medical checkups and counseling.
Design Preview
Here is what our forms will look like.

Create an Elementor Pro form
Create all basic form fields that do not require Dynamic. ooo. In our case, these are the Name, Email, Phone Number, Location, and Physician Type.
Create Amazing Websites
With the best free page builder Elementor
Start Now
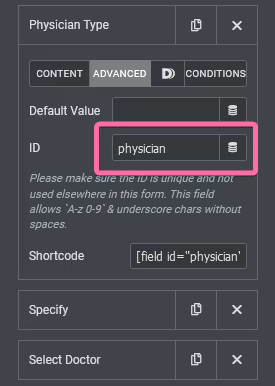
Because other fields in the form were constructed based on possibilities in the Physician Type choose field, you must assign an ID to this field. Then, when consumers select the type of physician, they want to view, this ID will be utilized to pull data dynamically.
Add a Dynamic Select field to the Elementor Pro form
once an ID has been assigned to the field, and set the additional fields based on what is required. In our case, I included the Dynamic field. As seen in the image above, it's called Dynamic Select, and I've labeled it "Specify."

- Type: You can see that the field's type is set to "Dynamic select."
- Reference Field ID: The reference field ID is set to "physician," which is also the ID of the Physician Type field.
- Options: In this section, you must provide the options displayed when a user picks an option in the Physician Type area.
To construct data in your Dynamic, choose, and utilize square brackets and choices. For example, when a user selects a Pediatrician or Gynecologist on our form, we want to pull sub-specialties. As a result, our selection will be as follows:
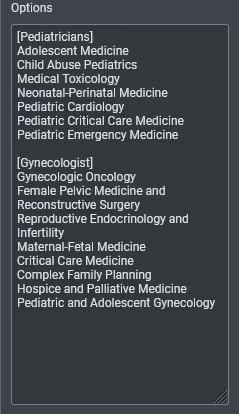
As you can see, we have enclosed the alternatives in the Physician Type select field in square brackets and the option that will be presented if the options (Physician Type) are selected. We have [Pediatrician] and [Gynecologist] here. Add the alternatives you want users to choose under the mentioned option, and you're done.
Add Conditional Logic To Elementor Pro Form
Dynamic.ooo allows you to display fields in your Elementor Pro form based on a user's action. Although the procedure of generating this condition is not as simple as it is in other WP form plugins, it is still something worth having. Moreover, they will most likely make the procedure more effortless in the future, especially for beginners.
The procedures involved in utilizing Dynamic.ooo to create conditions in Elementor forms.
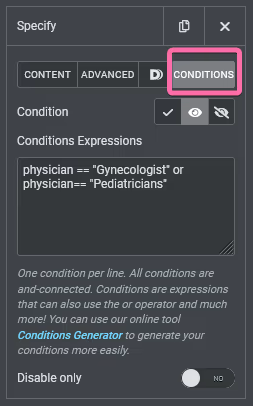
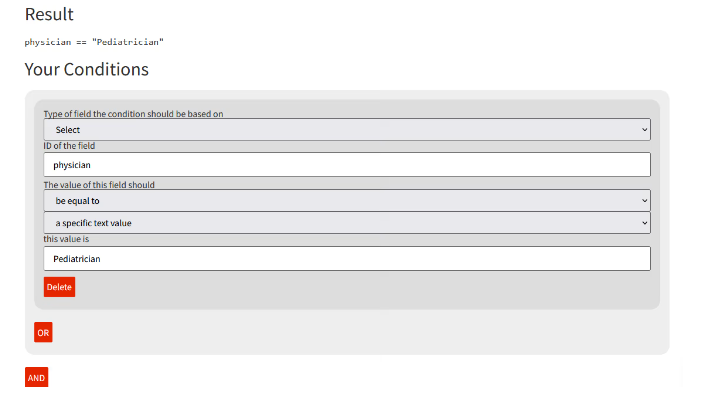
It is intuitive to write the conditions in Dynamic.ooo if you have any programming skills. You only need to enter the reference ID and the option you want to check. In our case, the condition has been added to the Specify field, and we want to display the field based on the alternatives selected by the user in the Physician Type field.
I used the Physician ID and options in the select area to configure this properly. Remember that our ID is "physician," and we have four possibilities in the field (Select, Pediatrician, Gynecologist, and Neurologist). The Specify field should be displayed based on whether the user selected Pediatrician or Gynecologist.
As a result, we write our conditions as follows:
physician == "Pediatrician" or physician == "Gynecologist"
The Condition Generator makes it simple to build condition expressions, as shown below.
Once you've finished constructing the expressions with the Condition Generator, copy the result and paste it into the condition expression box, then save and refresh the page to test.
Add a Dynamic Select field To Elementor Pro form
This is one of Dynamic.ooo's most useful extensions for the Elementor Pro form. Have you ever wanted to construct a form that dynamically pulls data from your posts and CPT into it for users to select? If this describes you, Dynamic.ooo has made this feasible.
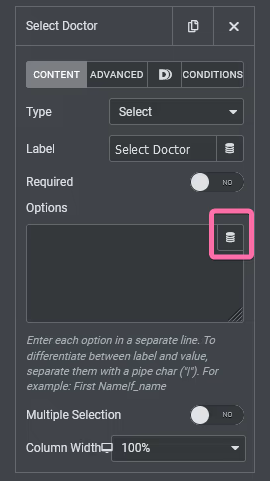
In this tutorial, I wanted the user to choose the doctor they wanted to consult with, and all I had to do was add the Select field to my form.
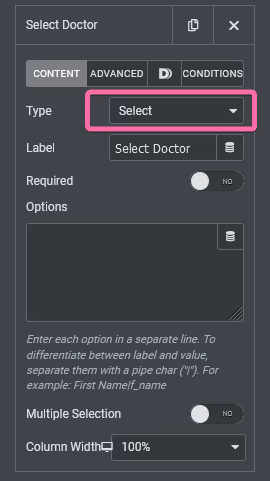
Then, instead of manually entering options for our pick field in the Options box, as we do with the Elementor form, we must open the Dynamic tag by clicking on the icon.
Scroll down to Dynamic.ooo in the opened window and select "My Post." I've chosen My Post because I wish to pull content from a custom post type. If you want to pull content from a blog post or a Woocommerce product, Dynamic.ooo already has that functionality built in. Unfortunately, we couldn't locate products under Dynamic.ooo area of the panel because we don't have WooCommerce installed on our site, but you can see Post, second on the list after Cryptocurrency.

You must access the "My Posts" settings to configure it to pull the exact data you require after selecting My Posts. For example, we need to pull published data from the Doctor's CPT in our situation.

I selected to display the data alphabetically rather than by date, which is the typical setting for this fantastic extension. I've also put the conditions from the Specify box to the Select Doctor form, and as you can see, both fields will only appear if you select Pediatrician or Gynecologist.
Suppose Dynamic.ooo can fine-tune this extension so that we can genuinely pull the data we want, such as manually adding the physicians we want or fetching doctors based on a taxonomy. In that case, this add-on- will be the complete form solution for WordPress.
Final Words
While the form extensions supplied by this add-on- elevate Elementor Form to new heights, I could not capture everything that this add-on- is capable of.
For example, the Dynamic.ooo location Autocomplete feature should have been covered in this course. You're presumably already aware of what it does, as it's regularly seen online. It's the Google Maps API-powered address autocomplete. Yes, Dynamic.ooo supports this as well. Hopefully, this tutorial will help you to set up Elementor pro forms perfectly. If so, then share this Post with your friends and check other elementor tutorials.


