
When it comes to creating interactive and personalized experiences on your WordPress website, using conditional logic in forms can be a game-changer. Whether you want to gather specific information from your users or tailor the Ninja form fields based on their responses, conditional logic allows you to dynamically adjust the form's behavior and appearance.

WordPress, the popular content management system, offers various plugins and form builders that make it easy to implement conditional logic without any coding knowledge. By harnessing the power of conditional logic, you can streamline the user experience, improve form completion rates, and gather relevant data effectively.
By utilizing conditional logic in WordPress forms, you can gather more accurate and relevant data, eliminate unnecessary form fields, and provide a seamless user experience. Whether you're running a survey, collecting user feedback, or capturing leads, conditional logic empowers you to create smart and user-friendly forms that meet your specific needs.
How To Make A Conditional Logic Form In WordPress
Creating conditional forms in WordPress may seem intimidating, but with our contact form plugin, it becomes a breeze. You only require two things to begin:
Create Amazing Websites
With the best free page builder Elementor
Start Now- The Ninja Forms
- The Conditional Logic add-on
Install And Activate
To begin, you can install the Ninja Forms free core plugin on your WordPress website by following these steps:
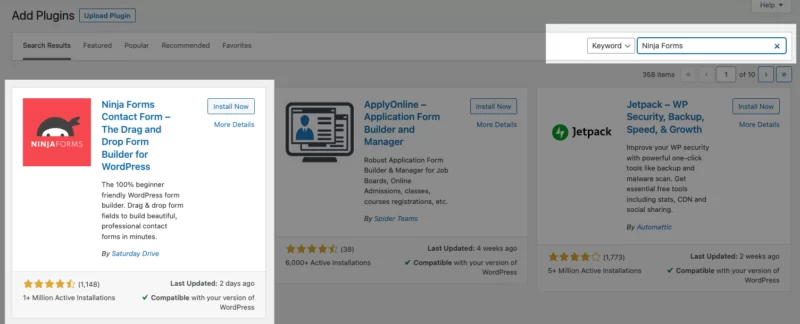
- Access your WordPress Admin Menu and click on "Plugins" and then "Add New".
- In the "Search Plugins" field, enter "Ninja Forms".
- Locate the plugin in the search results and click on the "Install Now" button.
- After installation, click on the "Activate" button to activate the Ninja Forms plugin.
Once you have obtained access to Ninja Forms conditional logic, you can easily download it from your Ninja Forms account and proceed to upload it to your Plugins section. To obtain detailed instructions on the installation process, please refer to our comprehensive installation guide, which provides step-by-step guidance.

Upon successful installation, you should be able to locate the Conditional Logic tab within the Advanced section of the Ninja Forms form builder. If, for any reason, you are unable to find this tab, ensure that you have enabled the Developer Mode in your Ninja Forms settings.
In addition to the Conditional Logic tab, you will also notice the presence of the Conditional Logic section within each new action available under the Emails & Action tab. This section allows you to create conditional actions that include sending personalized emails based on specific conditions, displaying customized text after form submission, redirecting users to different landing pages, or saving submission entries only when certain conditions are met.
Now that we have acquainted you with the location of the conditional settings within your form, allow us to provide practical examples of when and how to utilize form logic effectively. By employing form logic, you can simplify and personalize your forms, ensuring that users only encounter relevant fields and information.
Enable Dynamic Form Fields
Using the Conditional Logic add-on, individuals have the ability to create dynamic forms where specific form fields can be displayed or hidden based on a user's interaction with other form fields. This functionality enhances the user interface, saving visitors time and resulting in faster form completion. Consequently, more forms are completed and the rate of form abandonment decreases.
To illustrate, consider the example below. When users select the option "No," certain fields are hidden. Conversely, if users choose "Yes," the content dynamically changes, revealing another Radio list of options.
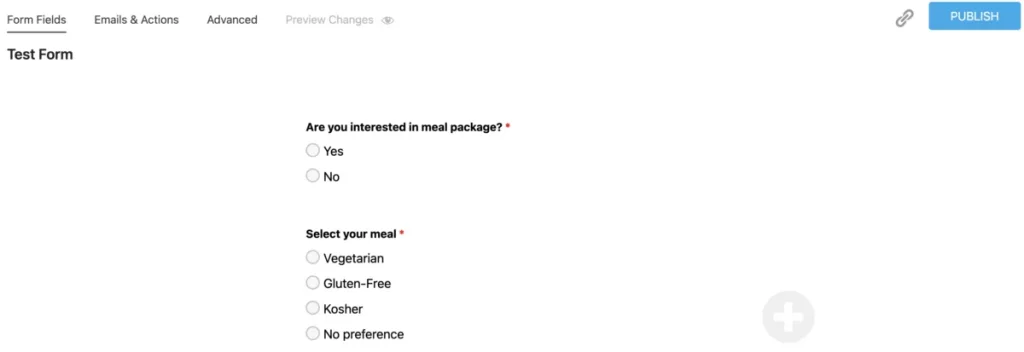
To implement this on your form, begin by creating form fields with options using the Radio list field. Ensure that the Value of your form fields is filled out.
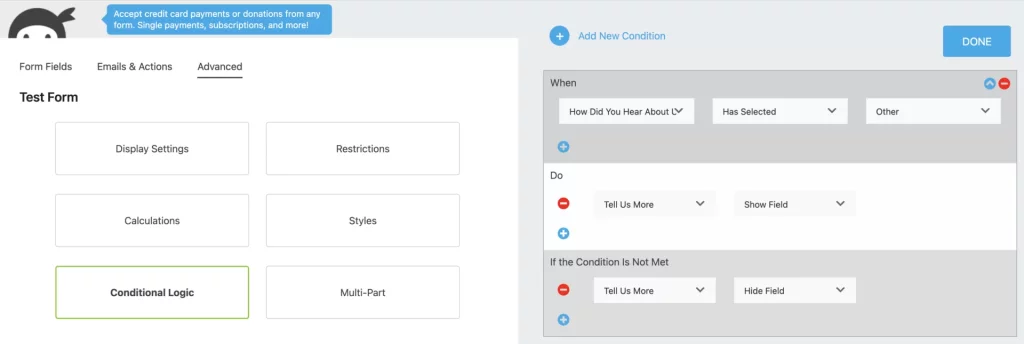
Next, navigate to the Advanced tab and select Conditional Logic. Here, you can add conditions for your form fields, just as we did in the example to hide meal options when the user selects "No," as shown in the screenshot below:

That's all it takes! You have now learned how to create dynamic fields and display them based on user input on your form.
Hide And Display List Options
Conditional Logic in Ninja Forms provides the ability to hide or display specific options in list fields. This feature allows you to control the visibility of choices based on certain conditions. For example, you can show or hide the submit button to limit form submissions or prevent specific users from submitting entries due to spam concerns.
Another useful application of conditional logic is to offer custom responses in your form. If a user selects the "Other" option from a list of choices and you want to collect more specific data, you can incorporate a Single Line Text field. This field allows visitors to provide personalized answers beyond the predefined options.
To implement this, assume you have created a Radio List field and a Single Line Text field on your form. To set up the desired conditions, navigate to the Conditional Logic section under the Advanced tab. Here, you can configure the conditions according to your requirements.
In a similar vein, you have the ability to automatically select or deselect options in a list based on earlier interactions with the form. This can be achieved by creating a logic statement that relies on the user's previous interactions with the form.
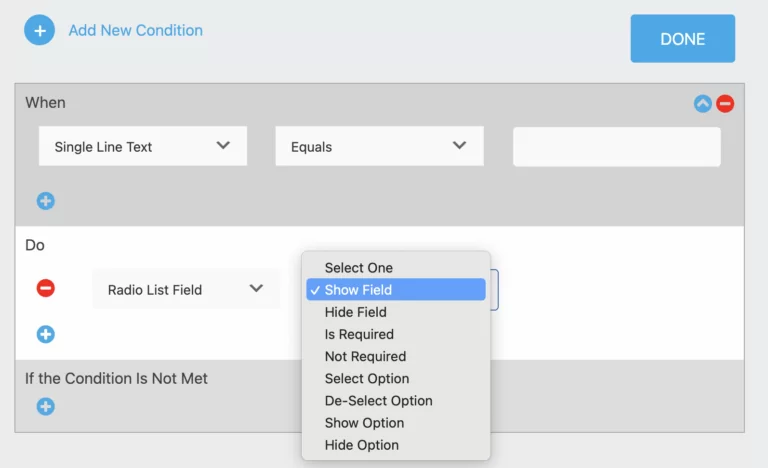
It's important to note that the available conditional trigger options will vary depending on the type of form field. As shown in the screenshot below, the options differ between a Single Line Text Field and a Radio List Field.
Page View On Multi Step Form
In the previous section, we demonstrated how easily you can configure WordPress form logic to target specific form fields. However, it's important to note that the same logic can also be applied to entire steps or pages of your form if you're utilizing Multi-Step Forms. Instead of focusing solely on individual fields, you can employ conditional logic statements on the individual pages themselves.
With the assistance of our free Ninja Forms core plugin and the Conditional Logic add-on, you have the ability to show or hide pages within multi-step forms that contain unnecessary form fields, all based on the user's input. To accomplish this, you'll need to organize your form fields into sections or groups and then apply the conditional logic to these sections rather than individual fields. This will result in a form that is broken down into distinct parts.
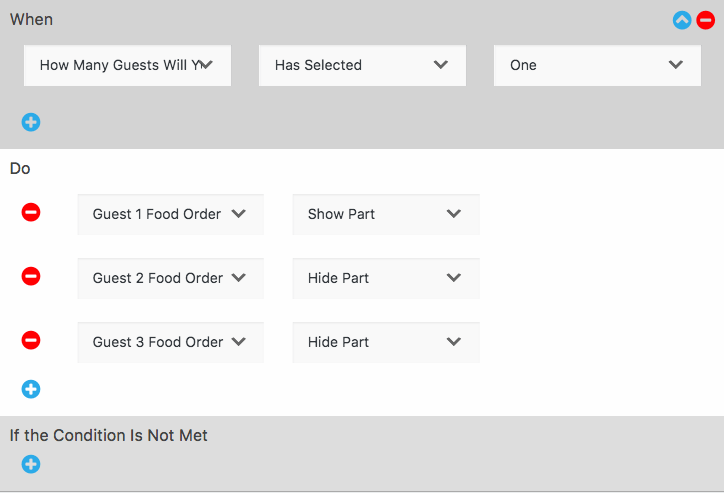
Once you have established these groupings or sections within your form, it's time to utilize the Conditional Logic add-on. Let's consider an example conditional statement that will hide the sections pertaining to "Guest 2 Food Order" and "Guest 3 Food Order" if the invitee selects only one guest.
By implementing conditional logic in this manner, you can significantly streamline your forms and spare your visitors from unnecessary frustration. Nobody wants to waste their time filling out fields or groups of fields that have no relevance to them, and you undoubtedly want to prevent the loss of valuable form submissions.
The Conditional Logic add-on serves as the perfect solution to optimize your WordPress forms, ensuring that your visitors are able to complete them with ease and efficiency.
Create Conditional Actions In WordPress
Has anyone ever desired to send conditional emails in WordPress to notify only specific individuals through email? Is there a requirement to exhibit a customizable message following the submission of a form? Would one like to provide various lead magnets or redirect users to different landing pages? All of these tasks can be accomplished effortlessly by employing conditional logic.

Send Conditional Email
Not all form submissions have to be internally sent to the same individuals. Therefore, if there is a need to send an email notification to a specific department, conditional logic can be utilized. Ninja Forms allows for the setup of multiple email actions on any form. If there is a requirement to send email notifications to multiple departments based on the user's selection in the form, an email notification should be created for each department.
Here is an example of how a conditional email can be set up on a form:
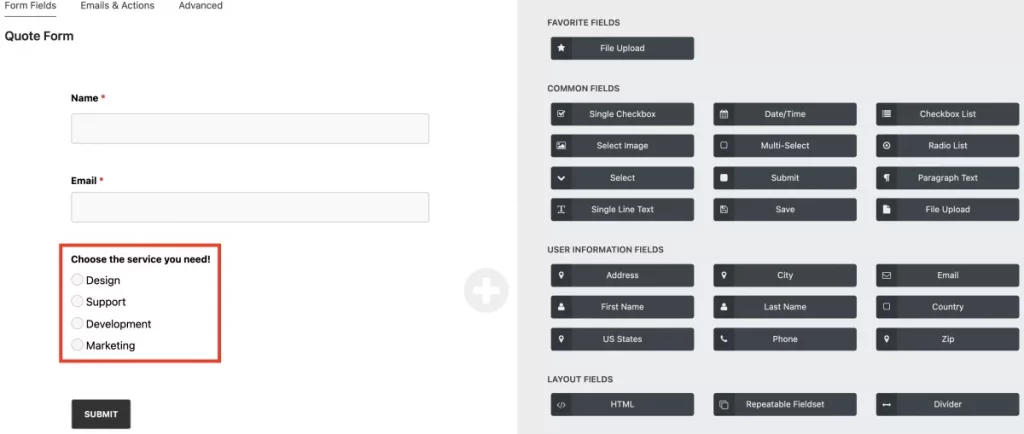
Within our form, we ask the user to choose from four service options. We utilize the Radio List field type where each option represents a department. Depending on the option selected by the user, the corresponding department will be notified via email.
Here are the steps to set up the Email action:
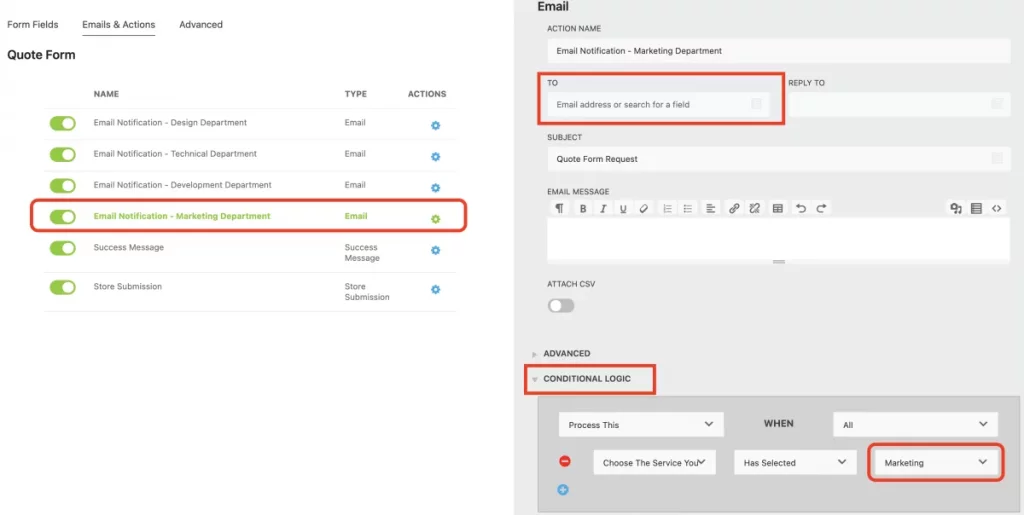
- Duplicate the Email action for each option, creating as many email actions as there are options. In our case, since we have four options in the form, we need to create four separate email actions.
- Ensure that each email action has the appropriate "To address" set for the department that should receive the email if that specific option is selected by the user.
That's all there is to it!
Sending Automation
By combining conditional logic with our Redirect action, a personalized experience can be offered to visitors, allowing users to be directed to different URLs or forms. Through triggering an action based on the specific entries made by users on their WordPress form, you can guide them to different landing pages.
Similar to applying logic to an email action, the Redirect action functions in a similar manner. For each option in a select field, an individual Redirect action needs to be created.
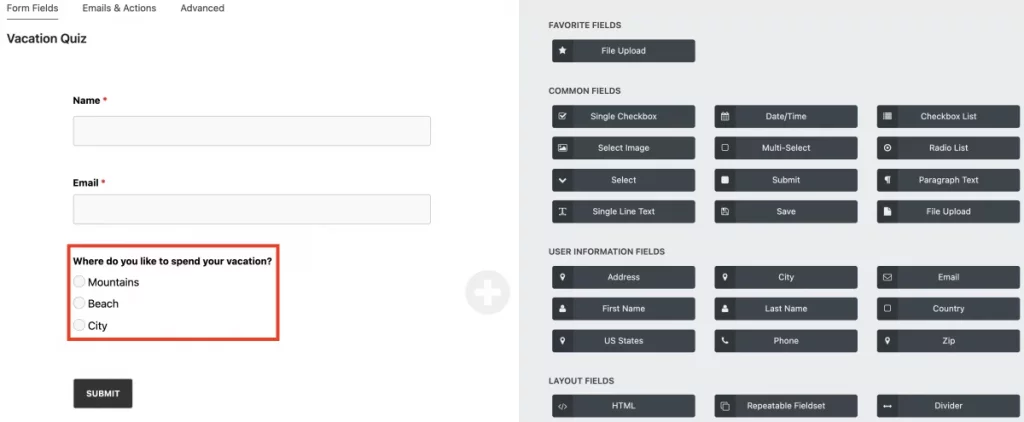
For example, let's consider a quiz where users are asked about their preferred vacation spot. Initially, you set up a radio list with options such as mountains, beach, and city. Depending on the options defined in the form and the choice made by users, they can be directed to the page that matches their interest.
Once your form is prepared, navigate to the Emails & Actions tab and create a Redirect action for each option (mountains, beach, city). Here's an example of how your Redirect action will appear if the user selects the Mountains option:
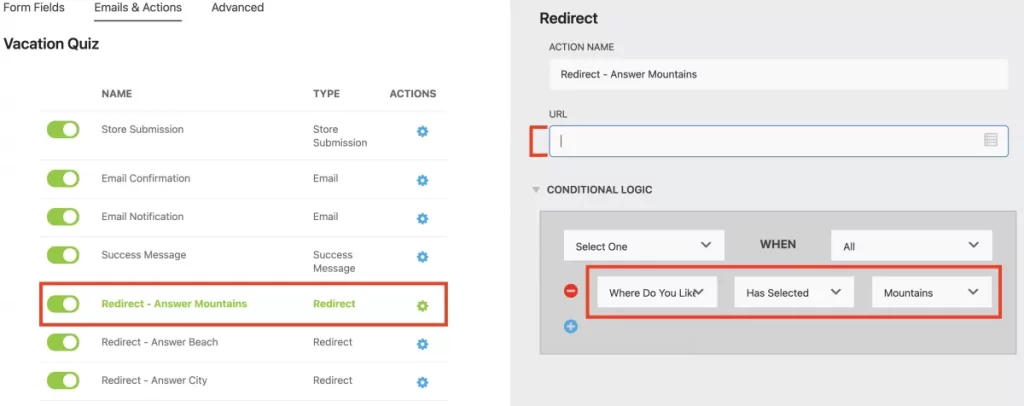
In the URL field, enter the desired website where you want to redirect users. Set up the other Redirect actions using the same logic as depicted in the image above for the remaining options. It is crucial to ensure that the conditions align with the appropriate actions.
Offer Lead Magnets
Not everyone will react in the same way to the same incentive, which is a common understanding. However, it can become quite complex when attempting to provide different lead magnets through a single form. Fortunately, our form logic makes this process remarkably easy.
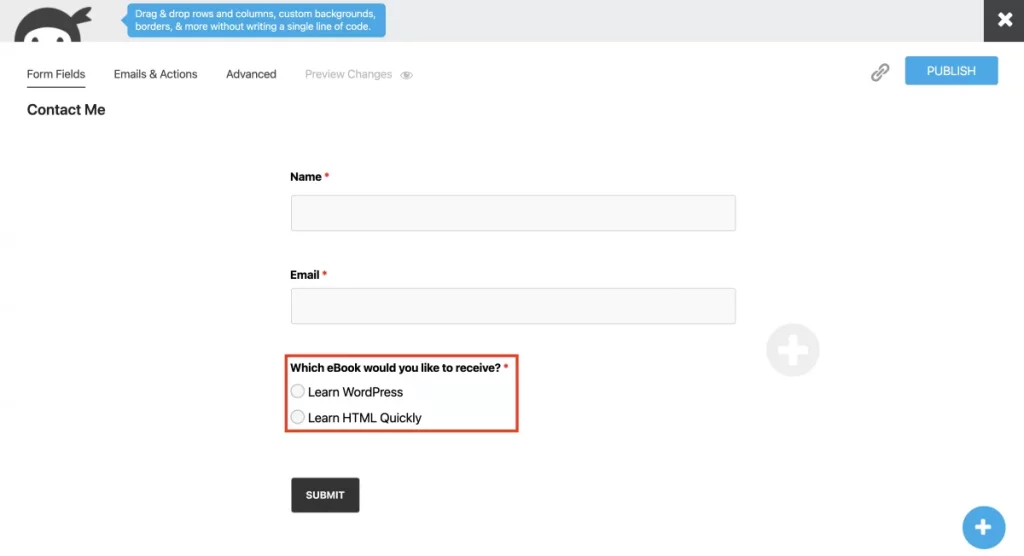
In our straightforward demonstration, we will illustrate how to present distinct success messages based on the users' input in the form. It is crucial to remember that each success message action corresponds to one user selection. For instance, if your select field has two options, you would create individual actions for option 1 (Learn WordPress) and option 2 (Learn HTML Quickly).
If the customer selects the eBook option "Learn WordPress," here is how you should set it up:
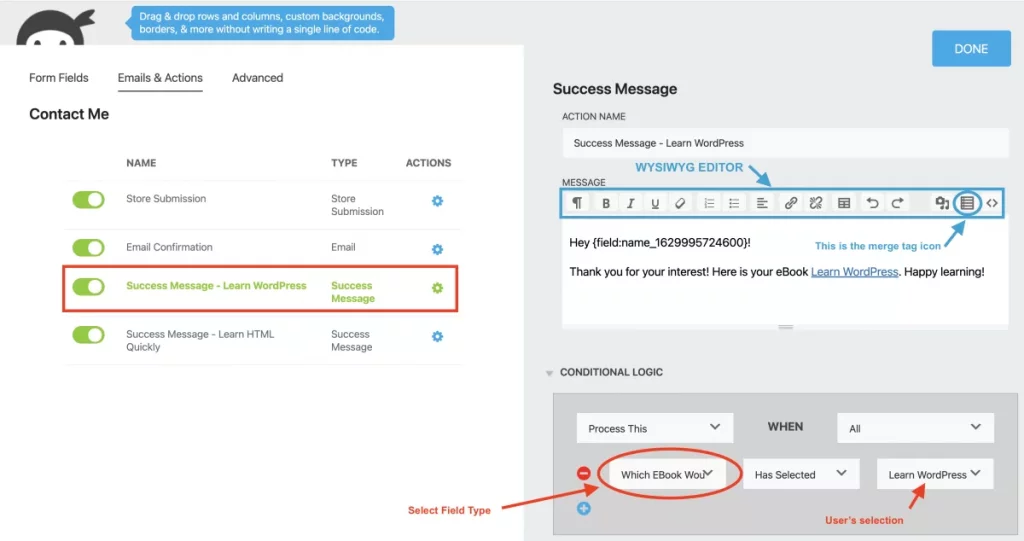
Using the integrated Summernote WYSIWYG editor in Ninja Forms, you have the ability to personalize each success message action. You can incorporate images, links, tables, and merge tags for enhanced customization.
Wrapping Up
Congratulations! You've learned conditional logic in WordPress. Try our Conditional Logic add-on for smarter forms that adapt to user choices. Customize messages, offer lead magnets, redirect to thank-you pages, and more. Buy the add-on individually or explore our membership plans. Don't wait, free up your time for important things (including naps!) with Ninja Forms.


