
Do you want to move your WordPress site to a different server or a new hosting company? When switching web hosts or moving a website to a new server, the biggest risk is losing data or having the site go down.
Both of these can make it so that users and search engines can't get to your website for a while. This can hurt your sales and search engine rankings.
In this step-by-step guide, we'll show you how to move your WordPress site to a new host safely and with no downtime.
We'll also answer the most common questions about moving a WordPress site to a new hosting provider, so you can avoid making some common mistakes.
Create Amazing Websites
With the best free page builder Elementor
Start NowBefore we begin, we'd like to inform you that many WordPress hosting providers offer a free migration service. It might not be on their website, so you should just ask. Most of the time, it's free, but some may ask for a small fee.
Shifting Website Hosting To A New Server
Select A New WordPress Host
Even after optimizing WordPress for speed and performance, if your web host is still too slow, it's time to move your WordPress site to a new host that can handle your growing traffic.
It's important to choose your new WordPress hosting provider carefully, so you don't have to move again soon.
Here's who we think is good:
- Bluehost is a good choice if you want reliable shared hosting. They are the ones that WordPress.org officially recommends.
- Siteground is a good place to look if you want cloud hosting or providers in a specific location. On three different continents, they have data centers.
- GoDaddy is a good place to look if you want to find managed WordPress hosting. They are the best and most well-known provider in the business.
DO NOT install WordPress on your new hosting after you've bought it. That will be the next step.
For now, your new web hosting account should be completely empty, with no files or folders in the main directory.
Setup Duplicator for Easy Migration
Install and turn on the free Duplicator plugin on the website you want to move. We highly recommend the free plugin Duplicator. You can also use it to change the domain name of your website without losing SEO.
But in this article, we'll show you how to use it to move your WordPress site from one host to another without causing any downtime.
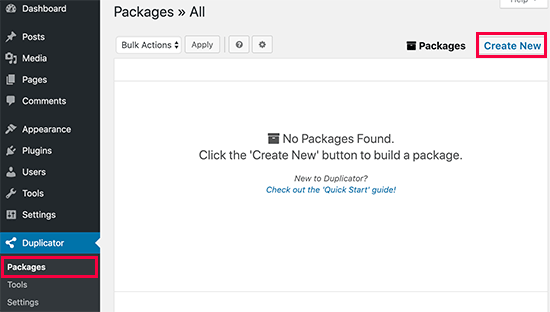
Once Duplicator is installed and turned on, go to the Duplicator » Packages page in your WordPress admin area.
Next, click the "Create New" button in the upper right corner.
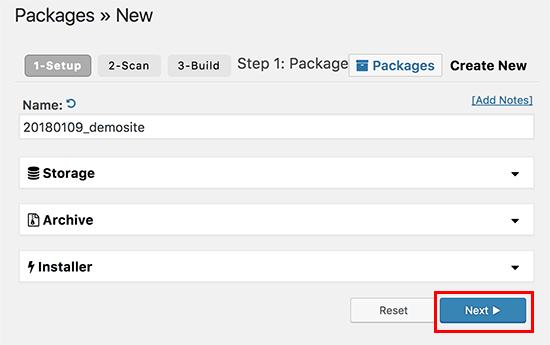
After that, click the Next button and follow the steps to make your package.
Check your scan results to make sure they are correct (everything should say "Good"), and then click the Build button.
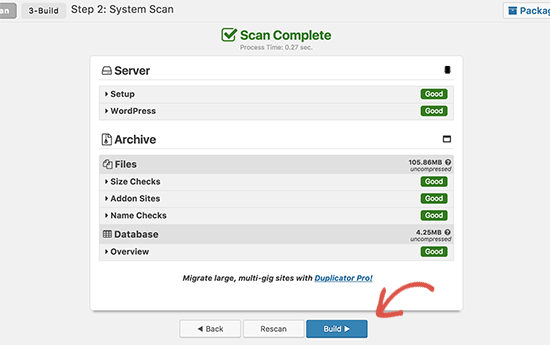
The process could take a few minutes, so leave the tab open while the plugin works.
When the process is done, you'll be able to choose to download either the Installer or the Archive package. To get both files, you need to click on the "One-click download" link.
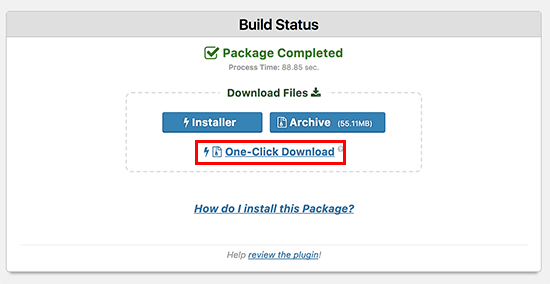
The archive file is a copy of your whole website, and the installer file will help you set up your website automatically.
Import To The New Host
The next step is to upload the archive and installer files to your new web host.
FTP lets you connect to your new web host and do this.
Usually, when you connect your FTP client, you would enter the domain name of your website as the host.
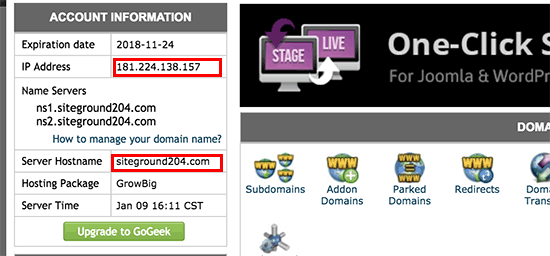
But since your domain name still points to your old host, you'll need to connect by typing in the IP address or hostname of your server. The cPanel dashboard of your new hosting account is where you can find this information.
If you can't find this information, you can ask your new web hosting company for help, and they will help you out.
You need to upload both the installer.php file and your archive.zip file to the root directory of your website using the FTP client.
This is usually /username/public_html/ folder.
Again, if you're not sure, ask the company that hosts your website.
Make sure there is nothing in your root directory. Some web hosting services will set up WordPress for you when you sign up.
If WordPress is already installed in the root directory, you need to delete it first.
Once you're done, you'll need to upload both the archive.zip file and the installer.php file to the root directory of your website.
Change Hosts File to Prevent Downtime
Once you've put both files on your new host, you need to open a browser and go to the installer.php file.
Usually, you can get to this file with a URL like this:
http://www.example.com/installer.php
But this URL will take you to your old web host, and a 404 error will show up. The reason for this is that your domain name still points to your old web host.
Other tutorials might tell you to change your domain's nameservers and point it to your new hosting company, but that's not right.
If you do this now, your site will be broken for your visitors while you move it.
We'll show you how to temporarily go to your new site on your computer without messing up your old site.
Your computer has a file called "hosts" that does this.
Using the host file, you can link domain names to certain IP addresses. In other words, it makes your computer think that the website has moved when it hasn't.
Let's look at how to add an entry for your domain name to the host's file so that it points to your new hosting company.
By making these changes, you'll be able to use your own domain name to get to the files on your new host, while everyone else will still be able to get to your site through the old host. This ensures 100% uptime.
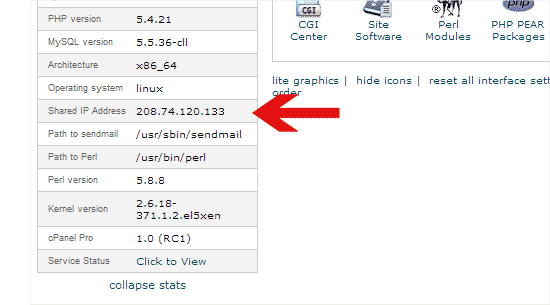
Find the IP address of your new web hosting server as your first step. To find this, log in to your cPanel dashboard and click on the expand stats link in the left-hand sidebar. The address of your server will be written as a Shared IP Address.
On some web hosting sites, this information is under the heading "Account Information."
The next step for Windows users is to go to Programs » All Programs » Accessories, right-click on Notepad, and choose Run as Administrator.
You'll get a message from Windows UAC, and you'll need to click "Yes" to run Notepad as an administrator.
from the computer notepad, go to the file option and navigate to the folder located at C:\Windows\System32\drivers\etc folder. Now, find the host file in this folder and open it. If you are a MAC user, then you need to open the terminal app and enter the following command to make changes to the host file.
sudo nano /private/etc/hostsFor both Windows and Mac users, enter the IP address you copied at the bottom of the hosts file, followed by your domain name. As an example:
192.168.1.22 www.example.com
Make careful to replace example.com with your own domain name and the IP address with the one you copied from cPanel.
When you're finished, save your modifications.
You can now access your files on the new server using your computer's domain name.
Creating MySQL Database on New Host
You must create a MySQL database on your new hosting account before we can run the installer on the new server. If you've already built a MySQL database, you can skip on to the next step.
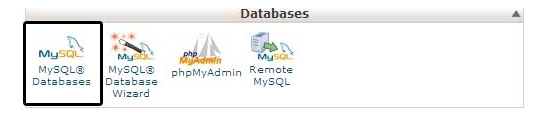
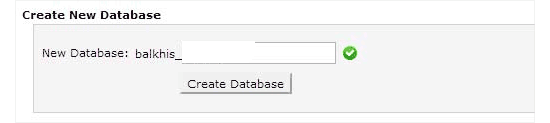
If not, navigate to the cPanel dashboard of your new hosting account, scroll down to the Databases area, and click the MySQL databases button to create a new database.
You'll notice a field for creating a new database. Give your database a name and then click the "Create Database" button.
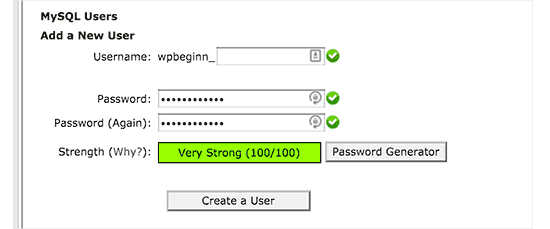
After you've created the MySQL database, navigate to the MySQL Users area.
After that, enter a username and password for your new user and press the 'Create a user' button.
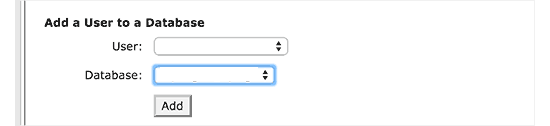
Following that, you must add this user to your database. This will grant the newly formed username complete access to the database.
Scroll down to the 'Add User to a Database' section to do so. Simply choose the database user you created from the dropdown menu next to the user, then database, and finally, hit "add".
Your database is now complete and ready for usage with WordPress. Keep a record of the database name, username, and password. That information will be required in the following step.
Duplicator Migration Process
We're now ready to launch the installer. In your browser window, navigate to the following address, replacing example.com with your domain name:
http://www.example.com/installer.php
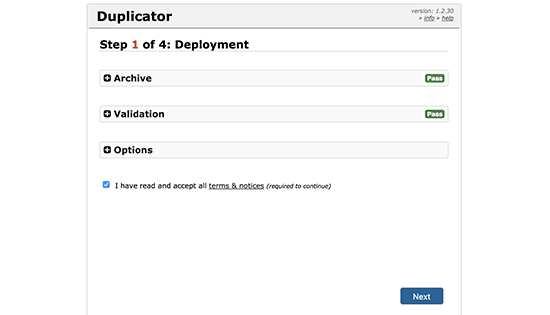
The installer will perform a few tests and display 'Pass' next to the archive and validation tests.
You must check the terms and conditions checkbox before proceeding by clicking the Next button.
You will now be prompted to enter your MySQL hostname, database name, username, and password.
Localhost is most likely your host. Following that, you will enter the database details that you created in the previous step.
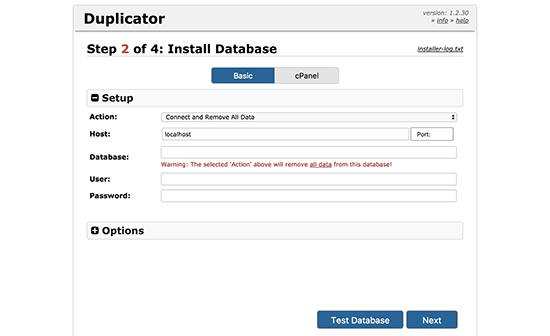
To ensure that you have entered the proper information, click the 'Test Database' option.
If Duplicator can connect, you will see a string beginning with Pass. Otherwise, the database connection problem details will be displayed.
To proceed, click the next button.
Duplicator will now import the WordPress database from the zip archive into your new database.
It will then prompt you to adjust the site URL or Path. Because you are not changing domain names, you DO NOT NEED TO MAKE ANY CHANGES HERE.
To proceed, simply click the next button.
Duplicator will complete the last stages and display the login button.
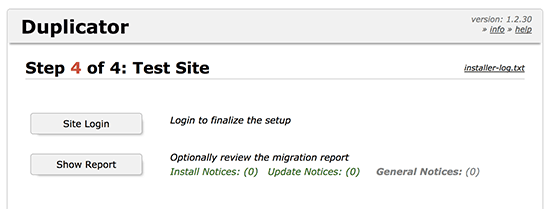
You can now access your WordPress site on the new host to ensure that everything is functioning properly.
Update DNS
You have now produced an exact clone of your WordPress database and files on your new hosting server, but your domain still redirects to your old web hosting account.
You must change your DNS nameservers to update your domain. This ensures that when your users type your domain into their browsers, they are directed to the new location of your website.
If you registered your domain with your hosting provider, you should move it to a different host. If you registered your domain with a registrar such as Domain.com, GoDaddy, or Network Solutions, you must update your nameservers.
Your new web host's DNS nameserver information will be required. This is typically a pair of URLs that look like this:
ns1.hostname.com
ns2.hostname.com
We will demonstrate how to update DNS nameservers using GoDaddy in this post.
The screenshots may differ depending on your domain registrar or web host. However, the fundamental notion remains the same.
Look for the domain management area, followed by the nameservers. If you need help upgrading your nameservers, contact your web hosting provider.
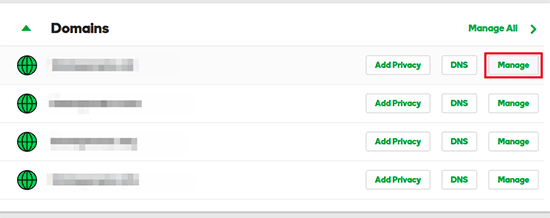
For GoDaddy, you must sign in to your account and then click Domains.
Following that, click the Manage button next to the domain name you want to alter.
To proceed, click on 'Manage DNS' under the 'Additional Settings' section.
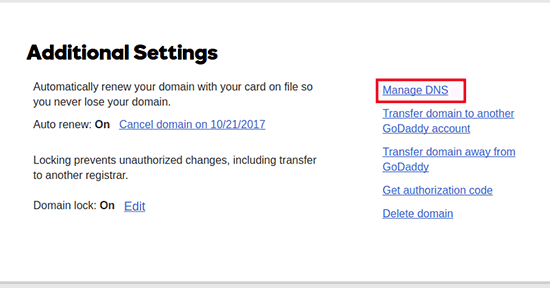
Then, scroll down to the Nameservers section and select the Change button.
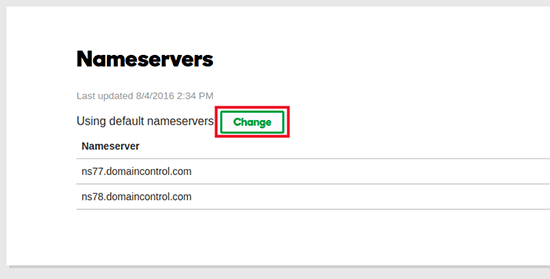
To begin, change the nameserver type selection from 'Default' to 'Custom.' Then, under Nameservers, provide the information for your new hosting provider.
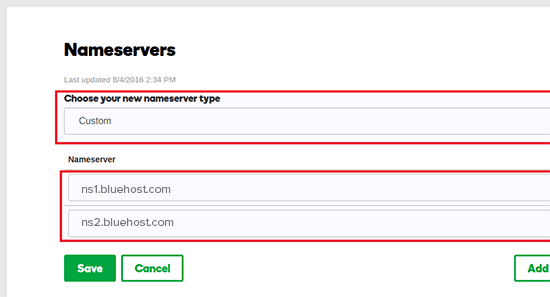
Remember to save your changes by clicking the save button.
You have successfully changed your domain's nameservers. DNS updates can take 4 to 48 hours for all users to propagate.
Because you have identical material on both your old and new hosts, your users will see no difference. Your WordPress migration will be completely seamless, with no downtime.
To be secure, we recommend that you wait 7 days after your migration to deactivate your old hosting account.
Bottom Line
If you want to move web hosts, but the methods above seem too hard, you can choose one of the following firms to migrate your website for you.
SiteGround, Cloudways, Bluehost, GoDaddy, and other similar services are excellent choices for website hosting. However, we hope that this step-by-step advice has assisted you in migrating WordPress to your new host with no downtime.


