
The background graphics on your website can be given new life by adding scroll movement to the background masks and patterns in Divi. You have already seen how to creatively mix Divi's background options, including how to make two layers of background designs. But as of right now, Divi's backdrop settings now include scroll movement.
In this guide, we'll demonstrate how to use Divi's scroll options to design and animate backdrop masks and patterns (no custom code needed). In order to achieve this, we'll use a Divi row to build a floating background layer (similar to what we did here), which we'll use to animate the background masks and patterns when a user scrolls across a chunk of text. Hope you will like it.
Design Preview
Here is a brief example of how the tutorial's backdrop scroll animation will seem.
Design Procedure
Section Background
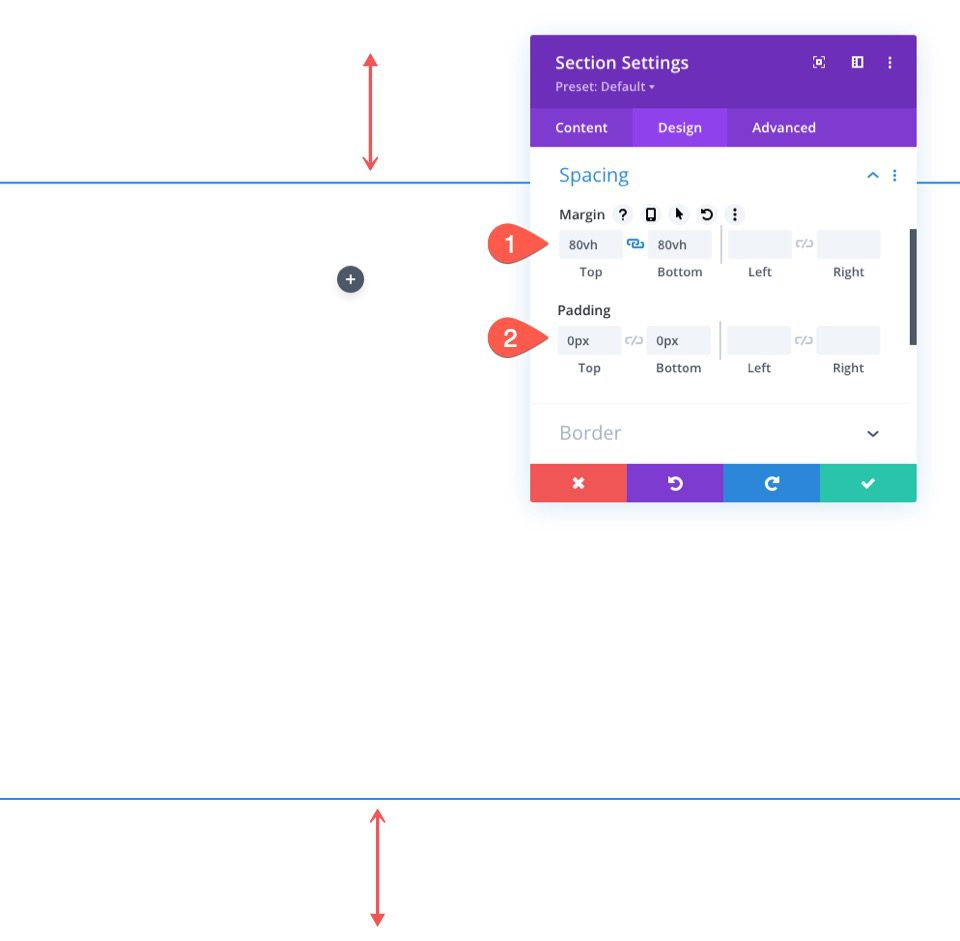
To start, we won't create a row; instead, we'll update the builder's default section that already exists. We need to increase the section's vertical height so that our backdrop design fills the browser. Adding a min-height to the section is a simple method to accomplish that.
Create Amazing Websites
With the best free page builder Elementor
Start NowOpen the section's settings. Update the padding and min-height under the design tab as follows:
- Min Height: 50vw
- Padding: 0px top, 0px bottom
Background Gradient for the Section
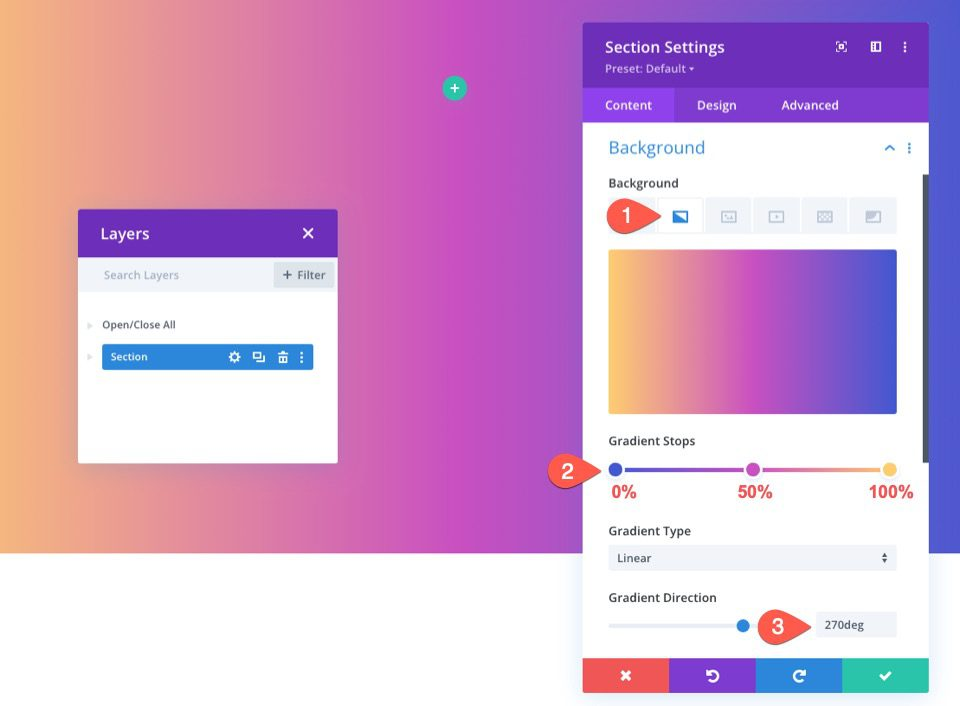
We may now give the segment a unique backdrop gradient. We are going to add three rather regularly spaced gradient color stops for this gradient. In order to focus on making our animated backdrops for the row, we'll keep it basic.
Make sure the section settings are open on the content tab before adding the first gradient stops. Click to create a new gradient after selecting the gradient tab. These two preset gradient colors will be added. Add the following gradient stops, each with a different color and position:
- Gradient Stop #1: #4158d0 (at 0%)
- Gradient Stop #2: #c850c0 (at 50%)
- Gradient Stop #3: #ffcc70 (at 100%)
- Gradient Direction: 270deg
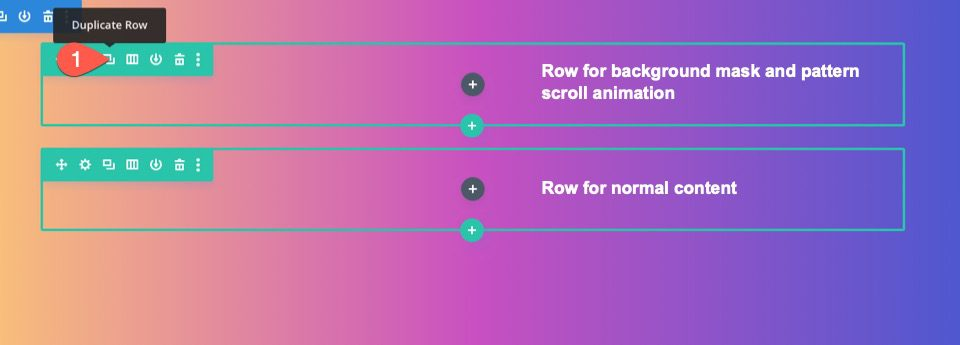
Add Rows
Add a one-column row to our section now that it is ready. Our backdrop mask and pattern scroll motion will be used on this row.
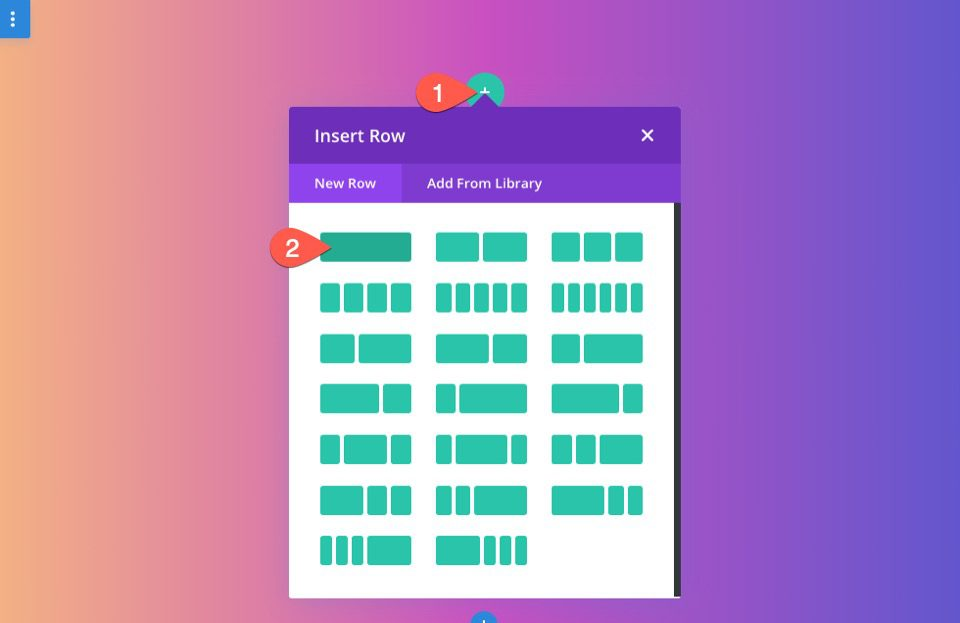
copy the row you just made after that. We'll use our stuff in this second (duplicate) row in the same manner as you would normally. The backdrop scroll animation should now be in the top row, and regular content should be in the bottom row.
Row Customization
We can focus on the row we'll use for our background scroll animation now that our section background gradient is complete. Launch the row's settings. Update the following information under the Advanced tab:
- Position: Absolute
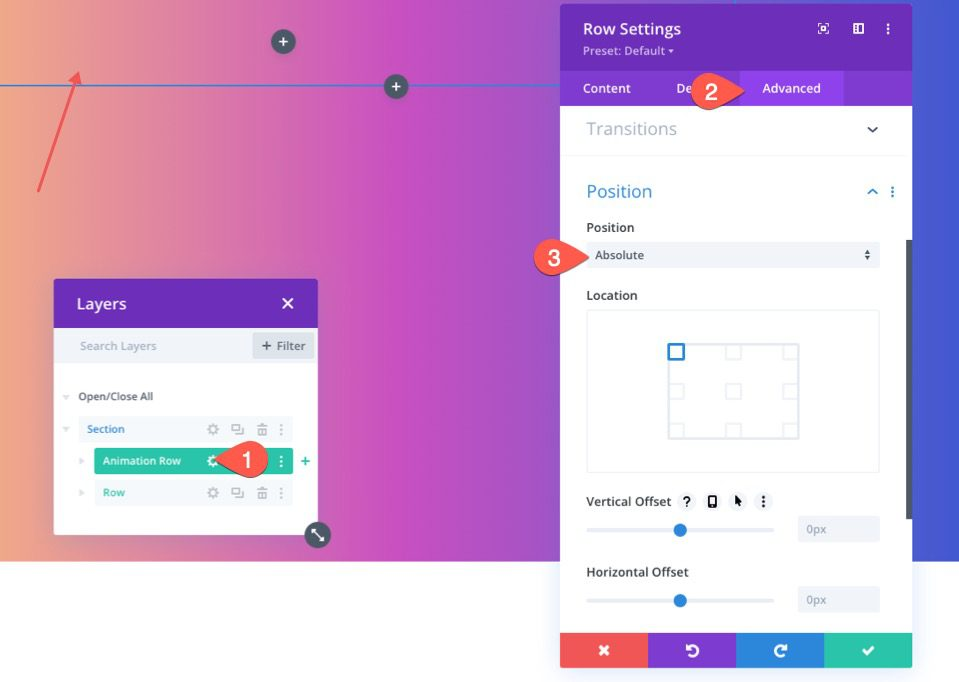
By doing so, the row will be able to cover the section without really taking up any space in the page. All that remains to be done is to update the height and width so that they fully enclose the section's width and height. The necessary overlay and our second layer of backdrop design will be produced as a result.
Update the sizing settings as follows under the design tab:
- Equalize Column Heights: YES
- Width: 100%
- Max Width: 100%
- Height: 100%
- Padding: 0px top, 0px bottom
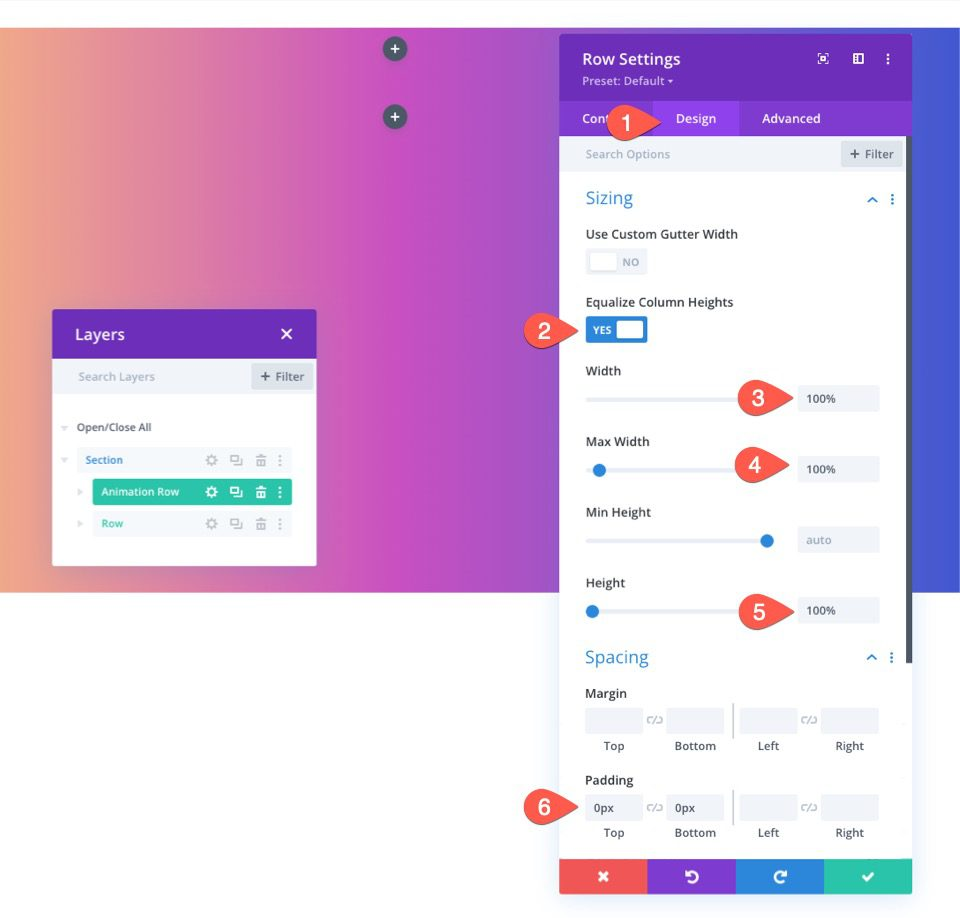
The row is now properly overlaying the background of the entire section, even though you might not be able to see it anymore.
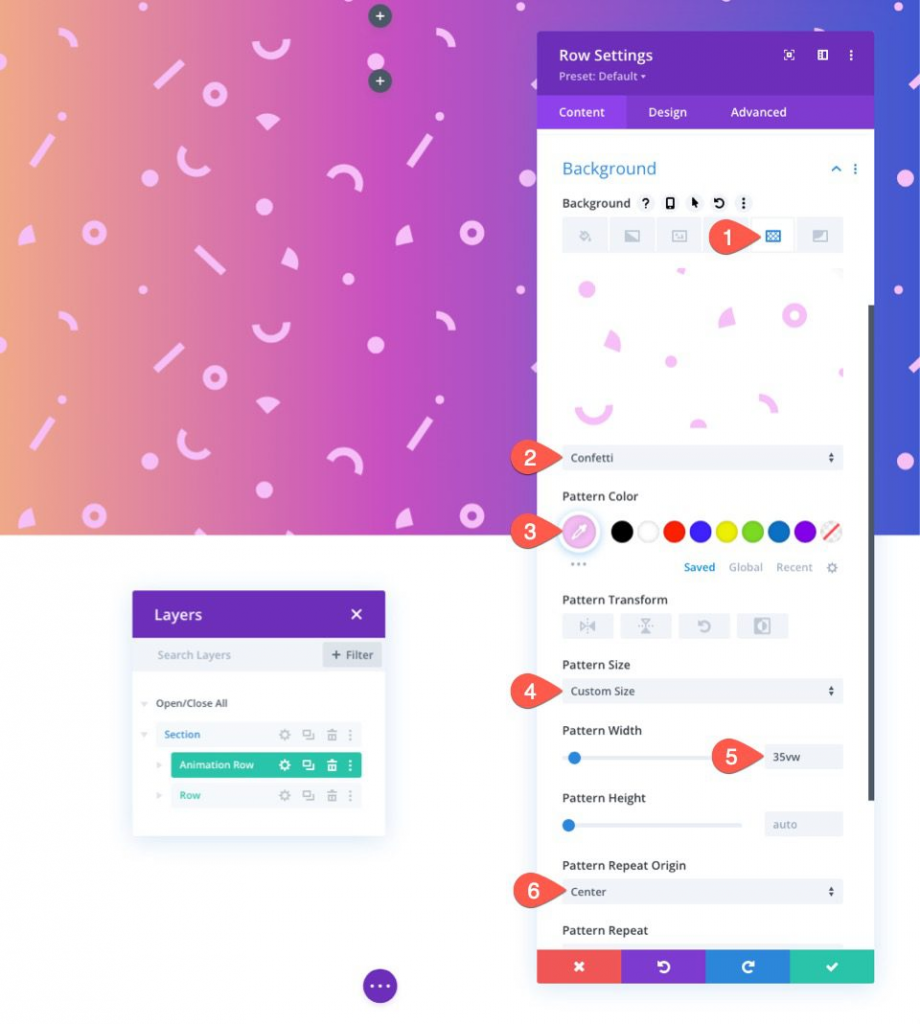
Background Pattern
We'll apply the Confetti pattern as the row background in this example.
Launch the row's settings. Update the following information under the patterns tab of the backdrop option:
- Background Pattern: Confetti
- Pattern Color: #f6bef7
- Pattern Size: Custom Size
- Pattern Width: 35vw
- Pattern Repeat Origin: Center
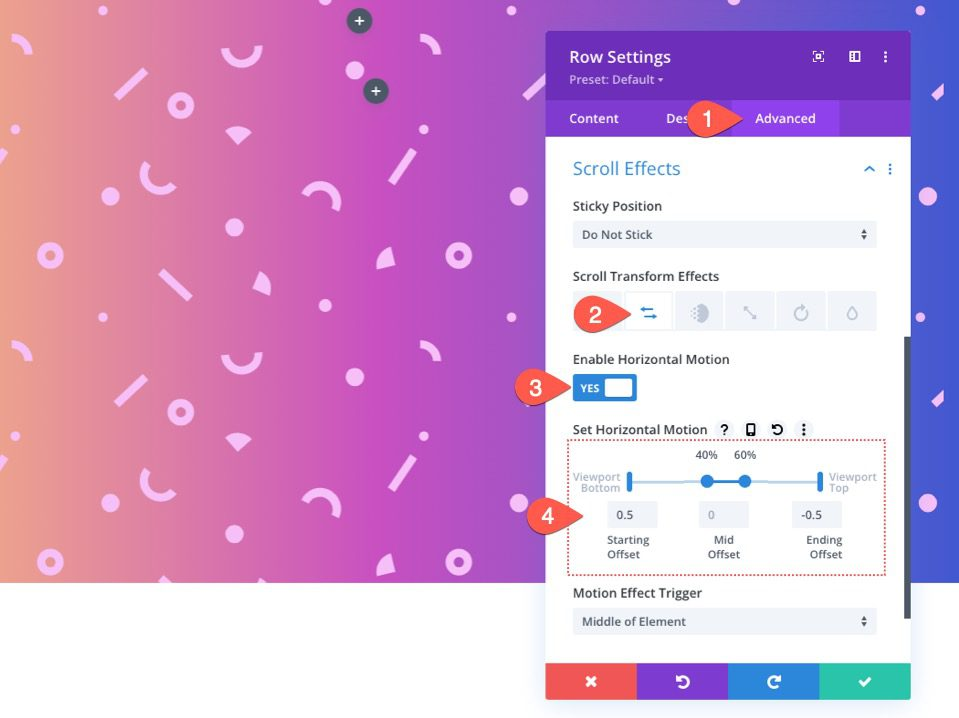
Add Scroll Effects
Having established our backdrop pattern, we can now add scroll effects to the row.
Activate the Advanced tab. Update the following under the scroll effects options:
- Enable Horizontal Motion: YES
- Starting Offset: 0.5 (at 0%)
- Mid Offset: 0 (from 40% to 60%)
- Ending Offset: -0.5 (at 100%)
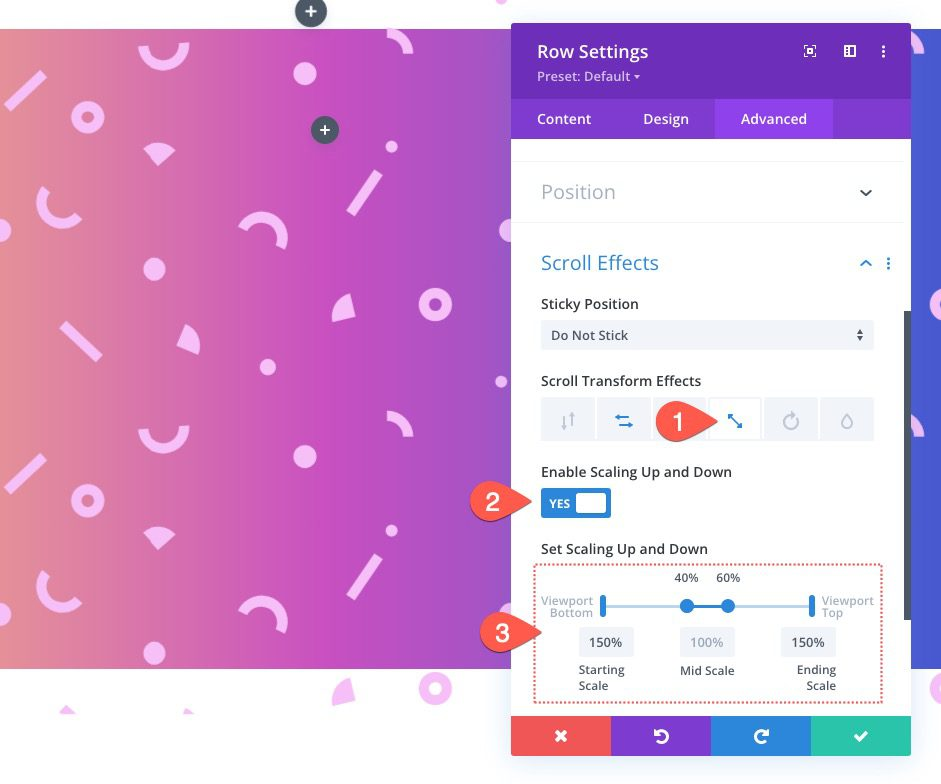
- Enable Scaling Up and Down: YES
- Starting Scale: 150% (at 0%)
- Mid Scale: 100% (from 40% to 60%)
- Ending Scale: 150% (at 100%)
Add a Background Mask
Once our row is complete, we can proceed to the column within the same row and apply a backdrop mask with scroll effects. Let's begin by adding a background mask.
Open the column settings to do this. Update the following under the masks tab:
- Mask: Layer Blog
- Mask Color: #ffffff
- Mask Transform: Horizontal Flip, Invert

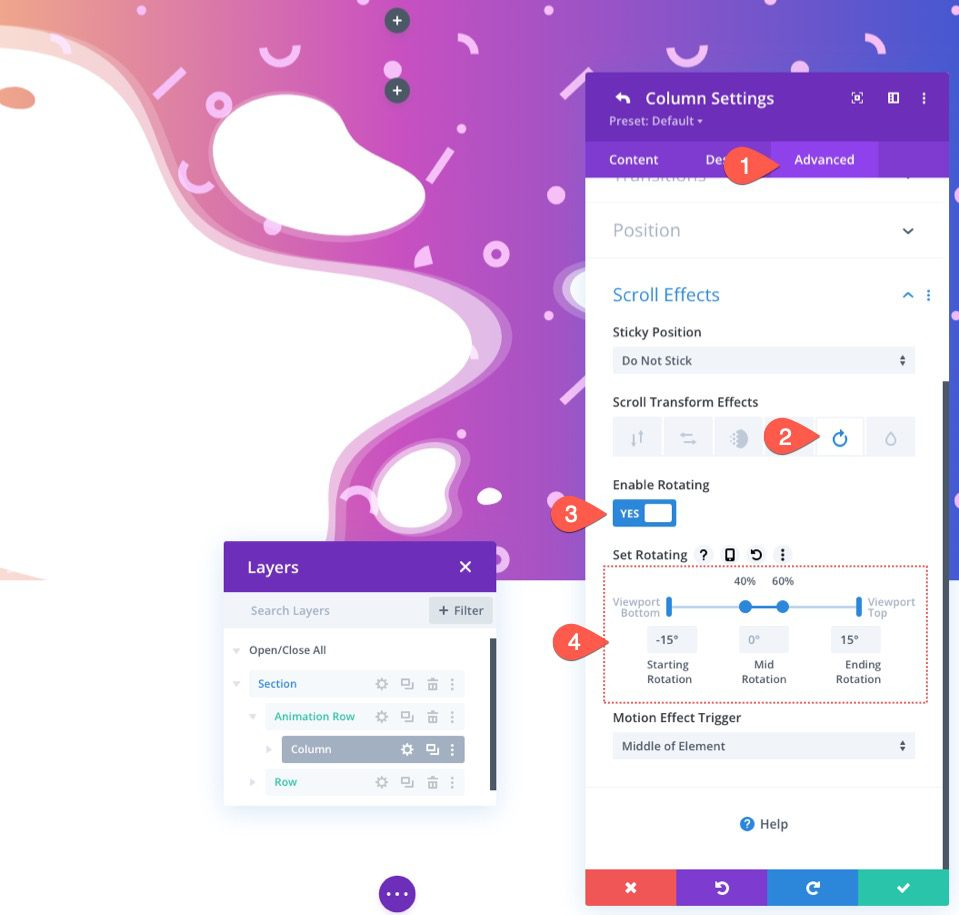
Scroll Effects to the Column
Having established our backdrop mask, we can now apply scroll effects to the column. Remember that the parent row's scroll effects have already been sent down to the column. To further separate the mask from the pattern during the scroll motion, all we need to do is rotate the column in the opposite direction of the row.
Activate the Advanced tab. Update the following information by selecting the Rotating tab under the scroll effects options:
- Enable Rotating: YES
- Starting Rotation: -15 deg (at 0%)
- Mid Rotation: 0 deg (from 40% to 60%)
- Ending Rotation: 15 deg (at 100%)
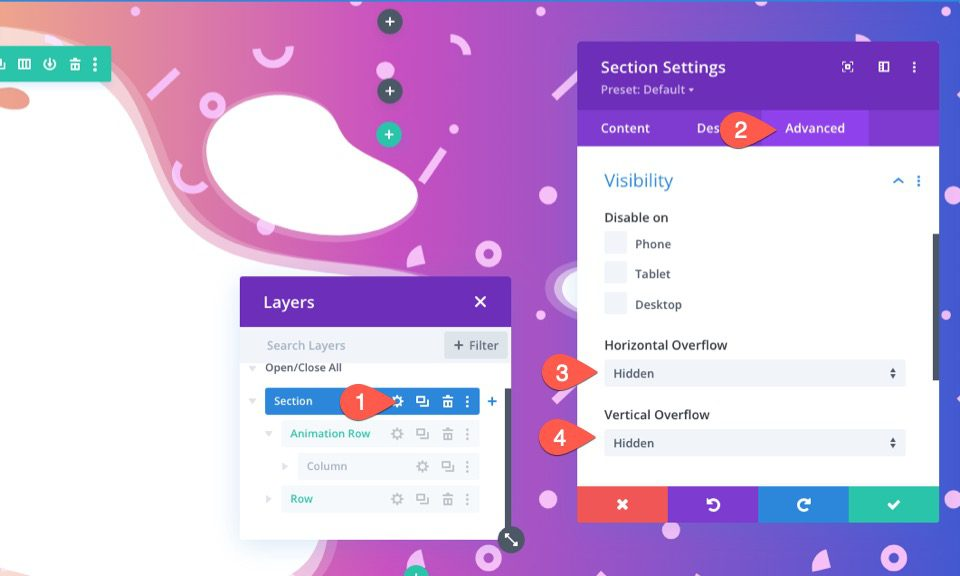
Hide the Section Overflow
Whenever the scroll movement leads the row to go past the section, it will still be visible.
We must conceal the section's overflow in order to make this look better. Open the section's settings to do this. Update the visibility parameters as follows under the Advanced tab:
- Horizontal Overflow: Hidden
- Vertical Overflow: Hidden
Now we have a better-looking design.
Once you add content according to your interest to the section, it will look way better. Here is what our design looks like after adding content.
Final Words
Amazingly, Divi's backdrop options make it simple to design such lovely backgrounds. Additionally, giving those designs scroll animation along with Divi's scroll effects gives them a fresh life.
For more information, see our related Divi tutorial.


