
Do you want to restrict access to your WordPress wp-login.php file based on an IP address? DDoS assaults and hackers frequently target the WordPress login page in an effort to access your website. Such attacks can be successfully thwarted by restricting access to particular IP addresses. You may simply restrict access to your WordPress wp-login.php file by IP by following the instructions in this article.
Importance Of Limiting Access By IP To Website's Admin Area
Users go to the login page for a WordPress website, which is commonly wp-login.php, to log in to your site. It grants you access to the WordPress admin area as the website owner, where you may manage, update, and maintain your website. However, many internet brute force attacks are known to target the wp-login.php page in order to enter websites. They can still be able to slow down or even crash your website even if they are unsuccessful in getting in. Blocking the IP addresses from which the attacks are coming is one technique to handle this scenario. An internet computer's IP address serves as its unique identification, similar to a phone number.
The IP addresses of hackers can be changed using the software. It might not be able to completely prevent all of the more sophisticated assaults because they employ a broader pool of IP addresses. In that situation, you can restrict access to particular IP addresses that you and other website users who use those IP addresses have access to. Having stated that, let's look at 3 simple methods, including a cloud security firewall, for restricting access to the wp-login.php file by particular IP addresses.
Ways To Limit Access to wp-login.php by IP Address?
Limit Access to WordPress Login Page by IP Address
You must modify the.htaccess file in order to use this technique.
Create Amazing Websites
With the best free page builder Elementor
Start NowThe root folder of your website has a special server configuration file called.htaccess, which may be viewed using FTP or the File Manager tool in your WordPress hosting control panel. Simply use an FTP program to connect to your WordPress site, then modify your.htaccess file and add the following code at the top.
<Files wp-login.php>
order deny,allow
Deny from all
# whitelist Your own IP address
allow from xx.xxx.xx.xx
#whitelist some other user's IP Address
allow from xx.xxx.xx.xx
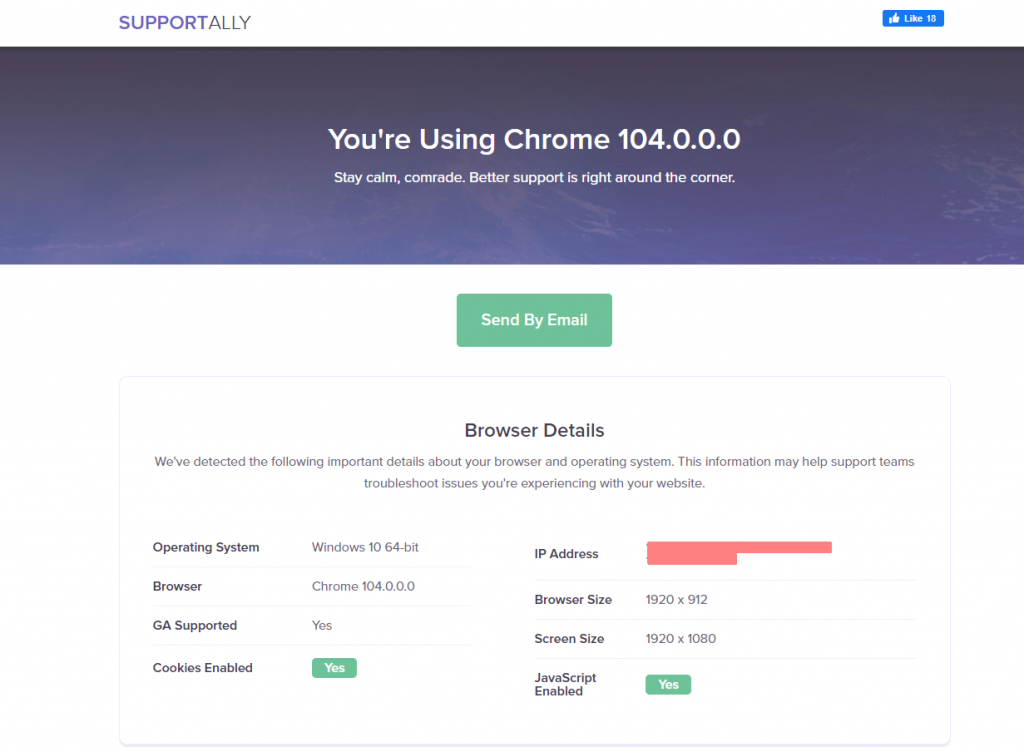
</Files>Don't forget to replace your personal IP addresses for the XXs. By going to the SupportAlly page, you may quickly identify your IP address.
You can ask other users to submit their IP addresses if they need to check in to your website with them. Then you may also include those in the.htaccess file.
Here's an additional example of the previously described code.
<Files wp-login.php>
order deny,allow
Deny from all
# Whitelist John as website administrator
allow from 35.199.128.0
#Whitelist Tina as Editor
allow from 108.59.80.0
# Whitelist Ali as moderator
allow from 216.239.32.0
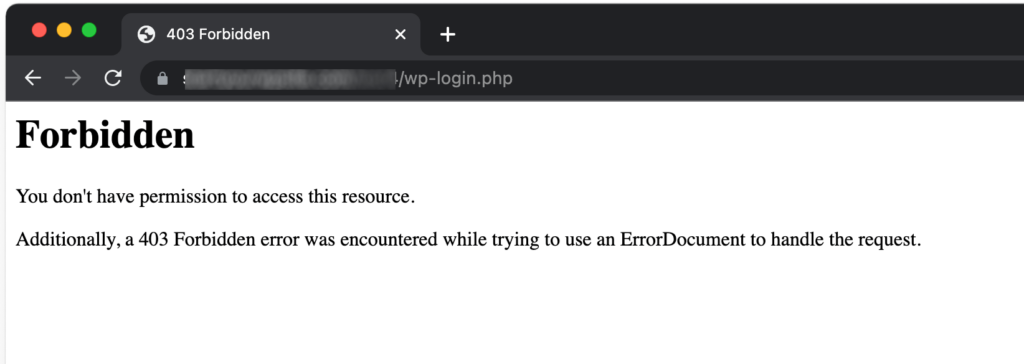
</Files>The wp-login.php file can now be viewed and used to log onto your website by people with these IP addresses. The following error message will appear to other users:
Blocking Specific IP Addresses
The first strategy is completely at odds with this one.
You will be able to restrict IP addresses that are used to attack your website instead of limiting access to the WordPress login page to particular IP addresses. For WordPress membership websites, online shops, and other websites where many users must log in to access their accounts, this technique is quite helpful. This method's drawback is that hackers can keep targeting your website by changing their IP addresses. Fortunately, many popular WordPress hacking efforts employ a set of fixed IP addresses, making this technique effective in the majority of situations.
Identifying the IP addresses used to attack your website is the first step.
Analyzing your server logs will help you discover the offending IP addresses the quickest. Simply navigate to the control panel for your hosting account and select the icon for Raw Access logs.
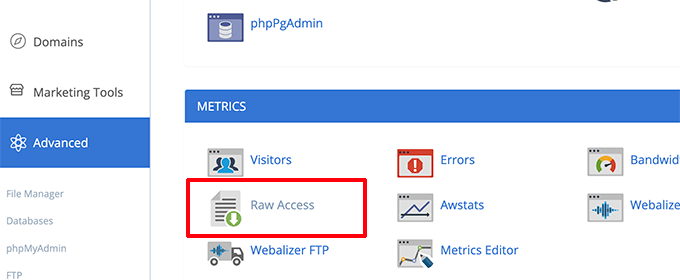
To retrieve the access logs, click your domain name on the following page. With this, a file with the.gz extension will be downloaded.
You must extract the file and use a text editor like Notepad or TextEdit to view it. From this point on, you may discover the IP addresses that frequently access the wp-login.php page.

Now, simply copy that IP Address and save it on a text file on your desktop.
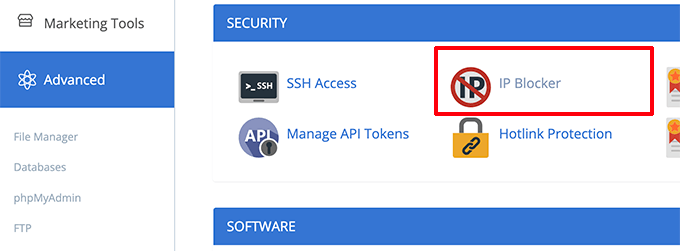
After logging in to your Cpanel, select the IP Blocker icon in your WordPress hosting control panel.
Copy and paste the IP addresses you want to ban on the following screen, then click the Add button.
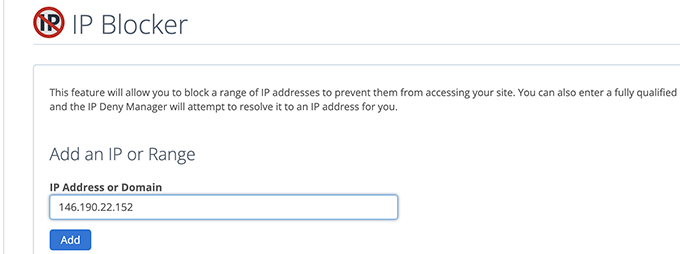
To restrict any other questionable IP addresses you desire, repeat the procedure. That's it. You were able to entirely prohibit shady IP addresses from entering your website. In the future, you can easily unblock one of these IP addresses via the IP blocker app if necessary.

Protecting WordPress Login with Website Firewall
You may not want to spend a lot of time as a website administrator controlling which IP addresses can access your WordPress login page.
Using Sucuri is the simplest approach to secure your WordPress login pages. It is the top WordPress firewall that comes with a complete security plugin for WordPress.
Without them ever reaching your website, Sucuri's website firewall automatically blocks suspect IP addresses from accessing crucial WordPress core files.
The speed and functionality of WordPress are also enhanced by this technique because it prevents erroneous actions from slowing down your server.
Sucuri additionally has a built-in CDN network on top of that. It would automatically provide static content from a server closer to your users, such as photos, stylesheets, and JavaScript.
If users can't access the WordPress login pages, you may quickly whitelist their IP addresses.

You can also use Optimole CDN as alternative.
Wrapping Up
We believe that this post has shown you how to restrict access to your wp-login.php file based on an IP address. Please spread the word about this article among your acquaintances and subscribe to CodeWatchers to read more.


