
Do you want to notify your customers when a previously sold-out item is restocked?

Back-in-stock alerts allow you to keep prospective sales alive by offering the customer the option of being notified when the product is back in stock. In this manner, you won't lose sales or customers simply because a product is momentarily out of stock.
We'll show you how to effortlessly set up back-in-stock notifications so you don't miss out on sales in this article.
But first, let's look at how useful back-in-stock notifications are.
Create Amazing Websites
With the best free page builder Elementor
Start NowWhat Are the Benefits of Using Back In Stock Notifications?
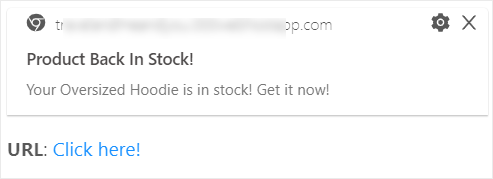
A back in stock notice is an alert that informs customers that the product they were looking to purchase is now back in stock.
When your clients discover that the product they are looking for is no longer available on your website, they may begin to look for other options.
You may immediately attract the shopper's attention by employing back in stock alerts and promising to notify them as soon as inventory is restocked.
Furthermore, these notifications function in a manner similar to preorders. You can assess the demand for a product before deciding whether or not to refill it.
Furthermore, these notifications are simple to set up and automate, so you won't be burdened with additional administrative labor.
The back in stock strategy succeeds for internet businesses for the following reasons:
- Improves customer experience: Customers no longer have to continuously check your website to see if the product is still available. They will be notified even if the browser is not open, allowing them to resume their shopping adventure as soon as the product is back in stock.
- Increase sales: Instead of turning away clients who are online shopping because you don't have the item in stock, back in stock notifications allow you to postpone a possible transaction. You can convert them and sell them at a later time.
- Determine demand: Using these notifications, you can determine which things customers desire and which they don't. You can stock products based on customer demand.
- Increase your subscriber base: When customers sign up to get product availability alerts, you have the option to communicate with them via email and other channels. This assists you in keeping users engaged with your business and building a loyal customer base.
Now that you understand what back-in-stock alerts can accomplish for you, let's look at how to implement them on your website.
How to Configure WordPress Back-In-Stock Notifications
Without touching any code, you can set up automated back-in-stock notifications, but you'll need the correct tool for that. We recommend that you use PushEngage.
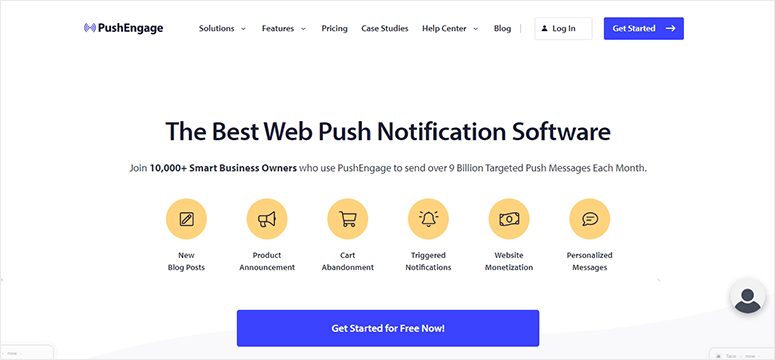
PushEngage is the best push notifications software for creating out-of-stock alerts. It includes a built-in price drop/Inventory alert tool for automating or scheduling back-in-stock messages.
The application includes an easy-to-use interface, so you can set up customized notifications in a matter of minutes. You also have complete control over the frequency, delivery time, and redirection link.
The nicest aspect about PushEngage is that your customers will be notified even if they are not actively exploring your website. You can also select to send notifications based on the recipient's local timezone.
This means they'll receive the notice at a moment when they're most likely to be online, increasing the likelihood of a transaction occurring immediately.
Aside from that, PushEngage provides a slew of useful features, such as:
- Options for segmentation to help you target the right subscribers at the right time
- With the goal tracking and analytics function, you may get analytics from your marketing efforts.
- Push notifications for your drip campaigns that are automated
- Notifications that are triggered based on a shopper's behavior and actions on your website
- A/B testing to improve outcomes
- One-click optin without the need for an email address
Furthermore, PushEngage provides a pleasant support team that will assist you in getting started and resolving any issues you may encounter.
We'll show you how to effortlessly set up your back-in-stock notifications with PushEngage now that you have the necessary tool.
Step 1: Sign up for a PushEngage account.
To begin, you must establish a PushEngage account. You can begin with the free plan, which includes 500 subscribers and 30 notification campaigns. You'll want to upgrade to the pro plan if you want access to more powerful features and a greater subscriber limit.
The first thing you should do after logging into your account is to add your site settings. Navigate to the Site Settings > Installation Settings page from the left menu and configure your site's settings such as site logo, site name, image, and more.
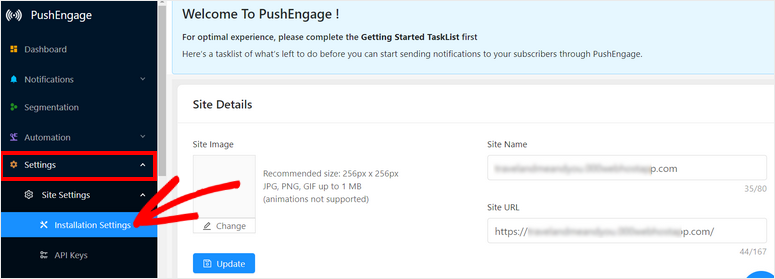
As a result, every notice you generate will have the correct name and URL.
After that, navigate to the API Keys tab and select the Generate a new API Key button.
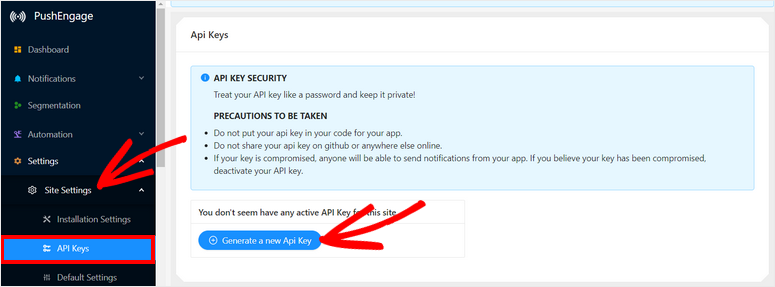
Copy the key to your clipboard; you'll need it later. It's now time to link PushEngage to your WordPress site.
Step 2: Integrate your WordPress site.
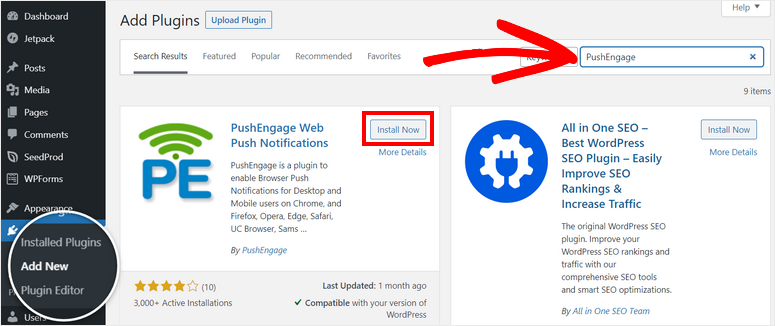
To connect to your WordPress site, you must first download and install the PushEngage plugin.
Go to your WordPress dashboard and select Plugins » Add New. Look for the PushEngage plugin and then click the Install Now option.
When you enable the plugin, the PushEngage plugin will show in your WordPress menu. Open it, then go to the Setup tab and enter your API key there.
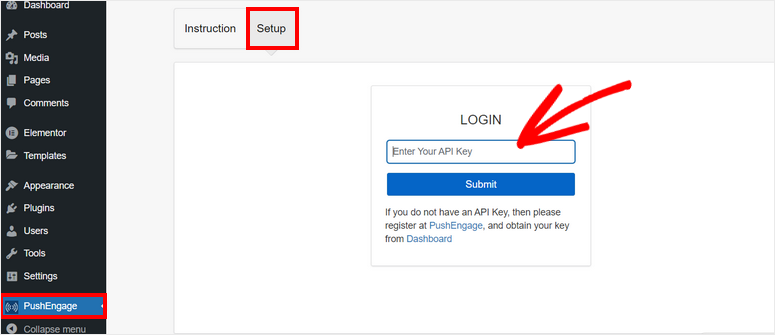
Your WordPress site has now been successfully linked to your PushEngage account.
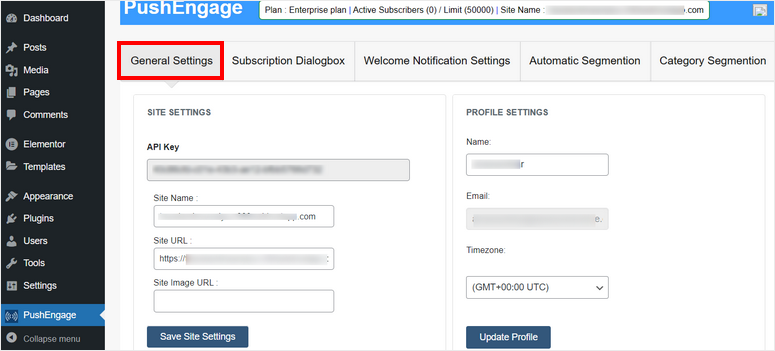
Your site settings, such as API key, site name, site URL, and site image URL, will be visible in the PushEngage dashboard in WordPress. Profile settings such as name, email, and timezone can be added here.
We'll now teach you how to configure subscription and notification settings directly from the dashboard.
Step 3: Customize the Notifications Settings
You must first invite visitors to subscribe to your notifications in order to send out push notifications and back-in-stock alerts. Before you send out any marketing content, be sure you have their permission.
Go to the Subscription Dialogbox page to add the opt-in box to your site.
On the right, you can see a preview of the optin popup, with choices to edit it on the left.

You can adjust the type of dialog box and set an optin delay period.
Following that, you may include a welcome notification to thank the person for subscribing and to welcome them to your brand. You can change the title and message under the Welcome Notification Settings tab. You can also provide a URL to lead them to a certain page.
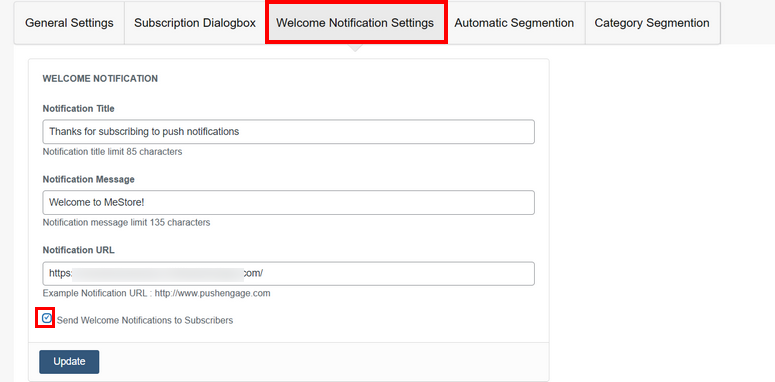
To disable this welcome message, uncheck the option at the bottom of the page that says Send Welcome Notifications to Subscribers. When you're finished, save your changes by updating the settings.
Now we'll show you how to alert your customers when a product is restocked.
Step 4: Configure the Back in Stock Notification
You must use your PushEngage dashboard to create a new back-in-stock notification. Navigate to Automation » Price Drop / Inventory Alert.
To create a new notice, click the + Create Price Drop / Inventory Alert button.
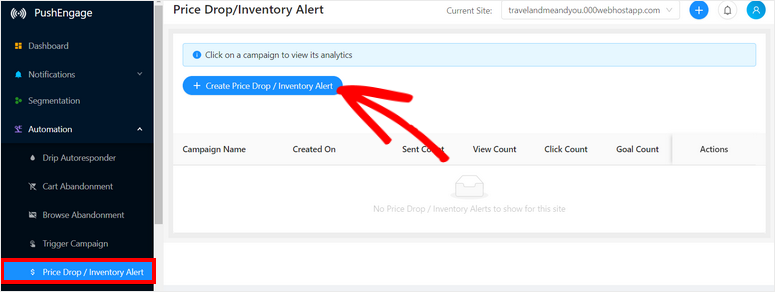
This will launch the notification editor, allowing you to personalize the alert. First, give your campaign a name and select Inventory as the Campaign Type.

Then you can specify the notification specifics, such as:
- Campaign duration: how long do you want the campaign to run?
- Trigger daily limit: how frequently should alerts be sent to subscribers each day?
- Trigger weekly limit: how frequently should alerts be sent to subscribers each week?
Make sure your notifications are often enough to capture clients' attention, but not so frequent that they become spam and annoy them. We recommend limiting it to 2-3 times a week.
If you use a third-party analytics platform, such as Google Analytics, you can select the box to Add UTM Parameters here.
Below that, you can personalize the back-in-stock notification to look exactly how you want it to. First, you may specify whether the notification should be sent immediately or after a particular number of days once your consumer subscribes.
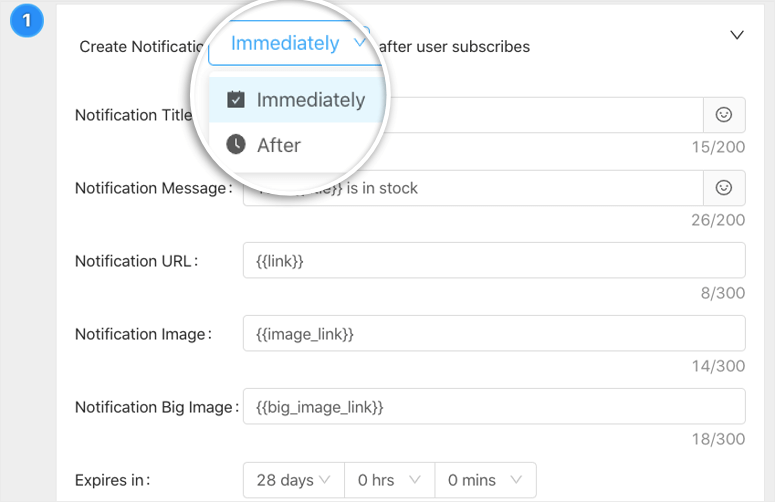
Then you may add a title, message, image, and choose the size of the image. The most crucial thing here is to include the URL of the specific product that has been restocked. Customers will be able to view the product page and finish the transaction immediately as a result of this.
That's all there is to it; your back-in-stock notification is now ready.
PushEngage, on the other hand, is jam-packed with features that you'll want to investigate. The application also allows you to set up an automated sequence of back-in-stock notifications on the same page.
You'll see a + New Notification button at the bottom of the page. This allows you to establish a follow-up notification so that if the consumer does not respond to the initial alert, you can send them another.
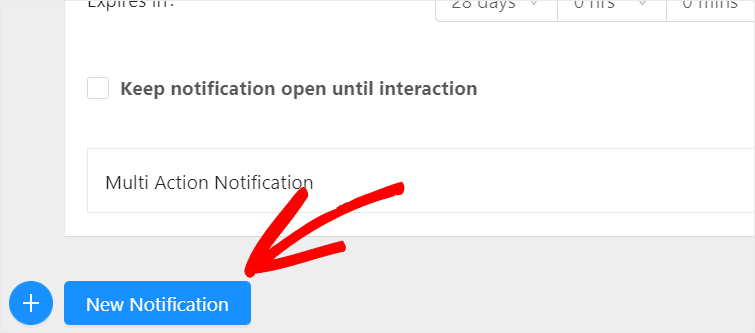
You may include as many follow-up alerts as you want in your back in the stock campaign.
Finally, at the bottom, hit the Save and Launch option. Once you've created your back-in-stock notice, you'll be routed to the Price Drop/Inventory Alert page, where you'll see the notification is active. You can view the campaign's details by clicking on it.
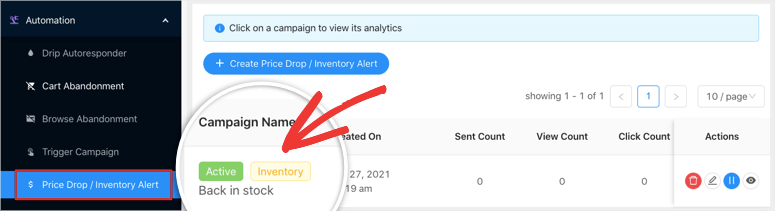
On the following page, you'll see your campaign conditions and triggers, as well as data that demonstrate how well it's performing.
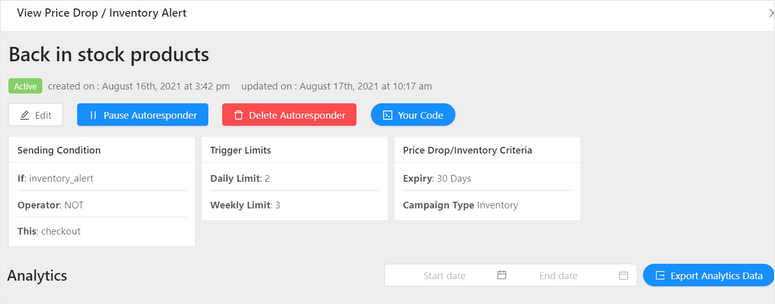
You'll see a procedure for each notification you built in this series as you scroll down. You can also get statistics for each notification you've sent.

This will assist you in determining what your audience likes and responds to better. You can even evaluate product demand to choose which products to refill in order to attract more customers to your store.
And you're finished! You've established a back-in-stock notification alert for your online store. More notifications for product variants and other stock items can be created in the same way.
We hope you found this article useful in learning how to easily alert customers when a product is back in stock.
If you want to alert customers when a product is back in stock, here are some additional choices for online store owners:
- OptinMonster: Create popups, slide-ins, and floating bars to tell all site visitors when an item is back in stock. You can also use targeting rules to control when, where, and who see the notification.
- TrustPulse: Create personalized messages that appear in non-intrusive popups on your website.
- Constant Contact: Set up automated stock alert emails to notify customers when things are back in stock using email marketing. There are pre-made email templates available to help you get started.
Why not try your hand at generating marketing push notification campaigns now that you know how to set up back-in-stock alerts? This will boost engagement, increase revenue, and keep customers coming back for more.


