
A well-known podcast host, Buzzsprout has a large and loyal following. Beginner podcasters can use the service for free; more advanced users can choose from a variety of subscription programs. Because of how simple and user-friendly they make podcast hosting, they are an excellent choice for any podcaster. Many users of Buzzsprout are wondering how to connect their podcast with a WordPress website. Fortunately, we've got you covered.
To get a better idea of what Buzzsprout has to offer, read on. To help you get Buzzsprout working on your WordPress website, we've put together a tutorial that walks you through three distinct integration options. Let's get started right away!
Benefits Of Using A Podcast Host
Research is often needed when picking a podcast host. As you think about your options, you should keep your own situation in mind. For instance, if you are on a tight budget, you might want to find the best deal.
If you're just starting out with podcasting, you might be thinking about whether or not you need a dedicated host. "No," from a technical point of view. But that doesn't mean you should avoid separate hosting from the beginning. In fact, we recommend that you host your website somewhere else.
Create Amazing Websites
With the best free page builder Elementor
Start NowYou can always host your podcast on your WordPress server, but that's not really a good idea because it has a few problems.
This is because putting large media files on your web server can slow down how quickly your page responds. Since it's been shown that slow page load times hurt your website's traffic, it's best to keep your site speed-optimized.
Also, if you choose a host made just for podcasts, like Buzzsprout, which we'll talk about next, you'll have access to features made just for podcasters. Most of these include the ability to publish new episodes easily to platforms like Apple Podcasts.
Embed A Buzzsprout Podcast Within WordPress
Another good thing about Buzzsprout is that it gives you more than one way to connect your podcast to your website. We already said that it's best to host your podcast on its own server, but it's also a good idea to make a website for your show.
When both are up and running, you should look at the following ways to connect them.
1. Embed Code From Buzzsprout
We recommend that you design your podcast website with WordPress. It is the most popular Content Management System (CMS) on the market, and podcasters can get a lot out of it. Before we talk about some of these features, let's look at how you can put a Buzzsprout episode on your webpage.
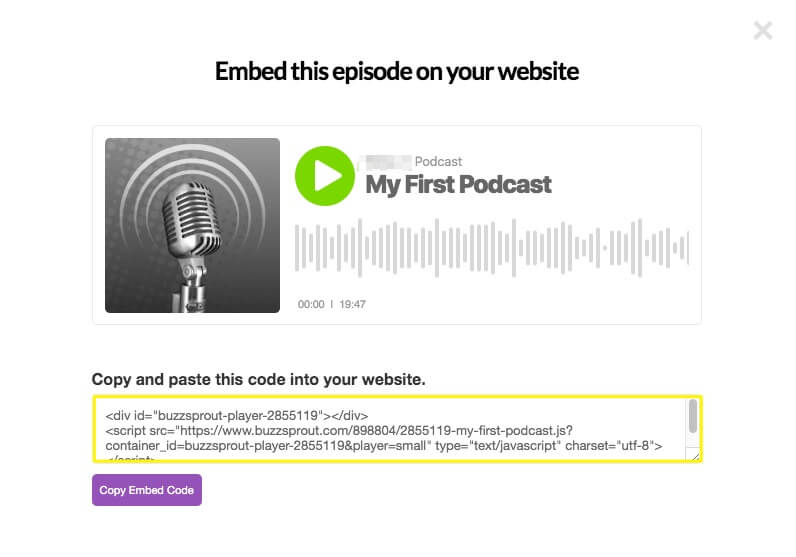
It only takes a few seconds to sign up for Buzzsprout. Once you've uploaded and published your episode, you can get an embed code by clicking on the episode and then clicking Embed this ONE Episode.

Next, a pop-up window will appear with all the information you need, including a piece of code to copy.
Next, open the page or post in WordPress where you want to add your episode. Then you can click on HTML Block and paste your embed code.
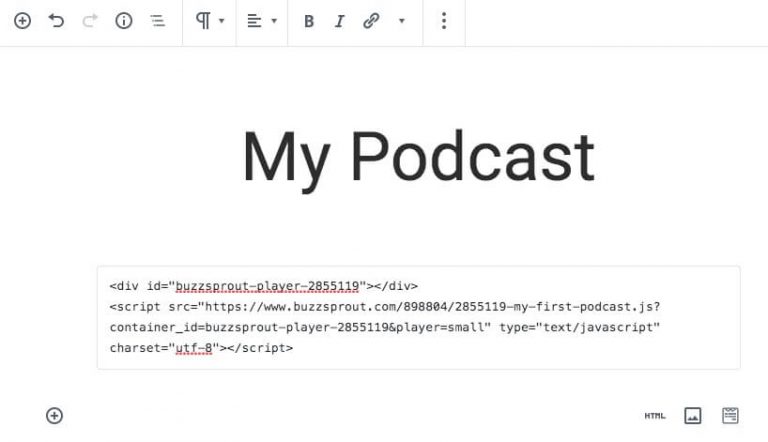
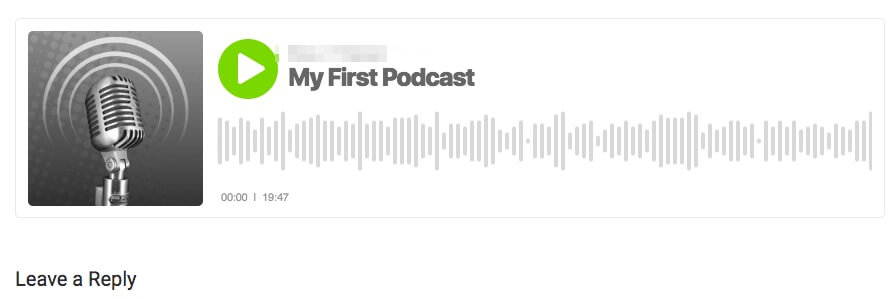
You'll only see the code while you're in edit mode. You'll need to click the Preview button at the top of the screen in order to listen to your embedded podcast. Posting a podcast should result in a stylish player for your podcast.
This is just one way to add your Buzzsprout podcast to a WordPress site. Let's look at a different way to get the same functionality.
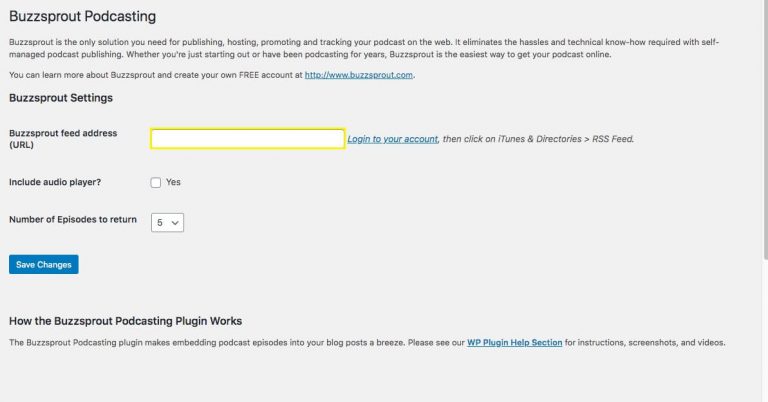
2. Buzzsprout Plugin for WordPress
If you don't want to copy and paste embed code, you can also install and turn on the Buzzsprout Podcasting plugin for WordPress:
This is a free plugin that adds a number of new settings to your WordPress dashboard. First, type in the address of your Buzzsprout feed.
You can now use your Media Library to add any Buzzsprout podcast episode to your posts and pages. You need to add the Classic Block to the WordPress Block Editor. This will put the classic text editor into your post. Then, you'll need to click on the icon that says "Add Media".
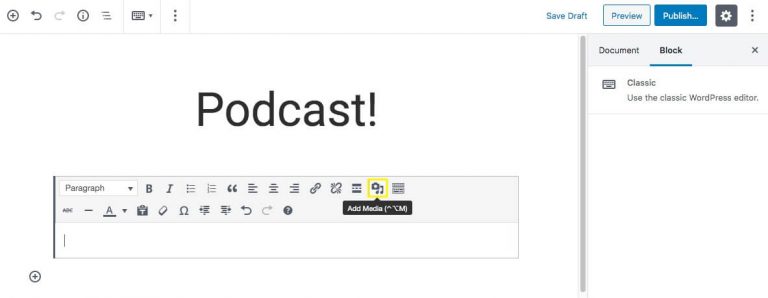
This will show you the different ways you can add media. By installing the Buzzsprout plugin and filling in your podcast's feed URL, you can now choose your podcast from a list and easily add it to your post. When you click on Buzzsprout Podcasting in the list of options, all of your published episodes will be shown. Click on the episode you want to embed, and a shortcode will be added to your content. Lastly, preview your post, save your changes, and then publish them.
Hosting A Podcast With Buzzsprout
Let's look at Buzzsprout's features. This is one of the few podcast hosts that lets you choose a free plan. You can upload podcasts for two hours per month, and your content will be kept for 90 days.
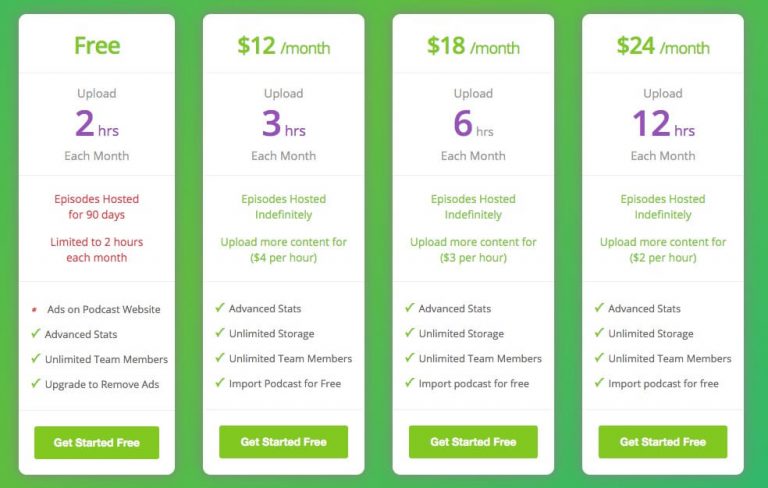
For a lot of new podcasters, this is enough to try out. Buzzsprout lets you put together and run a weekly half-hour show for free. But it's important to note that your podcast page will have ads if you choose the free plan.
If you want to grow your business, you can choose from any of Buzzsprout's $12–$14 per month premium plans. Every paid plan comes with.
- Advanced podcast statistics
- A simple web page
- Access to podcast directories
- Custom players for embedding
- A monthly bandwidth allowance of 250 GB
Another unique thing about Buzzsprout is that you don't have to sign an agreement every year. All of their plans last from one month to the next.
Wrapping Up
Now that you know more about how Buzzsprout's podcast hosting options are cheap and easy to use, you should be ready to get your podcast out there. If you have the right tools, you can put on the best show possible.
Now that you've set up some of the technical parts of your podcast website, you can focus more on the user experience and the way it looks as a whole. One way to make sure your podcast website is optimized for your listeners is to use one of our podcast-friendly WordPress themes.


