
WordPress is one of the most popular content management systems in the world, powering over 40% of all websites on the internet. It's easy to use, highly customizable and has a vibrant community of developers constantly improving it. However, in order to use WordPress, you need to have a web hosting provider that can support it.
DigitalOcean is a cloud computing platform that offers virtual private servers (VPS) to host websites and applications. It's known for its simplicity, scalability, and affordability, making it a popular choice for developers and small businesses.
In this guide, we will walk you through the process of hosting WordPress on DigitalOcean, from setting up a server to installing WordPress and configuring it for optimal performance. Whether you're a seasoned developer or a beginner, this guide will provide you with the step-by-step instructions you need to get your WordPress site up and running on DigitalOcean in no time. So, let's dive in and get started!
Hosting Process In DigitalOcean
WordPress is a popular platform for managing website content and blogs. This guide will show you how to create a WordPress site using the WordPress 1-Click App. This app includes components such as Apache, MySQL, and PHP, which together form the LAMP stack, a common software configuration for hosting dynamic websites. The app also includes security features like UFW and Fail2ban to keep your site safe from attacks. In this tutorial, you'll learn how to set up your WordPress site, configure your domain, and access your MySQL database.
Create Amazing Websites
With the best free page builder Elementor
Start NowCreating A WordPress Droplet
By clicking the Create WordPress Droplet option in the 1-Click App Marketplace, you can create a WordPress Droplet.

In order to customize your preferences before making your WordPress Droplet, click this to be directed to the Create Droplets page. For a detailed explanation of all the decisions you must make, read the article on How to Create Your First Droplet. A few important settings to think about are in the parts that follow.
WordPress 5.8 on Ubuntu 20.04 has WordPress 5.8's Marketplace tab already made up with your image.
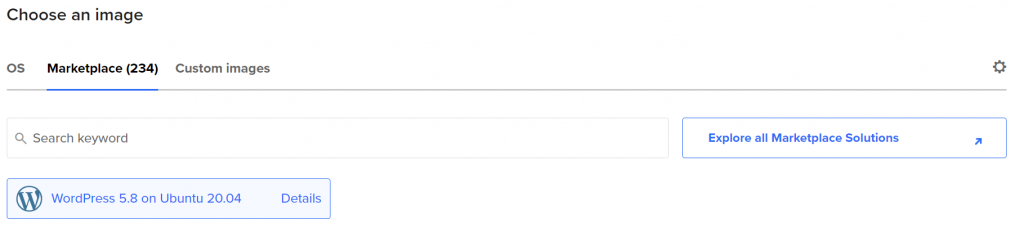
If this is not checked, type "WordPress" into the search window to find it. Once the correct WordPress image has been chosen, you can either use the preset settings or change them to suit your needs. Typically, we advise making the adjustments listed below.
It is advised that you choose a data center region that is near to your user base to prevent potential latency. We have multiple data centers in some areas. There is no distinction between these data centers in the same area. (e.g., SFO3 and SFO2).
It is advised to have at least 1GB of RAM or more in order to operate a Droplet with WordPress.
Instead of using a password for your Droplet, the SSH Key choice is advised. SSH Key authentication is usually more secure.
You can track the resource consumption of your Droplet over time by adding enhanced metrics monitoring and alerting. Additionally, you might want to think about setting automated backups. To enable backup functionality on Droplets you've already made, return later.
Give your Droplet a memorable identification moniker like "WordPress Droplet 1" or the name of the website you intend to host.
After making your selections, click Create Droplet in the control panel's bottom column. The Droplet's IP address will be shown once it has been established. This IP address can be used to login to and set up your Droplet. To capture the IP address to your clipboard, mouse over it and select capture:

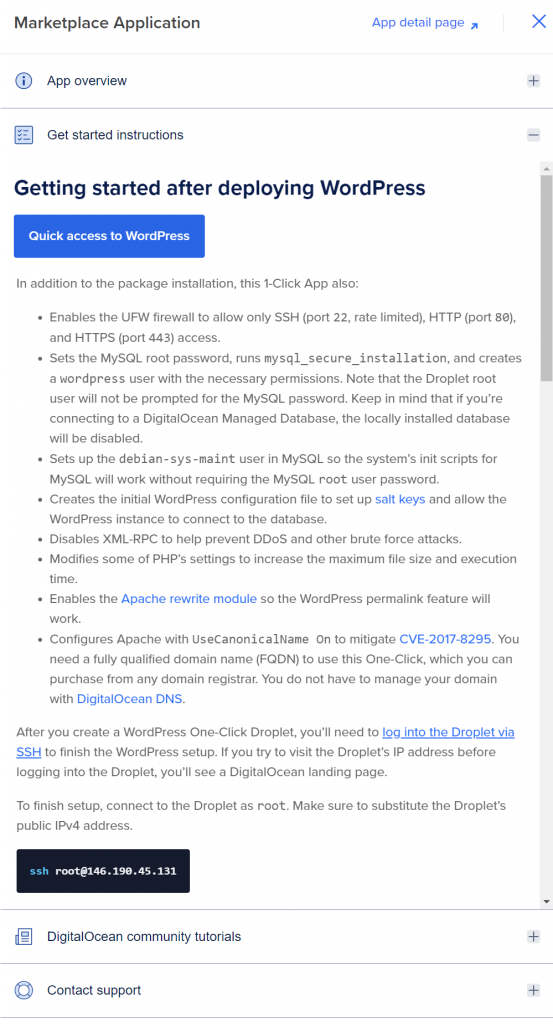
You can obtain additional resources included with Droplets created through the 1-Click Marketplace by selecting Get Started:

This opens a new window where you can learn more details about your 1-Click application. This contains an overview, additional instructions for setting up your Droplet, and references to pertinent lessons on our Community website. You'll also have access to WordPress support and other tools, including:
Checking the Placeholder Page
To view your new site, launch a web browser and go to the Droplet's IP address. You won't see the following screen until you log in using SSH:

The purpose of this security step is to safeguard WordPress's initial configuration, which creates the administrative user.
Until you are prepared to configure WordPress, you can safely keep the installation as is.
Accessing the Droplet via SSH
You must first establish an SSH connection to the Droplet in order to delete the placeholder web page. It's crucial to swiftly finish the WordPress setup after connecting. Anyone who visits your website could establish the administrative user and password until you do.
Start by opening a command-line connection straight to the server. This job must be finished just once in order to configure WordPress.When you're prepared, launch a terminal on your machine and enter the following command to log into your Droplet as root (or your administrative user) using SSH. Use your Droplet's IP address, and never forget to:
ssh root@your_server_ipAfter logging in, you will be given a sequence of instructions to follow in order to set up and enable configuration for your WordPress site.
You must first enter a domain or subdirectory name. You will then enter your email address, username, password, and blog title to establish a new admin user account for WordPress. Following the entry of this information, you will be prompted to verify its accuracy. If it does, enter y and then type y. To serve as a guide, the instructions are listed below:
Enter the domain name for your new WordPress site.
(ex. example.org or test.example.org) do not include www or http/s
--------------------------------------------------
Domain/Subdomain name: example.com
Enabling conf block-xmlrpc.
To activate the new configuration, you need to run:
  systemctl reload apache2
Now we will create your new admin user account for WordPress.
Your Email Address: [email protected]

Username: sammy

Password: wp_password

Blog Title: Sammy Swims

Is the information correct? [Y/n] y
You will be prompted to choose whether you want to use Let's Encrypt to acquire a certificate after completing these questions. A Certificate Authority (CA) called Let's Encrypt makes it simple to get and set up free TLS/SSL certificates, allowing encrypted HTTPS on web servers. We advise selecting yes or y to this question to create a certificate for extra security.
WordPress Admin Panel
When you connect to your Droplet using SSH, the Message of the Day (MOTD), which is presented, provides more information about the installation.
Welcome to DigitalOcean's One-Click WordPress Droplet.
To keep this Droplet secure, the UFW firewall is enabled.
All ports are BLOCKED except 22 (SSH), 80 (HTTP), and 443 (HTTPS).
You can locate your MySQL root user password in the /root/.digitalocean_password file using the command below if you need to enter your MySQL database server:
cat /root/.digitalocean_passwordThe output will look like this,
root_mysql_pass="c404aed5e912278adb4EXAMPLE9782f390286d706a9c4f72"
wordpress_mysql_pass="619863e454cEXAMPLE15be13d9730db5c0a52ad6a4d2491a"
The passcode can be found on the line that starts with root_mysql_pass, inside the quotation marks. Run the mysql command as follows, specifying the user (root) with the -u option and the password prompt with the -p flag:
mysql -u root -pAnd you are good to go.
Final Words
Once you have successfully set up your WordPress site, it is important to take additional steps to ensure the security and reliability of your server. The Initial Server Setup guide provides step-by-step instructions on how to grant sudo privileges to your user, which will allow you to perform administrative tasks without logging in as root. This is important because logging in as root can expose your server to potential security threats. Additionally, the guide walks you through how to disable root login, which will add an extra layer of security to your server. These initial server setup steps are crucial to ensuring your Droplet is ready for production and can handle any traffic that comes it's way. By following these steps, you can feel confident that your WordPress site is secure and running smoothly.


