
A carousel is a collection of revolving banners or a slideshow that appears on your store's homepage. It lets you show up to five slides of photos and text that may be connected to specific goods or sites.

In this tutorial, we will go over the process of creating an Elementor Vertical Carousel in a few easy steps without using any addons or third-party plugins.
How To Add Vertical Carousel With Elementor
To begin with, add a single-column section for the Elementor vertical slider content.

Fill this column with various inner sections. This Elementor vertical carousel's inner sections will each become a slide. And set up a class name for the column that contains all the sections.
Create Amazing Websites
With the best free page builder Elementor
Start Now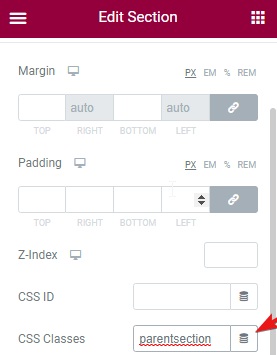
Next, set up a class name for all the inner sections as well. We have named it Swipee so that it does not get confused with other classes in the Elementor library.

Next, you can use the following HTML code to the functionality of Elementor Vertical Carousel.
<script src="https://unpkg.com/swiper/swiper-bundle.min.js"></script>
<script>
if (window.innerWidth > 1024){
let parent = document.querySelector('.parentsection .elementor-widget-wrap');
let children = parent.querySelectorAll('.swipee');
let wrapper = document.createElement('div');
wrapper.className = 'swiper-wrapper';
children.forEach((child) => {
wrapper.appendChild(child);
child.classList.add('swiper-slide');
});
let container = document.createElement('div');
container.className = 'swiper-container';
container.prepend(wrapper);
parent.prepend(container);
let pagination = document.createElement('div');
pagination.className = 'swiper-pagination';
container.prepend(pagination);
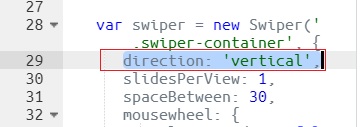
var swiper = new Swiper('.swiper-container', {
direction: 'vertical',
slidesPerView: 1,
spaceBetween: 30,
mousewheel: {
releaseOnEdges:true,
},
pagination: {
el: '.swiper-pagination',
clickable: true,
},
navigation: {
nextEl: '.swipee-down',
prevEl: '.swipee-up',
},
});
}
</script>
<style>
.elementor-element.elementor-absolute.swipee-up, .elementor-element.elementor-absolute.swipee-down{
z-index: 99;
cursor: pointer;
line-height: 0;
}
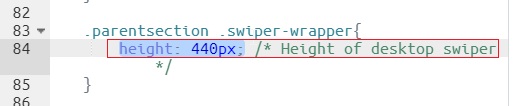
.parentsection .swiper-wrapper{
height: 440px; /* Height of swiper */
}
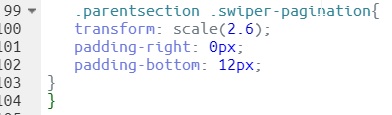
.parentsection .swiper-pagination{
transform: scale(2.6);
padding-right: 4px
}
</style>
Insert this code into an HTML element that is put after the Elementor vertical slider section.
You can now insert arrows to maneuver through the vertical slides.
Add two arrow icons, one directed up and the other down. Assign the class name swipe-up to the up arrow and swipe-down to the down arrow.
Moreover, you can also change the direction to horizontal by removing the direction attribute.
The height of the swiper wrapper should be identical to or higher than the height of the largest inner section in the CSS code here.
The size of the slider's navigation buttons may be altered by adjusting the transform. CSS values are shown below.
That's all the changes you might want to make while you can further change them to your preference and see the outlook on your website and you will be done with creating a Vertical Carousel for Elementor.
That's all from this tutorial. Make sure to join us on our Facebook and Twitter to stay updated about our posts.


