
Looking to strategically place ad blocks within particular posts on your WordPress website?

By strategically inserting ad blocks within specific posts, you can captivate your audience with advertisements precisely where they're most engrossed in the content. This not only enhances the visibility of your ads but also boosts the likelihood of receiving more clicks.
In this guide, I'll walk you through the straightforward steps to effortlessly showcase ad blocks within particular WordPress posts.
Importance Of Displaying Ads in Specific WordPress Posts
When you explore a WordPress website, chances are you'll come across banner ads strategically placed in the sidebar or just below the header. These ad spots, though commonly positioned, often fall prey to what's known as "banner blindness," where users overlook these advertisements. This oversight can significantly impact the click rates.
Create Amazing Websites
With the best free page builder Elementor
Start NowHowever, there's a nifty solution: instead of sticking to the standard ad placement, consider showcasing ad blocks within specific WordPress posts. This strategy ramps up the visibility of your ads, reaching out to users who are deeply engaged with your content.
It's not just about preventing ad fatigue by spreading them across various pages on your WordPress blog. Segmenting your audience and displaying targeted ads to those who are most likely to be interested can substantially boost engagement and click-through rates.
For instance, picture this: a user engrossed in one of your travel blog posts might be genuinely intrigued by an ad promoting travel gear or flight deals, prompting them to click and explore the prices further.
So, how do you seamlessly display these ads in specific WordPress posts? Let's dive into the methods using the quick links provided below:
How To Display Ads On Anywhere Of A WordPress Webpage
Here we have two ways to perform this. One is putting ad blocks in specific WordPress posts is by using the WPCode plugin, which is highly recommended. Another ways is displaying ads using AdSanity. We'll explore both ways.
WPCode
One of the things I absolutely love about WPCode is its incredible user-friendliness. It's hands down the best WordPress code snippets plugin out there, allowing you to seamlessly integrate ads into any page, post, or widget area on your WordPress site.
This fantastic tool enables you to display ads not only from third-party platforms like Google AdSense but also your own personally hosted ads, giving you full control over your ad placements.
To get started, the first step is to install and activate the WPCode plugin. Don't worry if you're new to this – our beginners’ guide on how to install a WordPress plugin provides comprehensive instructions to assist you every step of the way.
While the free version of WPCode works perfectly for this tutorial, I highly recommend considering an upgrade to the Pro version. This unlocks a cloud library of code snippets, smart conditional logic, and a whole host of additional features that truly amplify your ad placement capabilities.
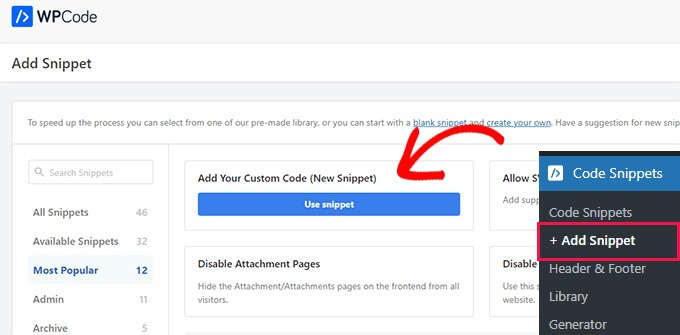
Once you've activated the plugin, simply navigate to the 'Code Snippets' section and click on the '+ Add Snippet' option in the WordPress admin sidebar.
From there, it's a breeze. Click on the 'Use Snippet' button under the 'Add Your Custom Code (New Snippet)' option, and you're well on your way to effortlessly integrating those ad blocks into your WordPress posts."
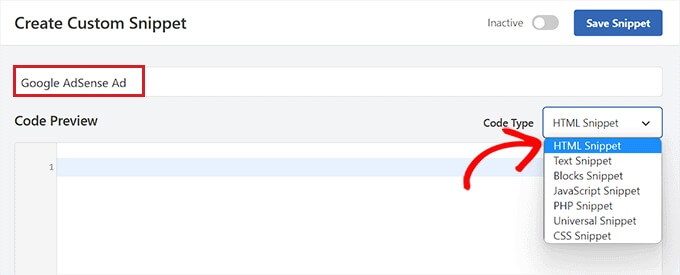
Once you're ready to get started, click on the button that says 'Create Custom Snippet.' This will take you to a new page where you can begin by giving your code snippet a name. Keep in mind that the title you choose is just for your own reference and won't be visible to users when they visit the website.
Next, from the dropdown menu on the right, make sure to select 'HTML Snippet' as the Code Type. This way, you'll be all set to create and share your HTML code snippet with ease.
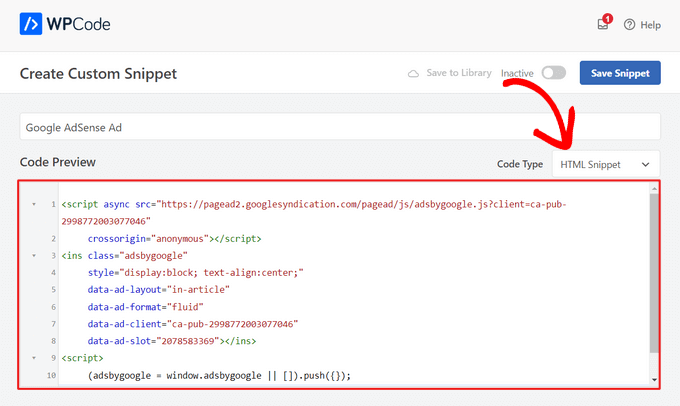
Next up, it's time to decide the type of ad that best suits your website. If you're crafting your own ad, you'll want to either obtain the code from the sponsor or create your own. Once you've acquired the ad code, it's just a matter of copying and pasting it into the 'Code Preview' box.
It's really a matter of tailoring the ad to match the vibe and content of your site. And if you're designing it yourself, it's your chance to infuse your creativity or the message your sponsor wishes to convey. So, once you've got that code in hand, simply slide it into the 'Code Preview' box, and watch the magic unfold!
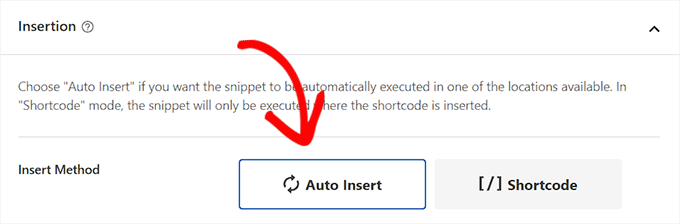
After that, you must scroll down to the 'Insertion' area and select the 'Auto Insert' mode.
The ad will be shown instantly in the post you select.
Then, open the 'Location' dropdown menu and select the 'Page-Specific' tab from the left sidebar.
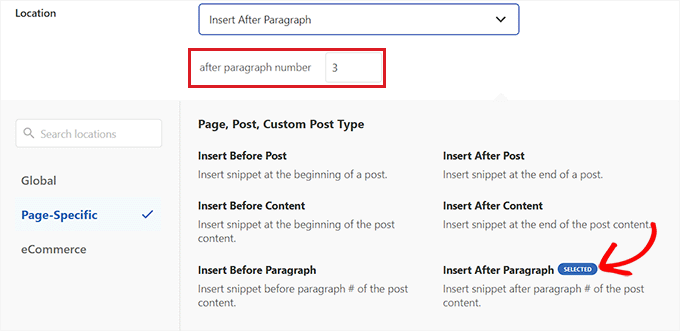
Select 'Insert After Paragraph' from the drop-down menu.
You can also change the number of paragraphs after which the snippet will be included.
For example, if you want the ad block to appear after the third paragraph, enter this value into the 'after paragraph number' field.
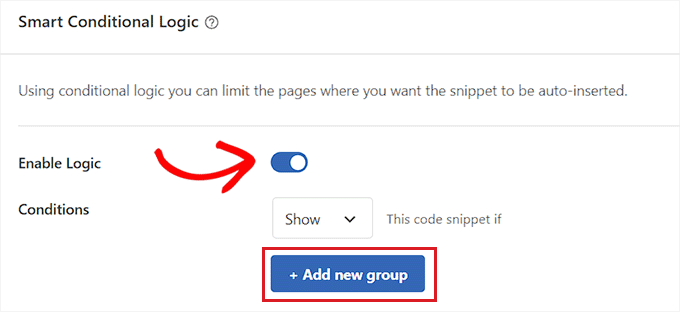
Scroll down to the 'Smart Conditional Logic' area and activate the 'Enable Logic' switch.
Then, for the code snippet condition, ensure that the 'Show' option is selected. After that, simply click the '+ Add new group' option.
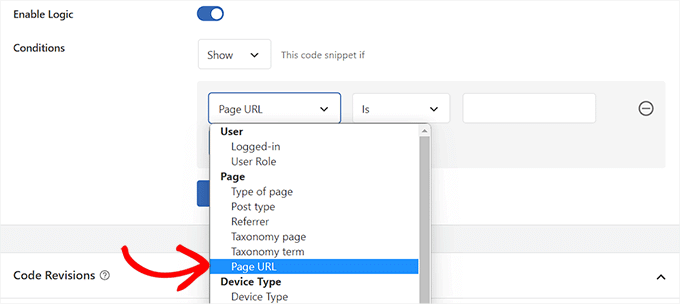
This will reveal new options in the 'Smart Conditional Logic' section.
Select the 'Page URL' option from the dropdown menu on the left from here.
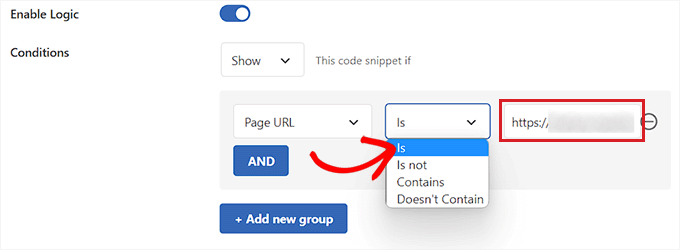
Then, in the middle, select the 'Is' option from the dropdown menu.
Then, in the right-hand corner of the screen, enter the URL of the individual article where you want the ad block to appear.
If you want to show this ad on more than one page or post, simply click 'AND' and then repeat the process with the other post URL.
After you've developed this conditional logic, your ad block will only appear in that particular WordPress article.
Now, navigate back to the top and toggle the ‘Inactive’ switch to ‘Active’.
Finally, click the 'Save Snippet' button to immediately execute the ad code on your website.

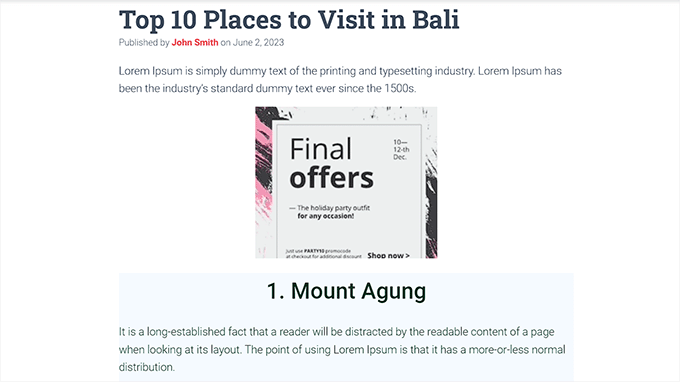
You can now view the ad block in effect by visiting the individual post you selected.
This is how it appeared on our demo website.
AdSanity
If you don't want to use code on your website, this is the method for you.
AdSanity is a premium WordPress ad management plugin that allows you to simply design and display ad blocks on your WordPress site. It is compatible with any third-party advertising network, including Google AdSense.
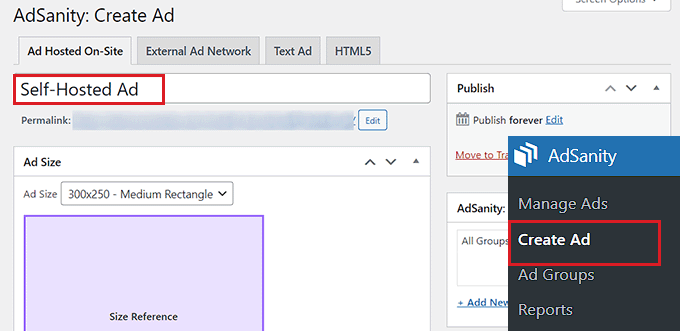
Following activation, navigate to the Adsanity » Create Ad page from the WordPress admin sidebar.
You can begin by entering a name for the ad you are generating.
If you are making your own hosted ad, you must then move to the 'Ad Hosted On-Site' tab at the top.
If you want to display an ad from a third-party platform, go to the 'External Ad Network' option. Similarly, if you want to upload an HTML file for your ad, select the 'HTML5' tab.
We'll be displaying a self-hosted ad in a specific WordPress post for this tutorial, but the methods are the same for other types of advertising.
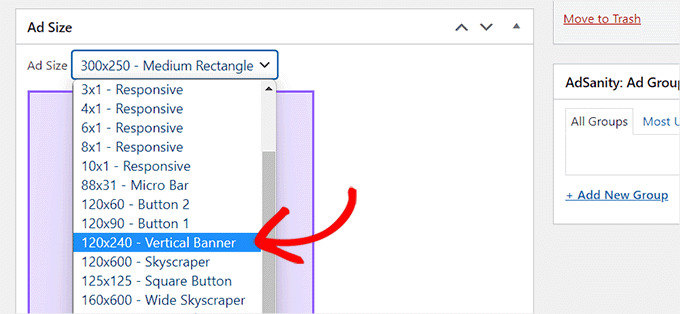
After you've given your ad a name, choose a size from the dropdown menu. This is the size of the ad banner in your post.
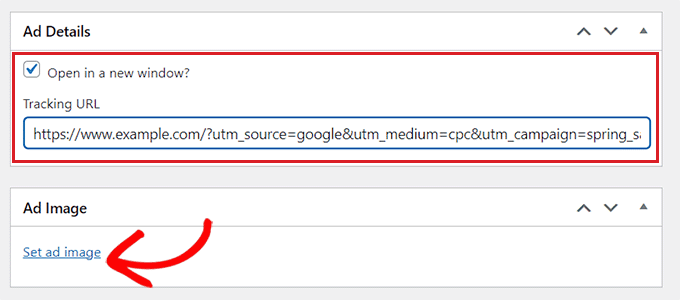
Then, scroll down to the 'Ad Details' box and copy and paste the tracking URL of the ad you wish to display.
After that, check the 'Open in a new window?' box if you want the ad to open in a new window when a user clicks on it.
You can also upload a picture to your ad by clicking the 'Set ad image' button. This will open the WordPress media library and allow you to upload a picture.
Finally, at the top, click the 'Publish' button to preserve your changes.
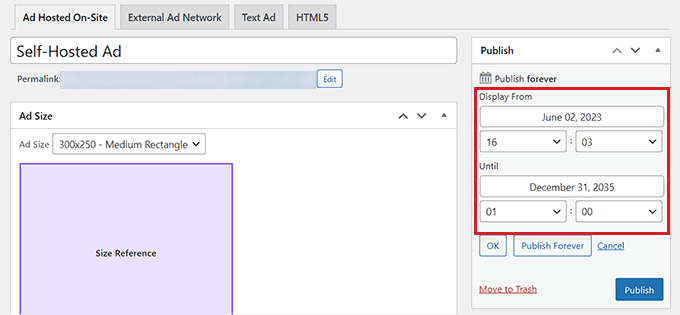
You can also set a start and end date for the ad by clicking the 'Edit' link in the 'Publish' section.
After clicking the 'Publish' button, you may place the ad block on any page or post on your WordPress site.
Wrapping Up
In conclusion, when it comes to displaying ads on various sections of a WordPress webpage, there are multiple options available. Both using WP code and Adsanity can get the job done effectively, but considering ease of use and cost-efficiency, WP code emerges as the preferable choice.
While Adsanity offers its advantages, the free version of WP code stands out as a convenient and budget-friendly option. Its user-friendly interface and compatibility with WordPress make it accessible to virtually anyone looking to incorporate ads seamlessly throughout their website. The simplicity and cost-effectiveness of the free WP code make it a practical and efficient choice for users aiming to manage and display ads effortlessly on their WordPress site.


