
Do you need help setting up an Elementor landing page? Look no further.

To develop beautiful and effective landing pages without writing a single line of code, Elementor provides you with the visual, drag-and-drop editor you need.
But putting all of those things together might be a little daunting, right?
You may have concerns such as:
Create Amazing Websites
With the best free page builder Elementor
Start Now- What should my landing page's content consist of?
- What's the best way to set up Elementor for this?
- What can I do to add an email opt-in form to my site?
All of those questions and more will be answered in this post as we walk you through the process of creating an Elementor landing page step-by-step.
To get things started, let's go through the essential components of every landing page (Elementor or otherwise). With the free Elementor page builder, we'll teach you how to set up everything, including adding an email opt-in form powered by MailPoet.
Design Preview
After finishing this post, you'll be able to construct a design like this.
Elementor Page Builder Key Elements
We're not saying that "your landing page needs all of these features and nothing else" because landing pages are unique to your product or service.
But if we had to pick only four things that every landing page should have, these would be them.
Hero section
The material in your hero section is the most eye-catching and appears above the fold of your website. Your visitors will notice this as soon as they land on your landing page.
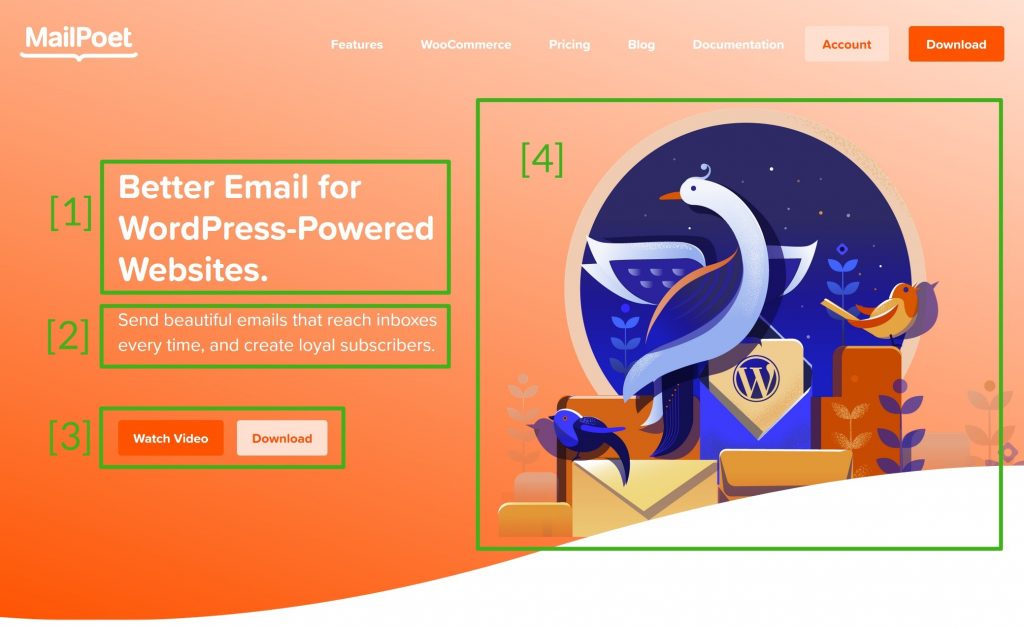
There is no need to overwhelm the reader with a wall of text in a hero section. Instead, most hero portions begin with the following fundamental set-up:
- Headline: The headline is the first thing a potential customer sees and sums up the main value of your product or service in a single sentence.
- Subheading: An effective way to elaborate on the headline while yet keeping it succinct is to use a subheading.
- CTA: What you want visitors to do is called a call to action (CTA). CTAs are typically limited to two per page.
- Media Files: An image, video, or illustration is usually included in addition to the text.
Features/Benefits

After that, you'll have a section for your product's characteristics and benefits. In this section, you'll be able to display the supporting evidence for your hero headline.
About

You will have the opportunity to add a few details about yourself or your business further down the page. As a result, you'll be able to create trust with your audience.
Email Optin
Most landing pages have an email opt-in form at the bottom. It's safe to assume that those who took the time to read the rest of your landing page are interested in what you have to say.

You can keep in touch with them in the future by snatching their email address.
Creative Elements To Make Attractive Landing Page
The four things listed above are not the only ones you should include. As a strong starting point, they're also good places to think about whether or not to include sections for:
- Impressive resume or portfolio.
- Social evidence can be provided in the form of client testimonials.
- Big-name brands you've worked with's logos on this page
- Tables of prices
- Latest Blog Posts
- Calls to action
We'll walk you through the process of setting up your landing pages utilizing these four critical parts in the tutorial below.
However, by the time you're done, you'll have the ability to add additional sections if necessary.
Elementor Landing Page Build Up
Elementor is a great tool for creating landing pages, but now it's time to get down to business.
Besides showing you the procedures, we'll also give you some recommendations on the content and appearance of your landing page.
Canvas Selection
To begin, you'll need to decide on a canvas for your Elementor page.
There are two options available to you at this point. Either you can start with a completely blank slate. You'll begin with a clean slate, free of any remnants of your current WordPress theme. Also, There is no need for a sidebar or container in between your theme's header and footer, so that you have complete control over everything in between.
You should choose the second approach if you want your landing page to smoothly integrate with the rest of your site. However, if you're creating a single page, the first option is the better choice.
Making this choice:
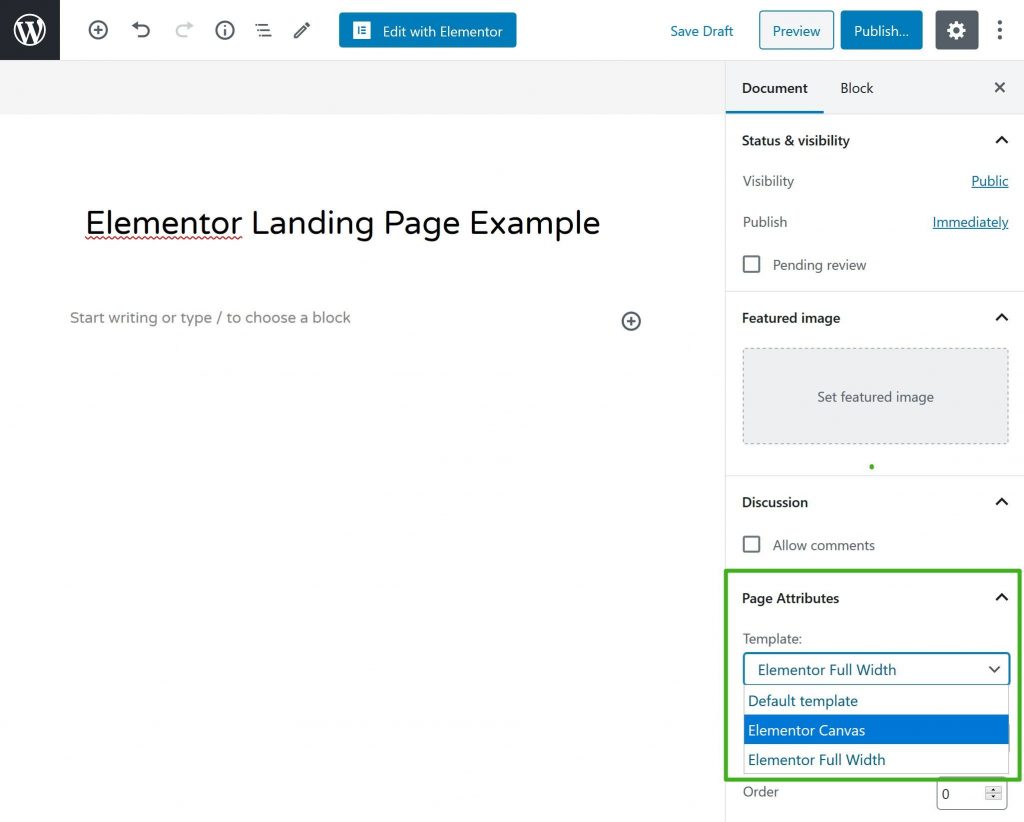
- The landing page should be stored on a standard WordPress page.
- The Document sidebar contains a section titled "Page Attributes".
- Choose your canvas from the Template drop-down menu.
Elementor has two template style.
- Elementor Canvas
- Elementor Full Width
Design Approch
As soon as you have a blank piece of paper, you may begin designing. You can start from scratch and create your complete landing page if you're up for the challenge.
Nevertheless, if this is your first landing page, it can be a bit intimidating to handle everything by hand.
Please take a look at the templates, which can be found by clicking the folder symbol in your browser's toolbar
To see whether you can discover a fully-built landing page template that matches your topic, you can browse the Page templates.
However, the Block templates tab is typically a better alternative. Parts of your landing page's design can be included into a block template. As with legos, you can mix and combine the pieces to create your ideal design.
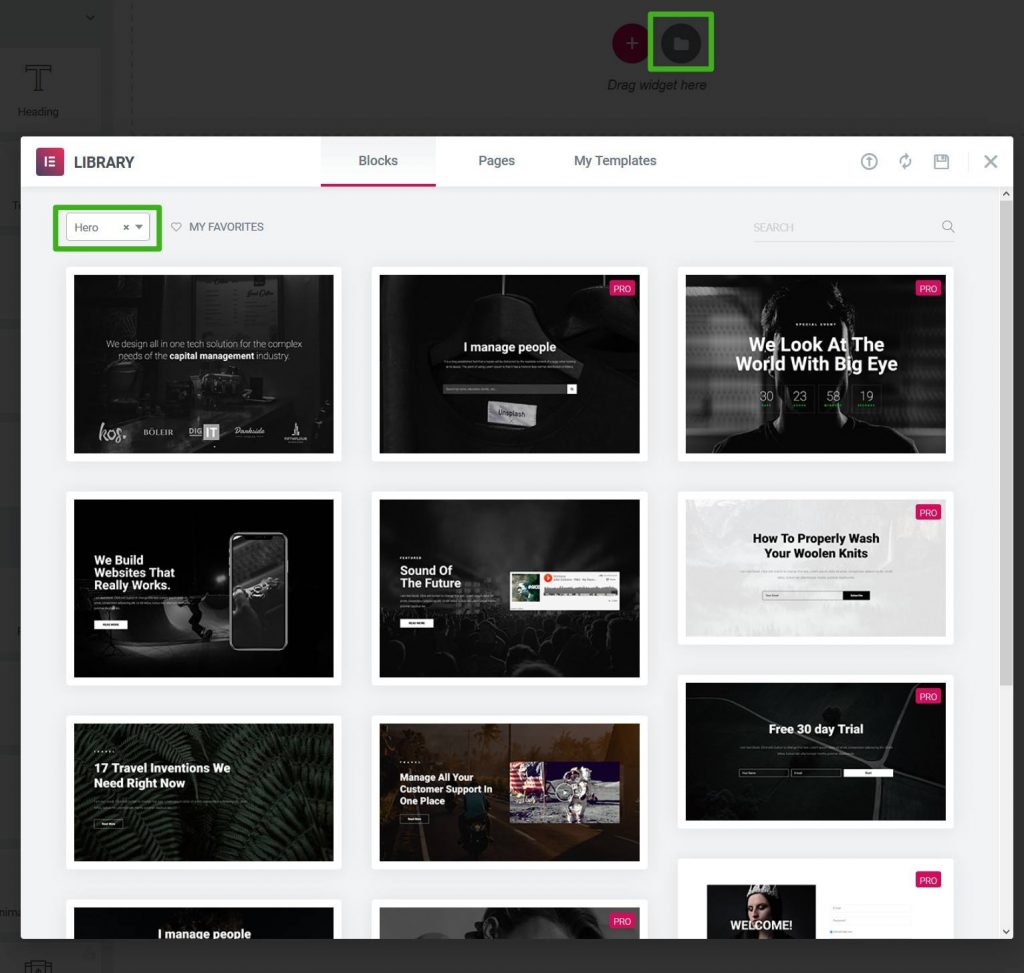
Elementor block templates are niche specified. There are the types of templates available - Hero, Features, About.
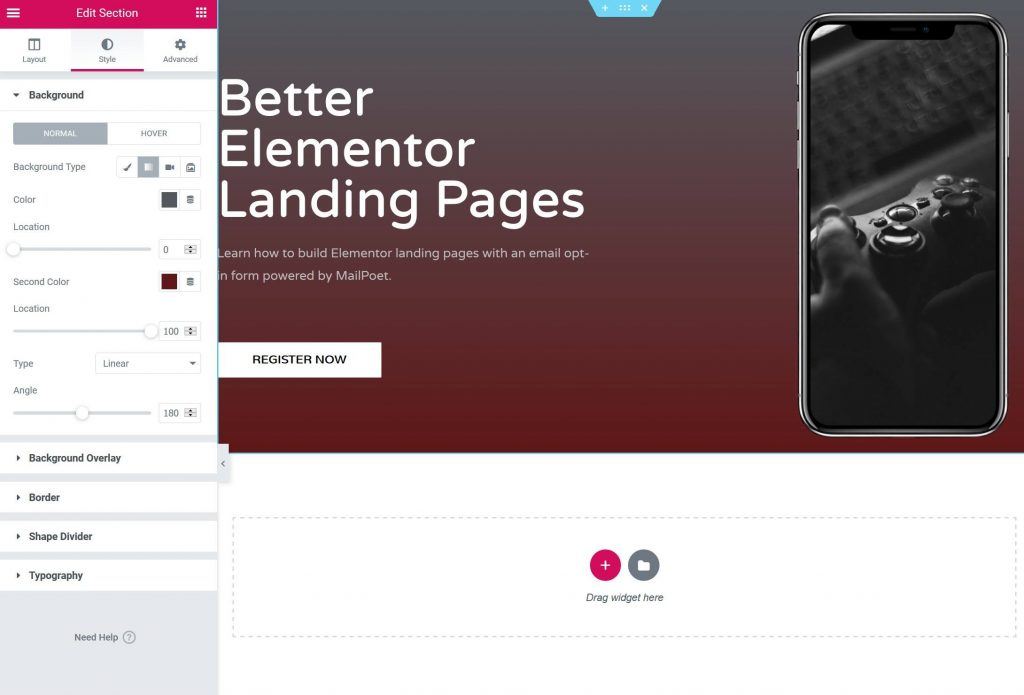
Hero section Design
It's now time to get down to business and build your landing page in the nitty-gritty.
Elementor's default behavior is for each "part" of your landing page to be its own separate section within the editor.
Start by clicking the plus sign (+). As a result, you'll typically design a two-column area for your hero section.
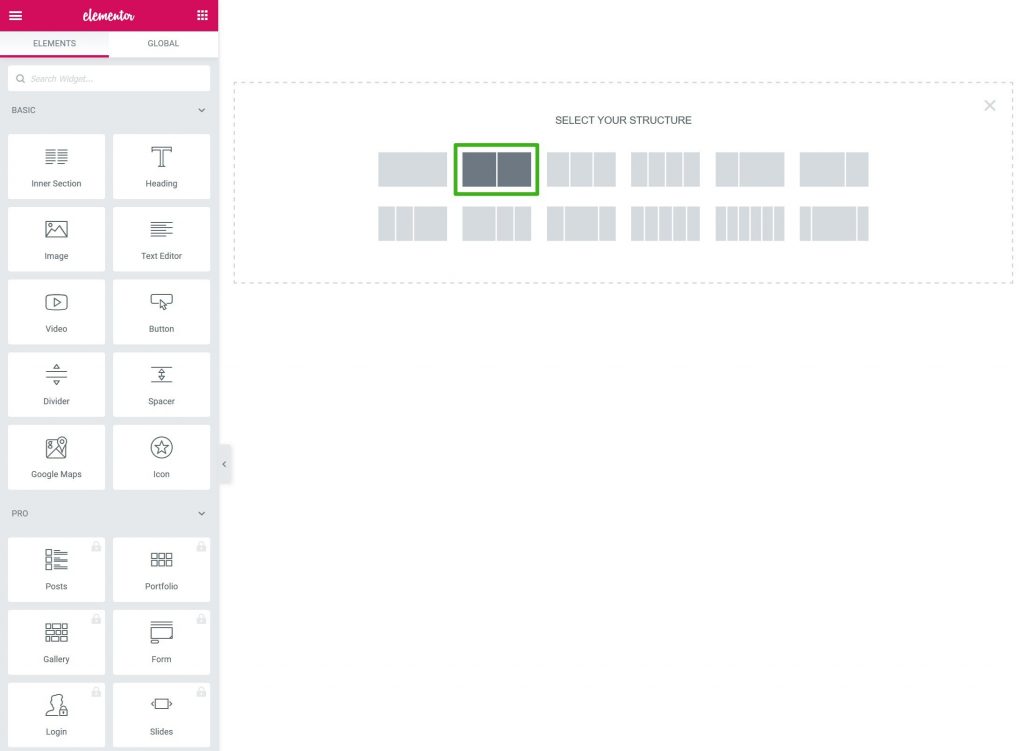
Within the columns, you can then insert content widgets.
You can add: to the left column.
- For your headline, an H1 Heading widget. This should be a one-sentence summary. Describe the heart of what you're selling in this section. "Better Email for WordPress-Powered Websites" is the tagline for MailPoet.
- For your subheading, use an H2 or H3 header widget. Do not go over one or two paragraphs here. You have the option to elaborate on what you've stated in the title. In terms of MailPoet, that translates to "Send beautiful emails that reach inboxes every time, and build loyal subscribers."
- For your call to action, you'll need one or more Button widgets. Using more than one call-to-action button necessitates a brighter primary CTA button.
In the right column, you can then insert an image or video widget.
Section settings can be used in order to provide a background for all of your hero sections.
Design Your Features
Continue on to the section on features and benefits.
Add a new section with three or four columns for a more compact design. As a result, you may utilize the Icon Box widget to list each feature one by one.

It's typical to see landing pages employ this icon box technique.
Create two-column sections for each feature, as shown on the MailPoet homepage, if you want to go into greater depth about each one.
Text on one side, an image on the other. In order to keep things fresh, you can switch which side the text is on.

It's important to keep in mind that features shouldn't be listed in isolation. It's also a good idea to demonstrate the value that each feature provides to your users.
Email Opt-in Form
A tool for collecting email addresses and growing your subscriber list isn't included in the free version of Elementor, but you can get it with the purchase of Elementor Pro.
You may use the free MailPoet plugin to add an email opt-in form to your Elementor landing page.
If you're using Elementor, MailPoet can help you set up an email opt-in, and it can also automate or manually deliver newsletters from your WordPress dashboard.
If you want to get started with MailPoet, you'll need to leave Elementor for a moment and download and install the free plugin. Complete the short setup procedure on the MailPoet tab.
Create an opt-in form for your landing page in MailPoet Forms Add New.
Add new fields by clicking the + symbol. As an example, if you'd like to keep track of visits.
Your form can be configured and styled using the Form settings in the sidebar.

Once you completed this, save the form.
- Go back to the Elementor interface.
- Save your changes.
- Refresh the interface.
To add your email opt-in form to your landing page, simply refresh Elementor and look for the new MailPoet 3 widget.
This new form will be available for selection in the widget's settings. In Elementor, you should now be able to see a live preview of your form.
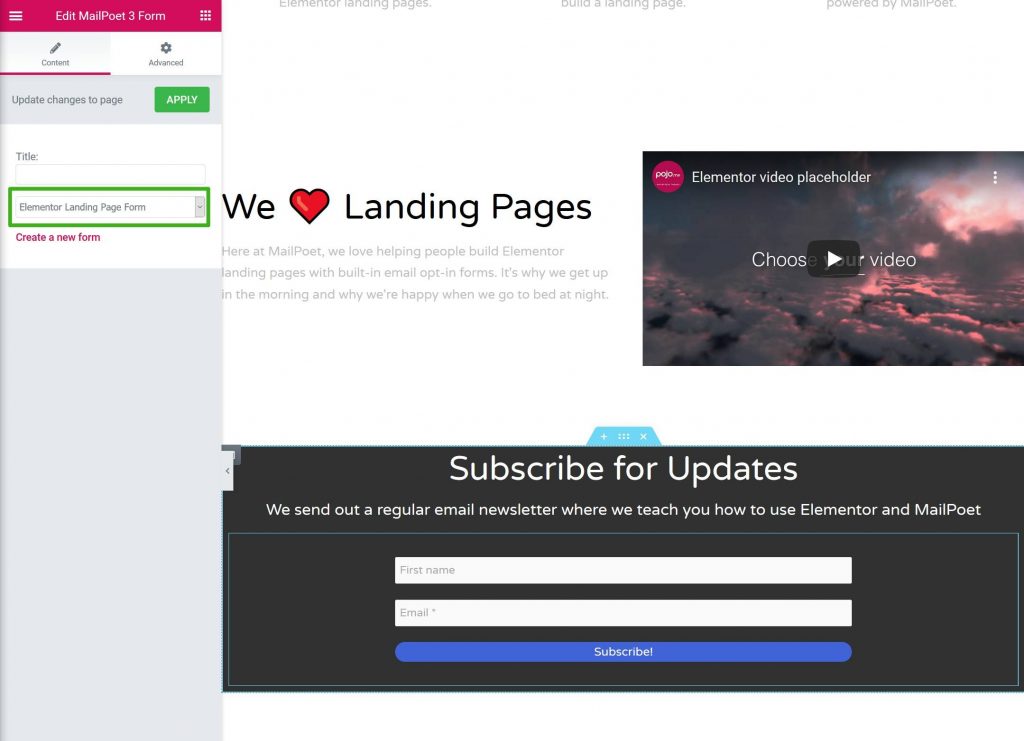
The Advanced tab of the widget's settings allows you to tweak the form's behavior and spacing.
You can also use other Elementor widgets, such as a heading above your form, if you choose.
It's done! Elementor was used to design a landing page.
Build Own Elementor Landing Page!
An appealing and successful WordPress landing page may be created using only the free edition of Elementor.
Everything can be built from the ground up if you so desire. Learn how to use Elementor templates to make the process a lot easier if that's too much for you.
Elementor's block templates are a solid halfway ground. In order to customize the templates, you can use them as a starting point and then add your own information and style.
Adding an email opt-in form to your landing page is not possible with Elementor's free edition.
Elementor with the free MailPoet plugin can be used to grow your email list by creating a landing page that can be used to send emails from your WordPress admin.
Using the dedicated widget in Elementor, you can construct your own bespoke email opt-in form and integrate it directly into your design.


