
With the introduction of the new Checkout widget in Elementor Pro, you can completely personalize your checkout page utilizing Elementor's intuitive visual interface without the need for coding. This widget seamlessly integrates with the Elementor Cart and My Account widgets, empowering you to craft all essential pages for your online store. Discover the step-by-step guide on how to utilize this feature effectively.

Previously, you had to depend on your WooCommerce theme for the checkout page layout. Alternatively, you might have used custom CSS or a third-party WooCommerce checkout plugin.
However, with the introduction of the Checkout widget in Elementor Pro, you can now completely tailor your checkout page using Elementor's intuitive visual interface and without the need for coding. This widget seamlessly integrates with the Elementor Cart and My Account widgets, enabling you to design all the essential pages for your store.
Functionality of the Elementor Pro Checkout Widget
The WooCommerce checkout page serves as the final destination for shoppers to complete their orders, where they input their addresses, contact details, billing information, and other necessary details.
Create Amazing Websites
With the best free page builder Elementor
Start NowThis page holds significant importance for any online store, requiring optimization for enhanced conversions and user-friendliness.
With the Elementor Checkout widget, you gain the ability to personalize your store's checkout page directly through Elementor. This feature facilitates the creation of a cohesive design that aligns with the overall aesthetics of your store while fine-tuning crucial elements on the page.
You have the freedom to modify colors and typography, adjust spacing, alter section and form text, and more. Whether implementing changes across the entire checkout process or focusing on specific areas, you can seamlessly tailor the design to your preferences without the need for coding.
For instance, if you wish to emphasize the coupon field, you can incorporate distinct colors, borders, and other visual cues effortlessly, all achieved without writing a single line of code.
Customize the WooCommerce Checkout Page With Elementor
Next, we'll transition to a comprehensive tutorial on utilizing the Checkout widget within Elementor Pro to personalize your online store's checkout page.
Alternatively, if you prefer a visual guide, you can find a video tutorial above. Both tutorials cover identical information.
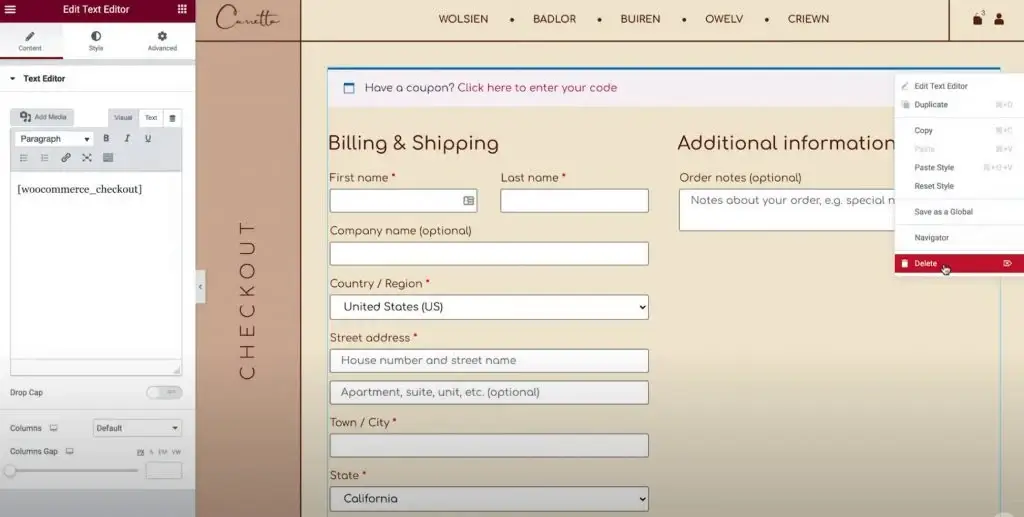
Edit Default Cart Page in Elementor
When creating a WooCommerce store, WooCommerce automatically generates a checkout page using the WooCommerce checkout shortcode.
In this guide, you'll utilize this page for simplicity, but instead of relying on the WooCommerce shortcode, you'll customize the page using Elementor and integrate the Checkout widget.
To begin, navigate to the Pages list in your WordPress dashboard and locate the checkout page, which WooCommerce automatically designates with an identifier labeled “Checkout Page”.
Once you've identified the correct page, click the Edit button to access the WordPress editor.
Within the editor, click the Edit With Elementor button to activate Elementor for this page and launch its editor interface.
Replace WooCommerce Shortcode With Elementor Widget
When creating a WooCommerce store, WooCommerce automatically generates a checkout page using the WooCommerce checkout shortcode.
In this guide, you'll utilize this page for simplicity, but instead of relying on the WooCommerce shortcode, you'll customize the page using Elementor and integrate the Checkout widget.
To begin, navigate to the Pages list in your WordPress dashboard and locate the checkout page, which WooCommerce automatically designates with an identifier labeled “Checkout Page”.
Once you've identified the correct page, click the Edit button to access the WordPress editor.
Within the editor, click the Edit With Elementor button to activate Elementor for this page and launch its editor interface.
Customize Checkout Page
To begin, access the Checkout widget settings in the Elementor sidebar.
First, let's review all the settings in the widget's Content tab.
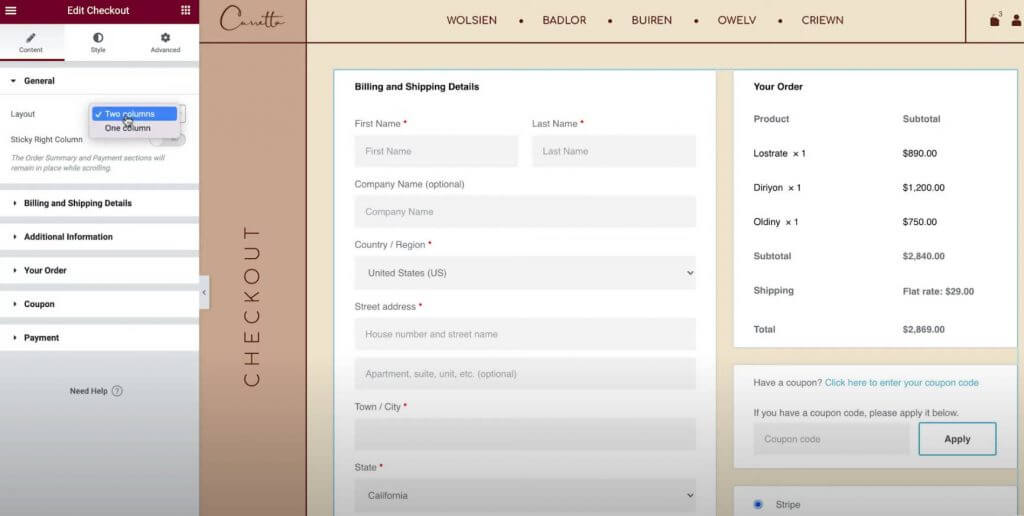
General
Choose between a One-Column or Two-Column Layout
Initially, utilize the General settings section to opt for either a one-column or two-column layout for your checkout page.
If you select a two-column layout, you can also make the right column sticky. Enabling the sticky right column provides an additional option to incorporate an offset, preventing your header from overlapping with the column.
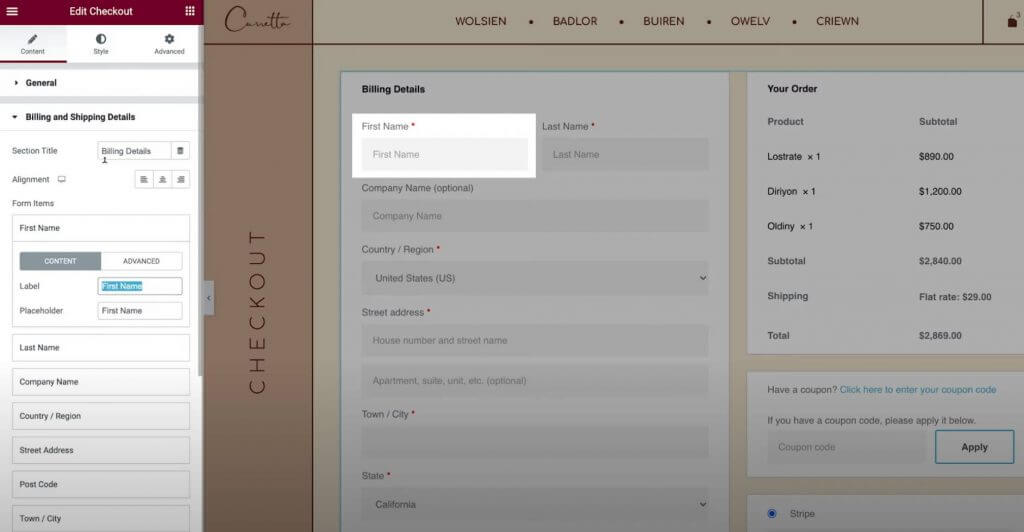
Billing and Shipping
Customize the billing and shipping form details using the Billing and Shipping Details section.
When you configure WooCommerce’s settings to have identical billing and shipping details, these fields will appear together. Enable this feature by navigating to WooCommerce → Settings → Shipping and selecting "Force shipping to the customer billing address." Alternatively, if the details differ, you will encounter separate fields.
Initially, specify the section title and alignment.
Subsequently, access the settings for each specific field to personalize labels and placeholders.
Additional Information
The Additional Information section provides customization options for this segment of the checkout page. By default, shoppers can utilize this space to leave special order notes, though the specifics may vary based on your store's configuration.
Similar to the other parts of your checkout page, you can adjust the alignment and labels within this section to suit your preferences.
Alternatively, you have the choice to conceal this section from the checkout page, which could be beneficial if shoppers do not require a space for custom notes.
Order
The settings in Your Order allow you to tailor the order summary section during checkout. When employing a two-column format, this section will be positioned at the beginning of the right-hand column. However, in a one-column layout, it will be situated beneath the billing and shipping details.
Coupon
The Coupon settings offer customization options for both the coupon section title and alignment. Additionally, you have the choice to personalize the link text used for applying the coupon code. This feature enables you to enhance the shopping experience by making it more optimized and user-friendly for customers applying coupons.
Payment
The Payment settings offer options to adjust the positioning of the purchase button and personalize the message and link text for terms and conditions.
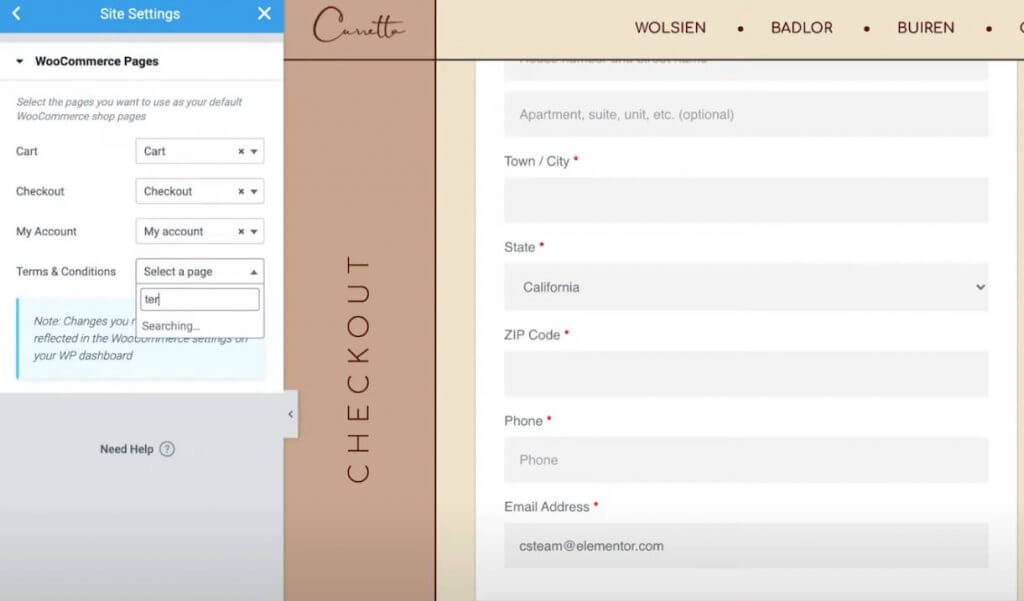
To view the terms and conditions message, ensure you have designated the terms and conditions page in your WooCommerce settings. You can easily do this without exiting Elementor:
- Click on the hamburger menu icon located in the top-left corner of the Elementor interface.
- Choose Site Settings.
- Navigate to WooCommerce.
- Utilize the Terms & Conditions field to search for and designate the appropriate page for your terms and conditions.
Returning Customer
Enabling guest checkout in WooCommerce's settings will grant access to an extra settings section named "Returning Customer." Within this section, you can personalize the message encouraging returning customers to sign in to their existing accounts.
Customize Checkout Style Settings
Afterward, proceed to the Style tab within the Checkout widget's settings to refine the appearance and layout of the checkout page, ensuring it harmonizes with your store's overall design.
Here are the various design options available for customization across different sections of your settings:
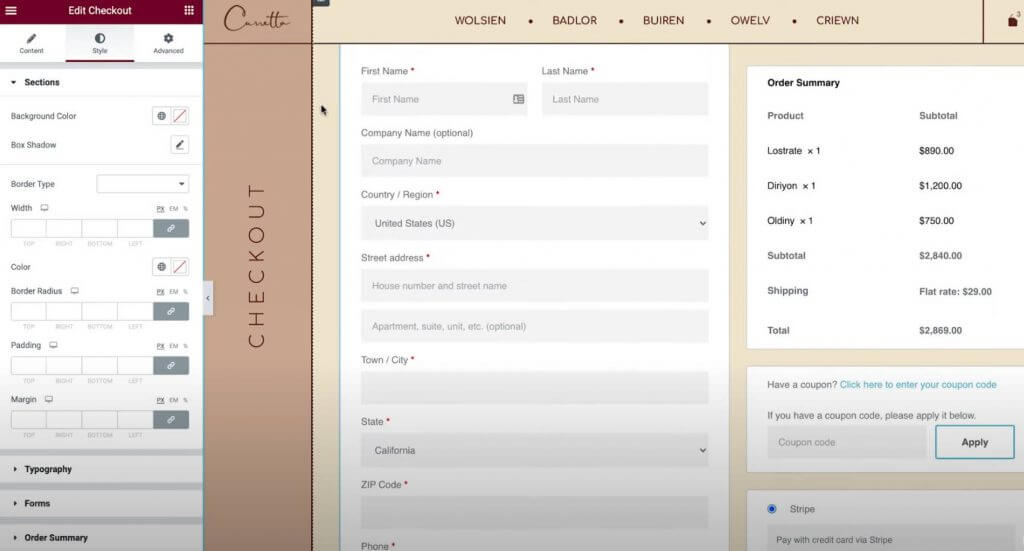
Sections
Within the Sections settings, you can modify the overall style encompassing all segments of the checkout process. Adjusting parameters such as background color, borders, and spacing will uniformly affect all sections.
Typography
In the Typography settings, you can personalize the colors and typography of most textual elements on your checkout page. This includes titles, secondary titles, descriptions, messages, radio buttons, checkboxes, and more. However, customization of form typography is reserved for the next section.
Forms
Under the Forms settings, you have control over every aspect related to forms and form fields on your checkout page. This primarily influences billing/shipping fields and the coupon form. You can fine-tune attributes like column and row gaps, typography of labels and fields, as well as spacing, borders, and backgrounds. Additionally, you can style the coupon button akin to other buttons on your website.
Order Summary
Within the Order Summary settings, you can manage row spacing within the list of items in a shopper’s cart. Furthermore, you can customize the colors and typography of various summary items. For instance, you could apply distinct typography settings for items versus order totals.
Purchase Button
In the Purchase Button settings, you can extensively tailor the purchase button, including typography, colors, spacing, and borders. Given its significance as the primary action button on the checkout page, ensuring it is eye-catching and aligns with your overall design is crucial.
Customize
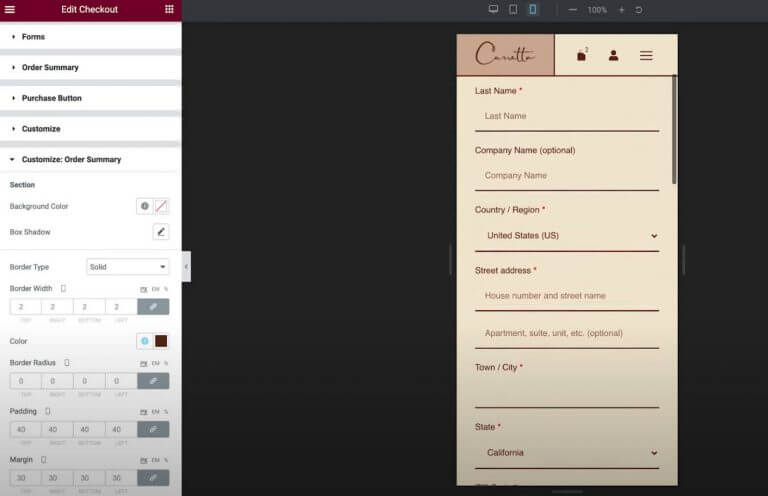
Lastly, the Customize feature allows for individual styling controls for specific sections of your checkout page, including Billing Details, Additional Information, Shipping Address, Order Summary, Coupon, and Payment.
For example, suppose you wish to highlight the order summary. In that case, you can enable customization settings for that area and configure them according to your preferences, such as adding a custom border.

Optimize For Mobile
After completing your customization of the desktop checkout page, it's time to transition to responsive mode to ensure compatibility with mobile and tablet users.
Just like all your designs made with Elementor, your checkout page design automatically adjusts for different screen sizes. However, you can fine-tune the design for mobile devices using Elementor's mobile controls. Look for the device icon next to settings that can be tailored for various devices.
For instance, you may need to tweak element spacing slightly for the mobile layout.
Test Your WooCommerce Checkout Page
Before implementing any changes to your checkout page, we highly advise conducting thorough testing to ensure smooth functionality. Remember, any disruptions to your store's checkout process can directly impact your profits.
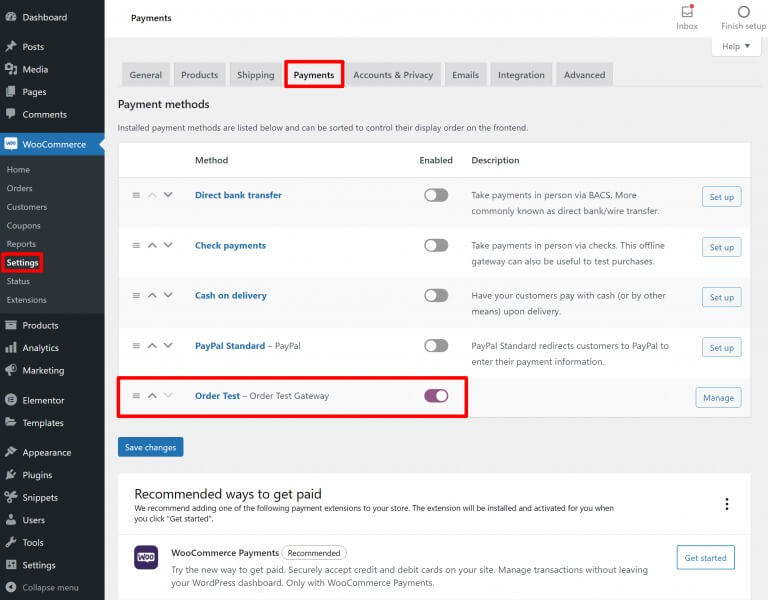
Numerous WooCommerce payment methods offer test modes for order submissions. This functionality is available in both the official Stripe and PayPal gateway plugins, as well as WooCommerce Payments. You can access detailed documentation for each gateway's test features through the provided links.
Alternatively, you can utilize the WC Order Test plugin, which introduces an "Order Test" payment gateway. Simply navigate to WooCommerce → Settings → Payments to configure this gateway.
Wrapping Up
Utilizing the Checkout widget within Elementor Pro empowers you to seamlessly tailor the WooCommerce checkout page with Elementor's intuitive visual interface and drag-and-drop functionality.
For the majority, Elementor serves as a comprehensive tool, offering customization options for colors, typography, text, spacing, borders, and more.
Should you desire additional enhancements and wish to incorporate new elements into your checkout page, you can leverage WooCommerce's native action hooks, fully compatible with Elementor's Checkout widget.
Furthermore, Elementor extends beyond merely customizing the checkout page, providing limitless possibilities for customization.


