
A website's header usually consists of a logo, the site's title, a navigation menu, and frequently some more components as well. Your theme determines the layout of these pieces and is responsible for their presentation.

If you want to personalize the header of the website, this tutorial will show you how to make use of the Site Editor. Your website has to be using a theme that is compatible with the Site Editor in order for you to be able to reorder the elements of your header using the manner that is detailed in this article.
Edit Header Template
To change how your header looks, you will need to change the Header template part. If you change this part of the template only once, the changes will show up on every page of your site. Follow these steps to get to the part of the template called "Header." First, go to the dashboard of your site and click on Appearance > Editor. On the left side of the screen, click on Template Parts. Now. click Edit, then click Header. On the next screen, you can change how the different parts of your site's header look.
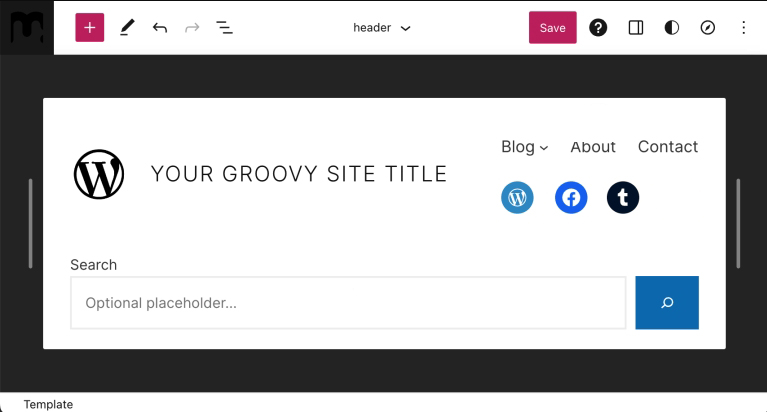
Various elements may appear in your pre-defined header depending on your theme. This document will walk you through the process of adding and customizing all of the different elements of your header.
Create Amazing Websites
With the best free page builder Elementor
Start NowAdding Elements To Header
You can include a variety of elements in your header. The following are the most common: a logo, menu, search bar, and social menu.
Site Logo
To include a logo in your header:
- Click the + Block Inserter button while in the Header template section.
- Locate the Site Logo block.
- Insert it by clicking the Site Logo block.
- Use the block to upload your logo image.
After you've added the Site Logo, you can adjust its position in relation to the other header elements by using the left and right navigation arrows.
Finally, you can resize it by moving the selection points in and out until the desired size is reached.
When you're finished, click Save, then Save Again, making sure the Header template part's checkbox is checked.
Learn more about how to use the Site Logo block. You'll learn how to reposition an image, change its alignment, crop it, apply a filter, replace it, apply different styles, and more.
Site Menu
To include a menu in your Header:
- Click the + Block Inserter button in the Header template section.
- Find the Navigation block.
- Insert it by clicking the Navigation block icon.
After you've added the Navigation block to your header, you can customize it by following our detailed guide on how to use the Navigation block. You'll learn how to insert a navigation block, add links, create submenus, and change link settings, among other things.
When the menu is complete, use the left and right arrows to reposition it.
When you're finished, make sure to click Save, then Save Again, and make sure the Header template part's checkbox is checked.
Search Bar
To include a search bar in your header:
- Click the + Block Inserter button while in the Header template section.
- Look for the Search block.
- Insert it by clicking on it.
After you've added the Search block, you can adjust its position in relation to the other header elements by using the left and right navigation arrows.
Finally, you can resize it by dragging the selection points in and out until the desired size is reached.
When you're finished, make sure to click Save, then Save Again, and make sure the Header template part's checkbox is checked.
Learn more about how to use the Search block. You'll learn how to add the block, change the button text, change the font and colors used on your button, change the block's width, toggle the button or change its position, change the block's alignment, and more.
Social Icons
To include social icons in your header:
- Click the + Block Inserter button in the Header template section.
- Look for the Social Icons section.
- Insert it by clicking on it.
You can begin adding social profiles after you've added the block. To accomplish this:
- Click the + Block Inserter button and enter the name of the social platform to which you want to add it. To add an item to your social icons, click on it.
- To add your profile link, click on the icon once more. Copy and paste the URL of your social profile, then click the arrow to confirm.
- If the next + button does not appear immediately after clicking the List View, click Social Icons on the left to reveal the + button and continue adding new icons.
- Repeat steps 2 and 3 as needed to add all of your social media profiles.
Once you've added all of your icons, you can select the block by clicking the Social Icons block in the List View. Then, you can use the left and right arrows to change where the block is in relation to the other menu items.
When you're done, make sure to click Save, then Save again, and make sure the checkbox for the Header template part is checked.
Wrapping Up
Now without the help of any third-party plugin, you can easily change your header following this tutorial. However, as the header is a very important part of a website and you have options to go beyond imagination, we suggest you use Elementor or Divi - both of these are capable of professional-grade website building. So, if you want to push the limit and want to take your WordPress development to a further level, we strongly recommend these plugins.


