
The world of artificial intelligence (AI) has witnessed remarkable advancements in recent years, and image-generative AI has emerged as one of the most captivating and rapidly evolving fields. This cutting-edge technology empowers us to create stunning, realistic images from mere text descriptions, opening up a realm of limitless creative possibilities.

Image-generative AI models leverage deep learning algorithms and vast amounts of training data to learn and understand the intricate patterns and relationships between text and visual representations. By providing a simple textual prompt, these models can synthesize entirely new images that remarkably align with the given description, capturing intricate details, styles, and compositions.
What Is Amazon Sagemaker?

Amazon SageMaker, a fully-managed machine learning service from AWS, simplifies the end-to-end machine learning workflow, enabling quick and efficient model building, training, and deployment. It abstracts complex infrastructure tasks, allowing developers and data scientists to focus on their core objectives and accelerate time-to-market.
SageMaker offers a wide range of built-in algorithms, pre-trained models, and support for custom models, ensuring flexibility and access to the latest advancements, including image generative AI models. Its user-friendly interface, SageMaker Studio, provides an integrated development environment for seamless coding, testing, and deployment, enhancing collaboration and streamlining the development process.
Create Amazing Websites
With the best free page builder Elementor
Start NowSeamless integration with AWS services like Amazon S3, EC2, and SageMaker Ground Truth allows users to utilize the AWS ecosystem for a smooth machine-learning experience fully. Advanced features like automatic model tuning, distributed training, and built-in deployment, along with robust monitoring and logging tools, optimize model performance and scalability. SageMaker helps organizations expedite their machine learning projects, reduce operational overhead, and deliver innovative AI solutions.
Getting Started With Amazon Sagemaker
Launching Amazon SageMaker Studio from the console is a straightforward process that allows you to access a fully integrated development environment for machine learning. Follow these steps to get started:
- Open the Amazon SageMaker Console
- In the left navigation pane, locate and select the "Studio" option.
- On the Studio landing page, you will see a list of available domains and user profiles. Select the appropriate domain and user profile you want to use to launch Studio.
- After selecting the domain and user profile, click on the "Open Studio" button.
- To finalize the launch, choose "Launch personal Studio."
By following these steps, you'll be able to quickly access Amazon SageMaker Studio and begin leveraging its powerful features for your machine learning projects.
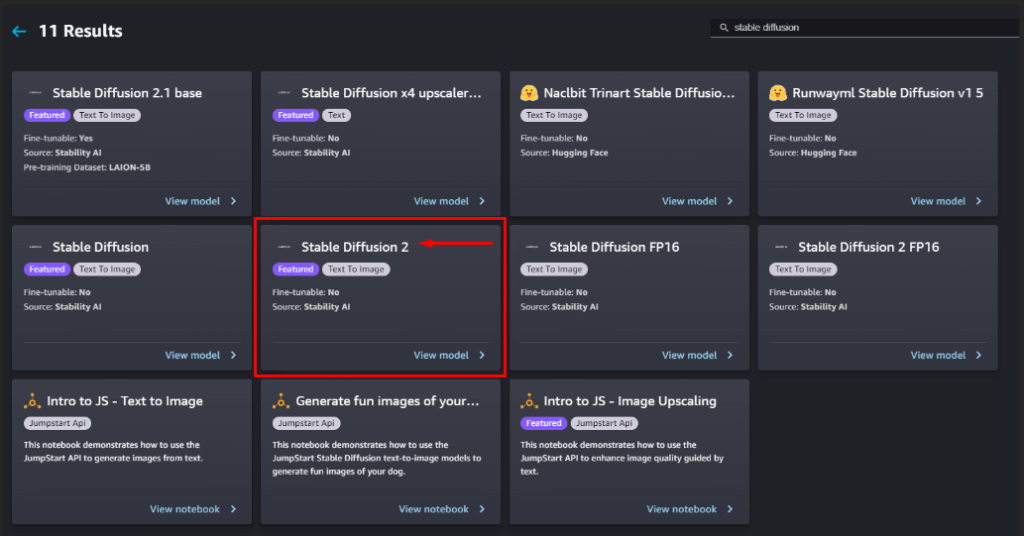
Choose a JumpStart
The Stable Diffusion 2 model allows us to create images from a simple line of text, making it ideal for generating content such as social media posts, promotional materials, album covers, and other creative artwork.
To use this model, from the JumpStart, search for "Stable Diffusion 2," and select it.
Then, in the "Deploy Model" section, click to expand the "Deployment Configuration."
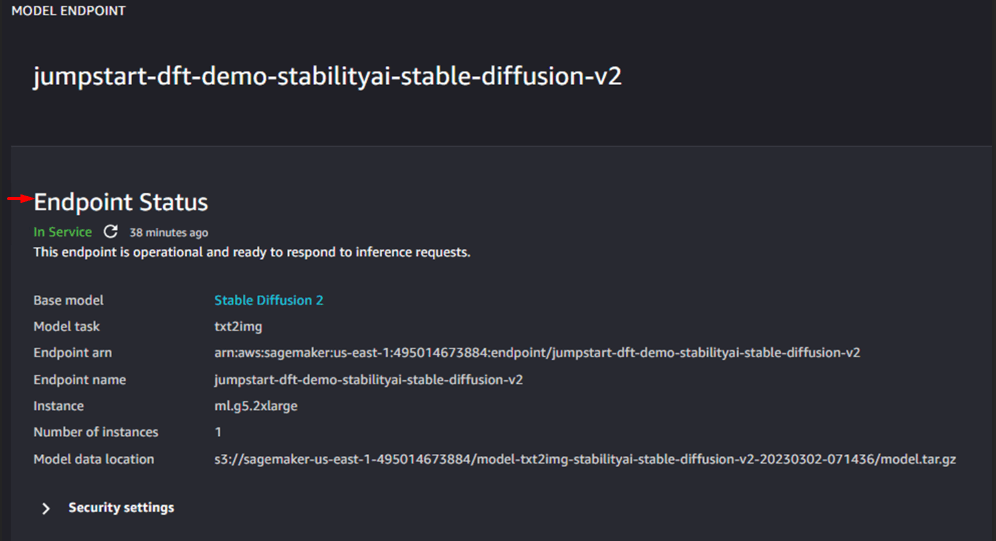
For the SageMaker hosting instance, choose your desired instance type. For this example, we are using ml.g5.2xlarge.
In the "Endpoint name" field, type demo-stabilityai-stable-diffusion-v2.
Click the "Deploy" button to start the deployment process.
Please note that deploying larger models can take some time. In this case, it may take up to 25 minutes. Once the deployment is complete, the endpoint status will update to "In Service."
Select "Open Notebook" to access a Jupyter notebook with Python code.
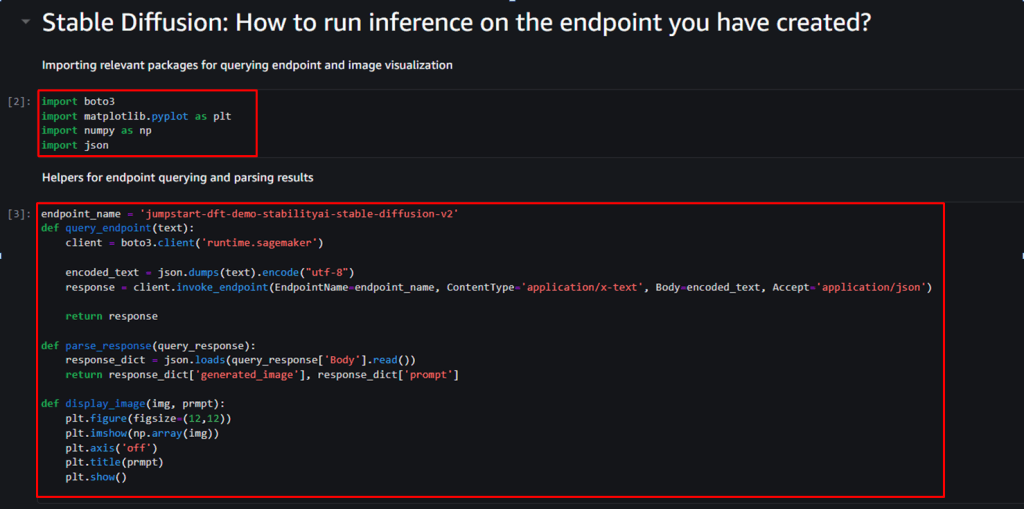
Here is the code for box notified as 2.
import boto3
import matplotlib.pyplot as plt
import numpy as np
import json
And here is for box 3.
endpoint_name = 'jumpstart-dft-demo-stabilityai-stable-diffusion-v2'
def query-endpoint(text):
	client = boto3.client('runtime.sagemaker')

    encoded_text = json.dumps(text).encode("utf-8")
    response = client.invoke_endpoint(EndpointName=endpoint_name, ContentType='application/x-text', Body=encoded-text, Accept='application/json')

    return response

def parse-response(query_response):
	response_dict = json.loads(query_response['Body'].read())
    return response_dict['generated_image'], response-dict['prompt']

def display-image(img,prmpt):
	plt.figure(figsize=(12,12))
    plt.imshow(np.array(img))
    plt.axis('off')
    plt.title(prmpt)
    plt.show()
Now, to initiate the process, run the first two box.
On the third box, enter the prompt and run the block.

Now you need to wait for one minute or a half to see the result.

If you want, there are a lot of advanced options to play with. And the best part is - it generates a brand-new picture every time.
Remember to delete your endpoint after use. Since we're using the ml.g5.2xlarge instance, it incurs higher charges, around $1 per hour at the time of writing.
Wrapping Up
By harnessing the capabilities of Amazon SageMaker, you can unlock the boundless potential of image generative AI, fueling your creativity and revolutionizing the way you approach visual content creation. Whether you are an artist seeking new avenues for expression, a marketer in need of compelling visuals, or a product designer exploring virtual prototyping, this technology offers a wealth of opportunities.


