
WordPress is the most popular website platform out there and it accounts for around 40% of the websites on the internet. All of this keeps the platform on the radar of hackers.

This is why it is beneficial to have a custom login URL in order to keep your WordPress site much secure. In this tutorial, we will understand how to create a custom login page URL for WordPress.
Why Should You Create Custom Login URL
Being the most famous CMS platform, WordPress sites are always on the verge of being hit by hackers and brute force attacks to log in to your WordPress dashboard.
The default WordPress login URLs such as wp-admin or wp-login are common and easily traceable and hackers use these URLs to get your WordPress dashboard. This is why changing the login URL of your website helps at large in improving your website's security.
Create Amazing Websites
With the best free page builder Elementor
Start NowBesides, a branding element and personalized design of your login page and URL go at lengths in improving the user experience. Let's move ahead and see how easy it is to create a custom login page URL.
How To Create A Custom Login Page and URL
We understand that not everybody is equipped with high-end coding knowledge and this is why the easiest way to create a custom login page with a custom URL is by using SeedProd.
SeedProd is one of the best page builders out there holding the trust of over a million users. The plugin's drag and drop builder allows you to be creative without having backup coding knowledge.
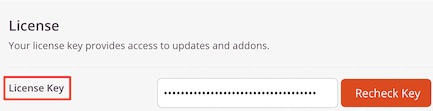
After you have installed and activated the SeedProd plugin, you will need to enter your Product License Key.
Head over to SeedProd and then Pages and then select Set up a Login Page.
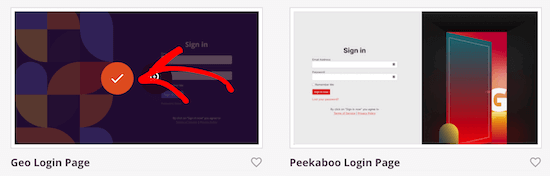
You will be directed to the templates library where you can choose a ready-made template or create a new design from scratch on a blank template.
Just go for the template and press the checkmark.
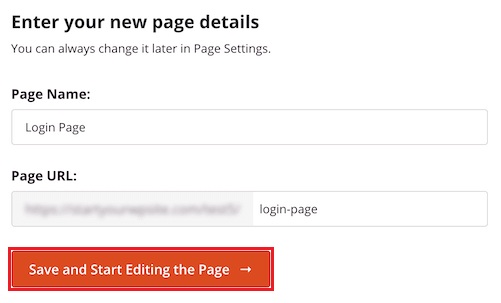
Next, you will be asked to enter a custom login URL and a name for the template. Then press the Save and Start Editing the Page.
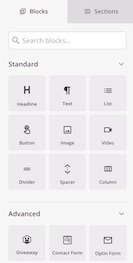
You will be directed to the customization page, where using the drag-drop builder you can edit the template.
Once you are done with all your customizations, you can go ahead and Publish the page and move further.

Next, you need to change the page URL to the custom login URL. Head over to the page settings at the top and scroll down to enable Redirect the Default Login Page.

Now the default WordPress login page will be redirected to the newly created page with a custom login URL. Make sure to save all the settings.
How To Change WordPress Login URL For Free
However, SeedProd is the best option to go with when you want to create a custom login page URL for WordPress but if you want to go with the default WordPress page while just changing the URL you can do that for free using the WPS Hide Login plugin.
WPS Hide Login is a free-to-use lightweight plugin that lets you create a custom login URL without customizing the page.
Once you have installed and activated the plugin, go over to Settings and then WPS Hide Login.
In the Login URL field, add your new login age URL. You can also add the URL for a redirection page in the Redirection URL box.
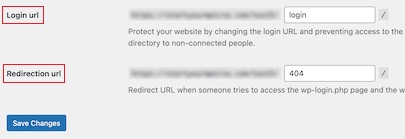
After you are done with you settings, save all the changes and all your visitors will be redirected to a new login page.
This is how you can add a custom login URL on WordPress. We hope this tutorial will help you make your website more secure. Make sure to join us on our Facebook and Twitter to never miss out on our tutorials.


