
Cron is a utility commonly employed in Unix/Linux systems to schedule commands or scripts on a web server that operates in the background. A cron job refers to a specific task scheduled to run at predetermined fixed times, dates, or intervals. Such tasks are often repetitive and automated to enhance efficiency. In the case of WordPress, the WP-Cron function is utilized to emulate a system cron.
Instances of WordPress cron jobs may include scheduling the publication of a post or running a backup plugin on a predefined timetable. The focus of this discussion is to provide comprehensive guidance on effortlessly creating, modifying, and executing a WordPress cron job.
How To Set up a Cron Job In WordPress
It is worth noting that WP-Cron differs slightly from a system cron, and each has its own advantages and disadvantages. WP-Cron relies solely on intervals, while a system cron relies on specific times. Furthermore, WP-Cron functions only when the page is loaded, whether it's the back-end or front-end, which may result in less reliability. The default intervals provided by WordPress include hourly, twice-daily, and daily schedules.
To schedule WP-Cron events, it is necessary to create custom hooks. We highly recommend consulting the official WordPress plugin handbook, which offers an excellent guide on scheduling WP-Cron events. If you are seeking an alternative method for configuring a system cron within WordPress, we suggest referring to Tom Mcfarlin’s article on defining a WordPress cron job. Additionally, for those who may be less experienced, we will explore an easy way to utilize WP-Cron in conjunction with the popular free WP Crontrol plugin. This plugin allows you to monitor and manage the activities within the WP-Cron system.
Create Amazing Websites
With the best free page builder Elementor
Start Now
WP Crontrol boasts an impressive number of active installations exceeding 200,000, coupled with an exceptional rating of 4.5 out of 5. Within the WordPress community, this plugin has garnered significant admiration.
This plugin offers remarkable utility by providing a comprehensive overview of the CRON jobs that are scheduled to run. It serves as an excellent initial step toward comprehending the underlying processes and determining their operational status. Such merits have led to a unanimous rating of 5 stars. Additionally, the ability to create new cron jobs and initiate the execution of existing ones further enhances its value, warranting an additional 5-star rating, as affirmed by Josh, the creator of Caldera Forms.
To acquire this plugin, one can either download it directly from the WordPress repository or locate it within the WordPress dashboard under the "Add New" plugins section. The noteworthy features of WP Control encompass:
- A comprehensive display of all cron events, including their respective arguments, recurrence patterns, and forthcoming execution times.
- The capability to modify, remove, or immediately initiate any cron events.
- The provision to introduce new cron events.
- The option to add, modify, and remove custom cron schedules.
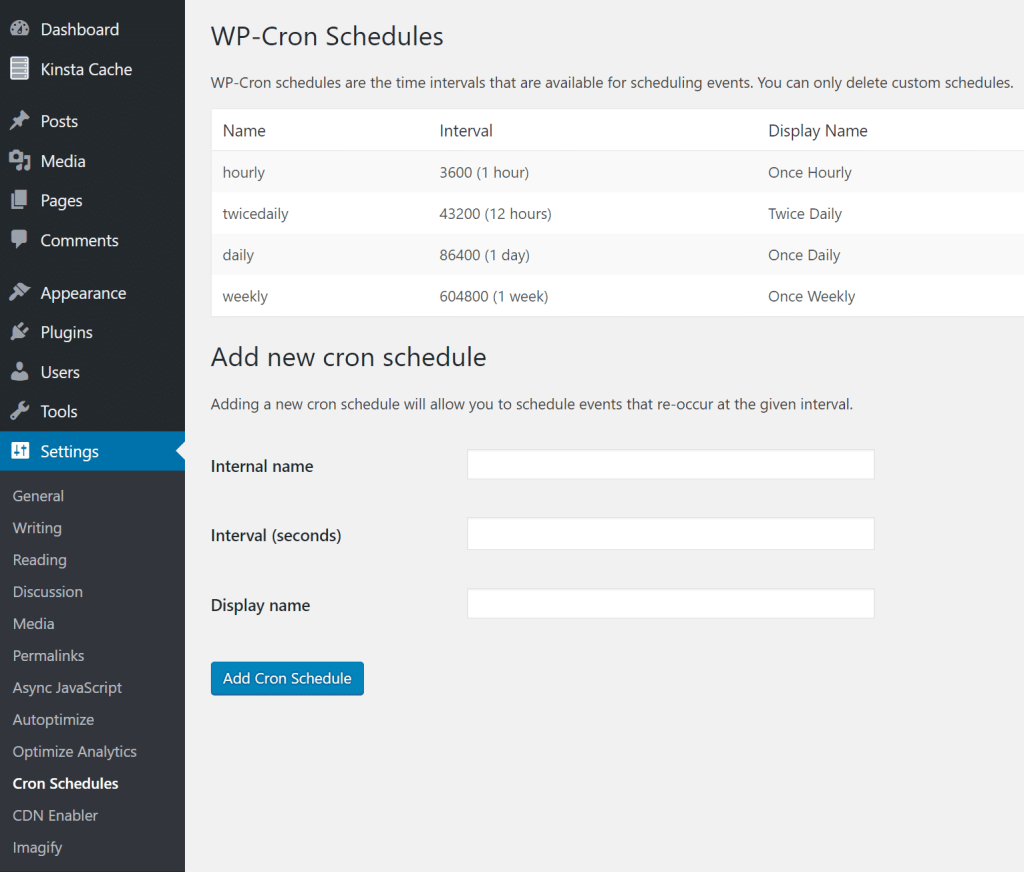
WP-Cron Schedules
Upon activation, the user gains the ability to modify the WordPress Cron job schedules by accessing the "Cron Schedules" section within the settings of their WordPress dashboard. It is important to observe that the plugin introduces an extra default schedule of a weekly frequency. Furthermore, users have the option to include additional schedules measured in seconds, for instance, 21600 seconds to execute tasks every 6 hours.
These intervals can be incorporated into the code by utilizing a filter, exemplified by the following line of code:
add_filter( 'cron_schedules', 'example_add_cron_interval' );

function example_add_cron_interval( $schedules ) {
 $schedules['five_seconds'] = array(
 'interval' => 5,
 'display' => esc_html__( 'Every Five Seconds' ),
 );

return $schedules;
 }
WP-Cron Events
Subsequently, the plugin can also be utilized to view the existing WordPress Cron jobs that have been scheduled. To access this feature, navigate to the "Cron Events" section under the "Tools" tab. Numerous action names are readily identifiable, as they are expected to correspond with specific portions of the plugin name, such as "woocoomerce_cleanup_sessions" or "gravityforms_cron."
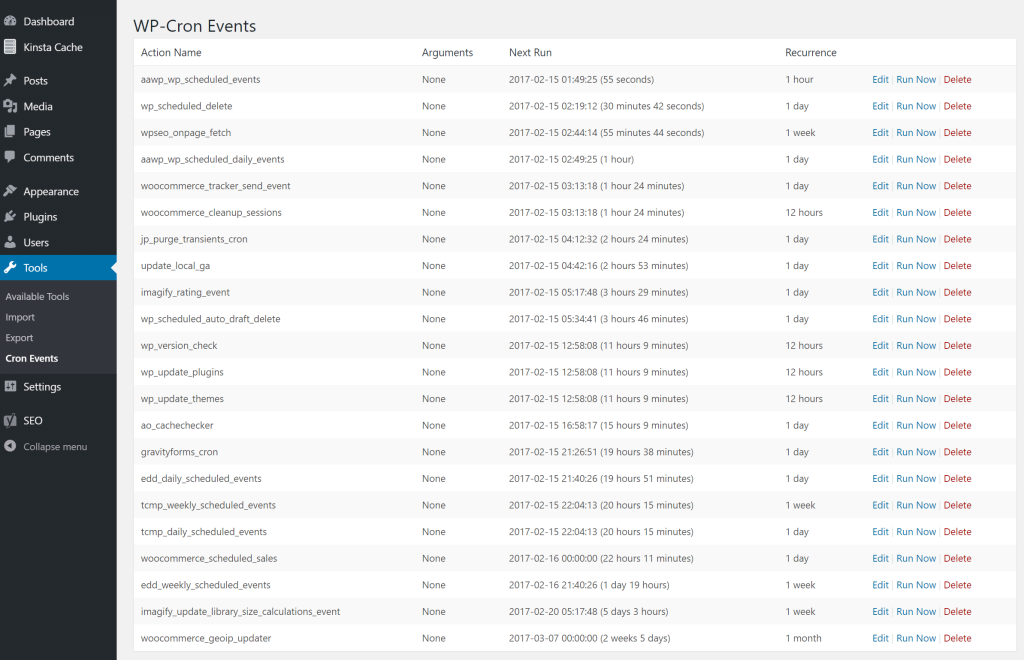
To initiate an immediate execution of a Cron event, one can simply click on the "Run Now" option adjacent to the corresponding action name. This functionality proves advantageous during the process of troubleshooting, particularly when it becomes necessary to run a Cron event multiple times.
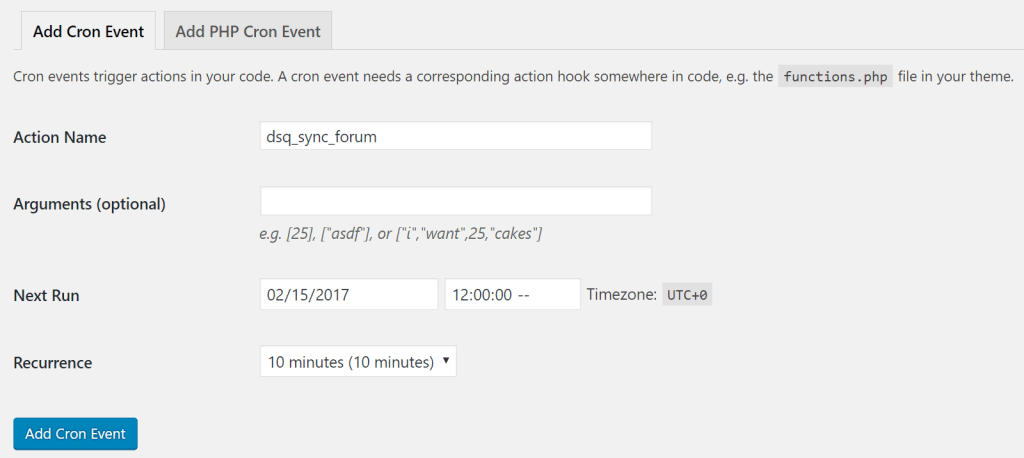
Add Cron Event
Additionally, you have the option to incorporate Cron events into your setup. In this instance, we will demonstrate the process of adding a WordPress Cron job specifically for the Disqus plugin. Many individuals may desire to perform this task in order to modify the synchronization frequency or resolve issues related to comment synchronization. The documentation provided by each third-party plugin developer should contain the designated name for their cron event, or in other words, the action name. In the case of the Disqus plugin, the action name utilized is "dsq_sync_forum."
If you intend to create a cron event from scratch, you will require a corresponding action hook within your code, such as the functions.php file. The following example, courtesy of WP-Crontrol, illustrates this concept:
add_action( 'my_hookname', 'my_function' );The next function you'll going to write is -
function my_function() {
    wp_mail( '[email protected]', 'WP Crontrol', 'WP Crontrol rocks!' );
}
In the case of Disqus, our initial step involves incorporating a fresh cron schedule with a duration of 600 seconds (equivalent to 10 minutes). Subsequently, we proceed to access the "Add Cron Event" feature, where we input "dsq_sync_forum" as the designated action name. We then select the subsequent execution time and opt for the 10-minute interval we recently established. Finally, we conclude the process by selecting "Add Cron Event." Consequently, this procedure ensures an automated recurrence every 10 minutes, facilitating the manual synchronization of Disqus comments with our WordPress database.
In essence, the utilization of this functionality is straightforward and user-friendly.
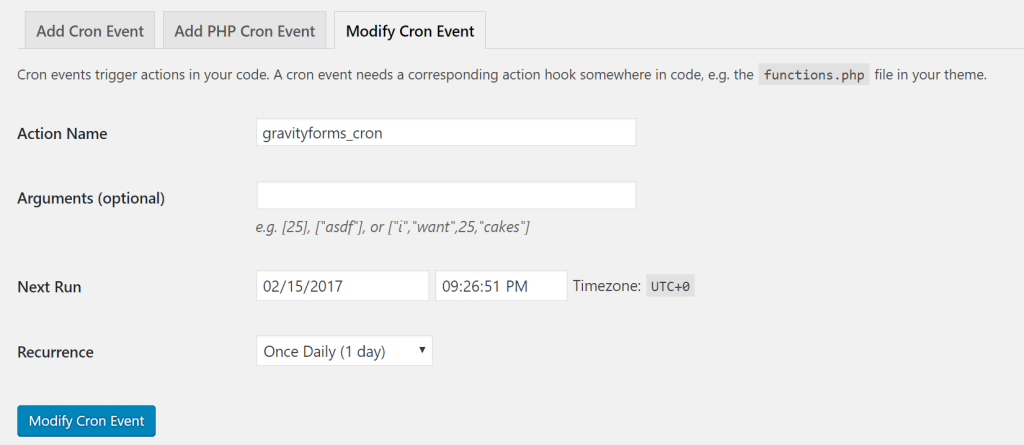
Modify Corn Event
In addition, it is possible to modify pre-existing Cron events by selecting the "Edit" option adjacent to the action name. Consequently, you gain the ability to alter the action name, arguments, subsequent execution, and scheduled recurrence. It is important to exercise caution when making such changes, as numerous plugins depend on their Cron jobs for proper functionality.
Add a Cron Job Using cPanel
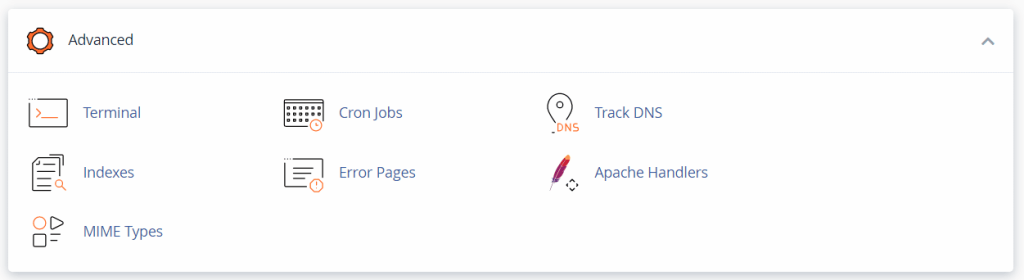
If you have access to a cPanel account provided by your web host, you can utilize the control panel to establish cron jobs. To accomplish this, please log in to your cPanel account and navigate to the "Advanced" section, followed by selecting "Cron Jobs."
The settings page for Cron Jobs offers choices for configuring cron job notifications and establishing new ones. To incorporate a cron job, please navigate to the section labeled "Add New Cron Job" by scrolling down.
Within this section, you will have the opportunity to adjust the command's frequency.
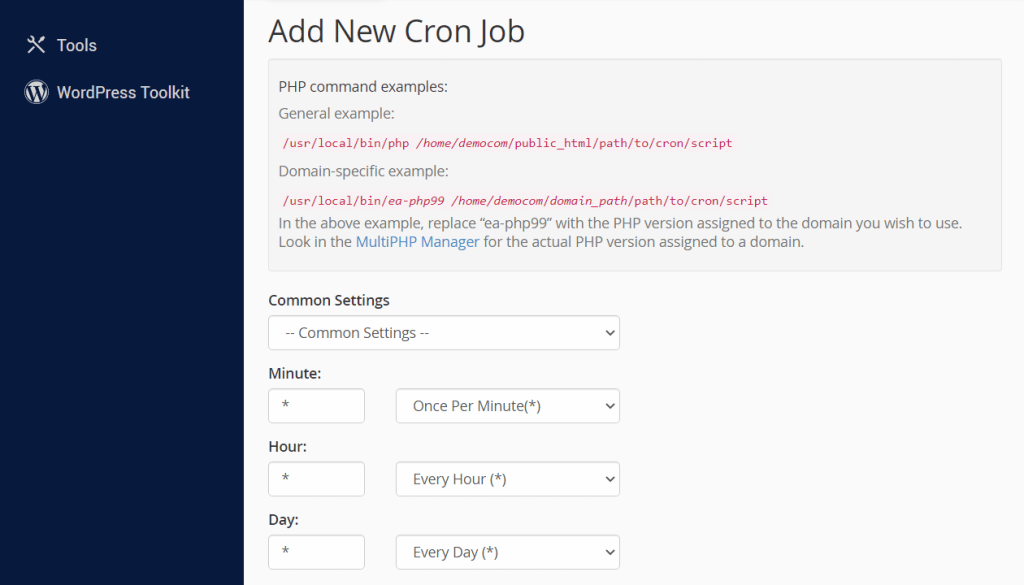
The Common Settings menu encompasses various preconfigured choices, spanning from a frequency of once per minute to once per year. Users have the flexibility to select any of these options or alternatively customize the fields below by inputting a personalized value.
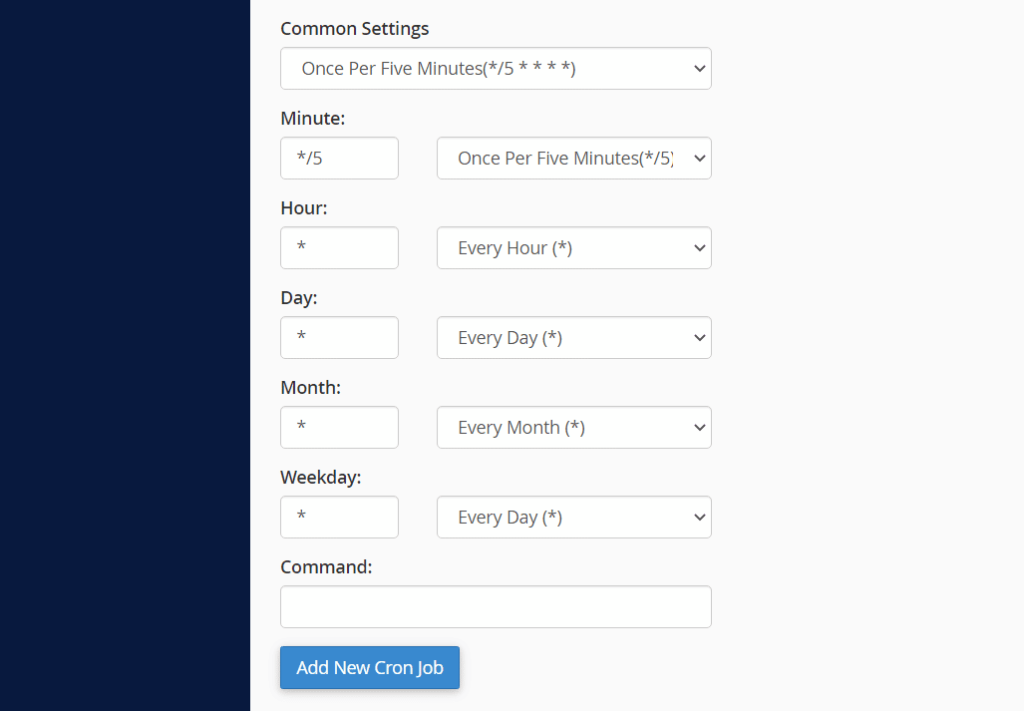
After configuring the frequency of the cron job, you can proceed to enter the command it will execute within the designated Command field. To preserve the changes, save the cron job by selecting the option "Add New Cron Job". Consequently, the newly created cron job will be displayed among the Current Cron Jobs listed at the bottom of the page.
Disable WP-Cron
In certain instances, the utilization of the WP-Cron function may give rise to complications for your website. WP-Cron is a simulated version of a cron job, lacking the continuous operation typically associated with such jobs. Instead, WordPress executes the wp-cron.php script each time a page is loaded.
This approach can lead to challenges for websites experiencing high traffic, as substantial resources must be allocated to execute wp-cron.php during every page load. If the script fails to run due to page loads, scheduled commands may also fail to execute, as wp-cron.php does not actively monitor the intervals.
If you encounter issues with WP-Cron, you have the option to deactivate this function by incorporating the following code into the WordPress wp-config.php file:
define('DISABLE_WP_CRON', true);Once the modifications have been saved to the file, the process is complete. Nevertheless, if you opt to disable WP-Cron, you will need to establish an alternative solution by employing any of the methods described in the preceding sections of this tutorial.
Wrapping Up
Enhance efficiency and reduce expenses while optimizing website functionality by leveraging enterprise-grade integrations valued at $275 or more, which are seamlessly integrated into each Managed WordPress plan. These integrations comprise a high-performance Content Delivery Network (CDN), robust Distributed Denial of Service (DDoS) protection, comprehensive safeguards against malware and hacking attempts, efficient edge caching mechanisms, and Google's swiftest CPU machines. Begin your journey without the need for lengthy contractual commitments, benefit from guided migrations, and enjoy a 30-day money-back guarantee.


