
Carousel sliders are widely embraced in web design for their ability to efficiently showcase services, images, features, and various other content without occupying excessive space. By implementing a carousel, you can optimize space utilization and enhance the overall user experience.
In this guide, I'll walk you through the process of integrating carousel functionality into your Divi website. We'll leverage the Swiper.js library from a third-party source and apply custom CSS to tailor the slider to your preferences.
To incorporate slider functionality into your Divi website, simply invoke the swiper.js library in your child theme's functions.php file.
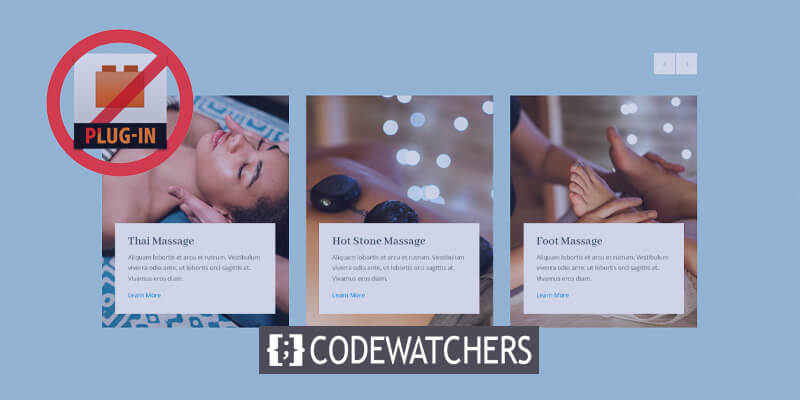
Design a Carousel Slider Without a Plugin
To enable functionality for our slider, we must include the swiper.js library in the functions.php file of our Divi child theme.
Create Amazing Websites
With the best free page builder Elementor
Start NowAdditionally, we need to insert configuration code specifying parameters such as the number of columns to display in the slider, whether slides should loop, and whether arrow navigation and pagination should be enabled, among other settings.
For a comprehensive list of available configurations, please refer to the Swiper API page. Now, let's dive into the implementation.
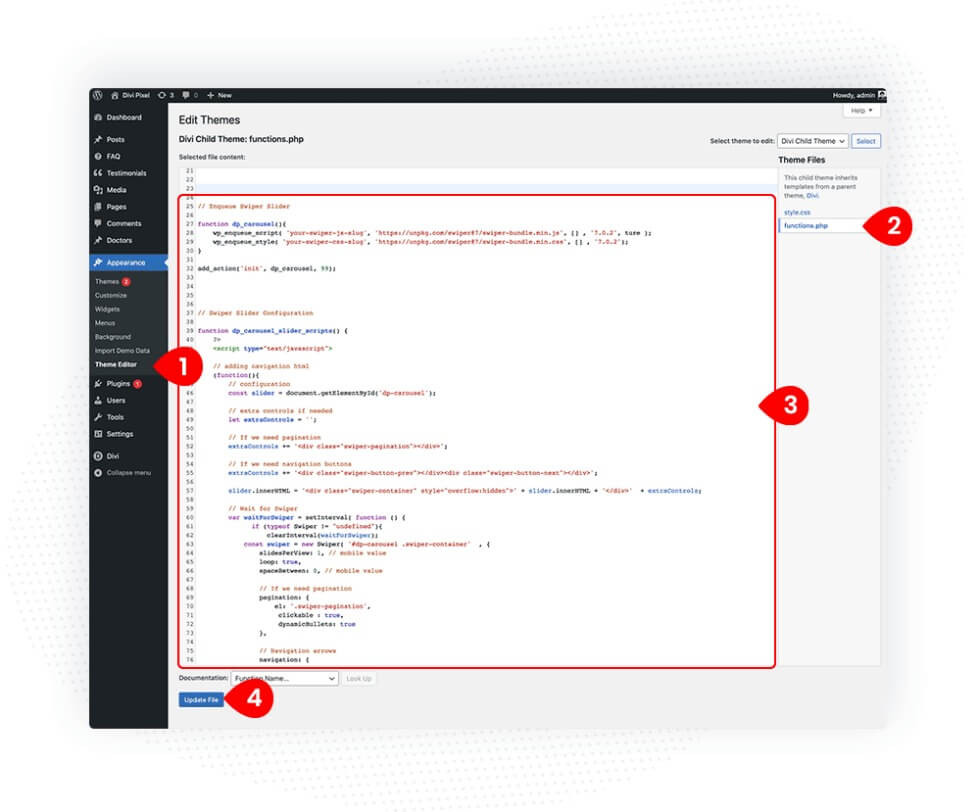
All PHP code should be incorporated into the Divi child theme's functions.php file. You can make edits to this file through FTP, the File Manager on your server, or by using the Theme Editor accessible in the WordPress Dashboard. In this instance, we'll proceed with the Theme Editor.
To enqueue the swiper.js library in our child theme, follow these steps:
- Navigate to Appearance → Theme Editor
- Open the functions.php file in your child theme and add custom PHP code.
<?php
// Enqueue Swiper.js Library
function dp_carousel(){
   wp_enqueue_script( 'your-swiper-js-slug', 'https://unpkg.com/swiper@7/swiper-bundle.min.js', [] , '7.0.2', true );
   wp_enqueue_style( 'your-swiper-css-slug', 'https://unpkg.com/swiper@7/swiper-bundle.min.css', [] , '7.0.2');
}
add_action('init', 'dp_carousel', 99);

function dp_carousel_slider_scripts() {
?>
  <script type="text/javascript">
  // adding navigation html
  (function(){
    window.addEventListener('DOMContentLoaded', function(){
        let sliders = document.querySelectorAll('.dp-carousel')
        sliders.forEach(function( slider ) {
            swiper_init(slider)
        })
    });

    function swiper_init(slider){
         // configuration
         if(slider === null) return;
         // extra controls
         let extraControls = '';
         // If we need pagination
         extraControls += '<div class="swiper-pagination"></div>';
         // If we need navigation buttons
        extraControls += '<div class="swiper-button-prev"></div><div class="swiper-button-next"></div>';
        slider.innerHTML = '<div class="swiper-container" style="overflow:hidden">' + slider.innerHTML + '</div>' + extraControls;

         // Wait for Swiper
        var waitForSwiper = setInterval( function () {
            if (typeof Swiper != "undefined") {
                clearInterval(waitForSwiper);
                let carousel_container = slider.querySelector('.swiper-container');
                const swiper = new Swiper( carousel_container , {
                    slidesPerView: 1, // mobile value
                    loop: true,
                    spaceBetween: 0, // mobile value
                    autoplay: {
                    delay: 3000,
                    },
                    speed: 600,
                    // If we need pagination
                    pagination: {
                    el: '.swiper-pagination',
                    clickable : true,
                    dynamicBullets: true
                    },
                    // Navigation arrows
                    navigation: {
                    nextEl: '.swiper-button-next',
                    prevEl: '.swiper-button-prev',
                    },
                    breakpoints: {
                    768: { // Tablet
                        slidesPerView: 2,
                        spaceBetween: 20,
                    },
                    981: { // Desktop
                        slidesPerView: 3,
                        spaceBetween: 30,
                    }
                    }
                });
            }
        }, 20);
   }
})();
</script>
<?php }
add_action( 'wp_footer', 'dp_carousel_slider_scripts'); - Select Update File.
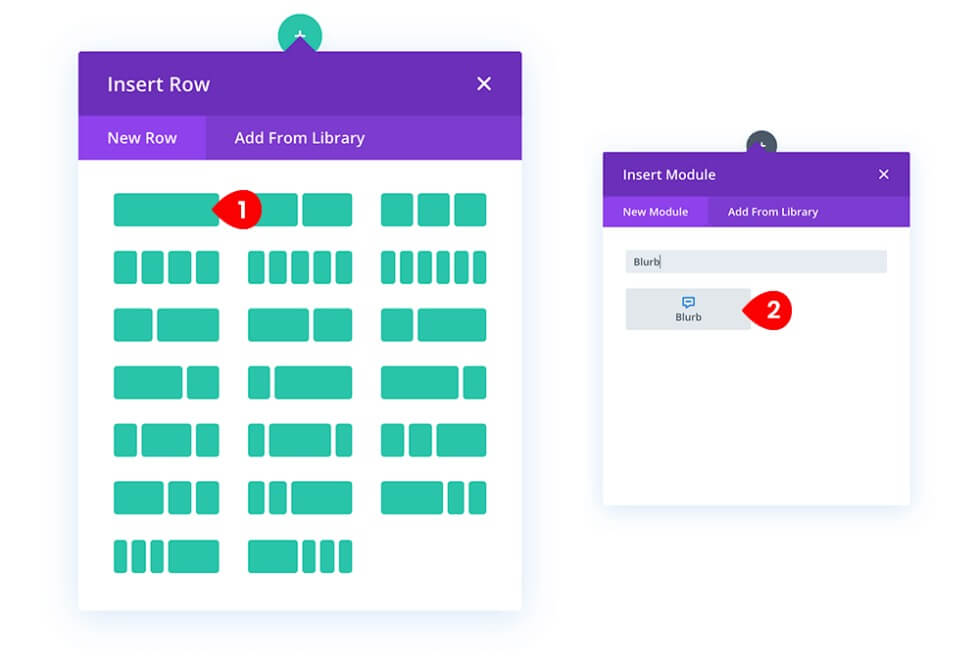
Now we must use the Divi Builder to create all of the things that will be displayed in our slider. Row, column, and module custom classes and IDs will need to be added. There can only be one column layout, and it will convert to a carousel based on the column numbers specified in the settings PHP code.
I utilized Blurb modules with some beautiful design and hover effects for this example, but you may use whatever Divi module you like.
Add a section with one column row to your page using the Divi Builder.
Find the Blurb module and add it to the page.
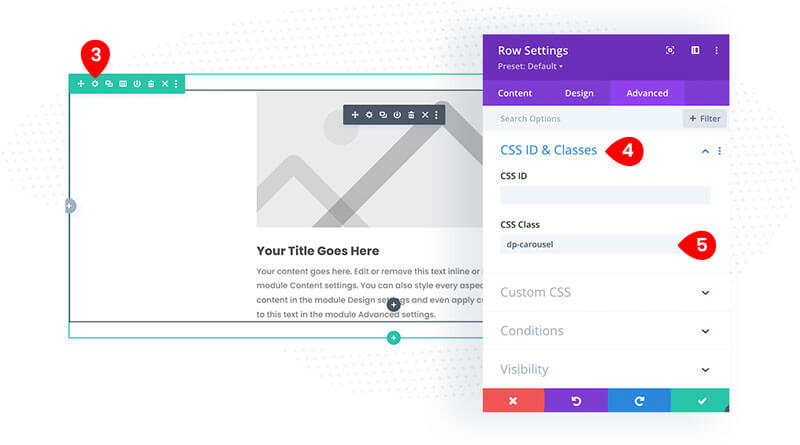
Row settings can be accessed by clicking the gear symbol in the green toolbar.
Select Advanced CSS ID & Classes.
Include dp-carousel in the CSS Class field.
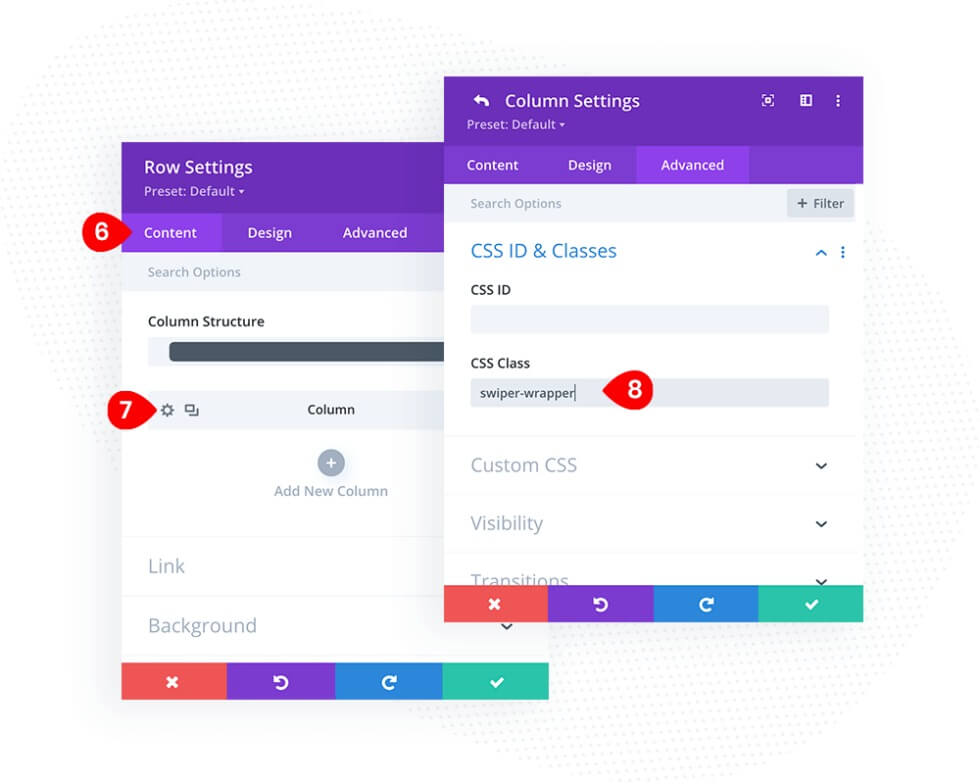
Switch to Content tab
Open Column settings, and add swiper-wrapper class to CSS Class field.
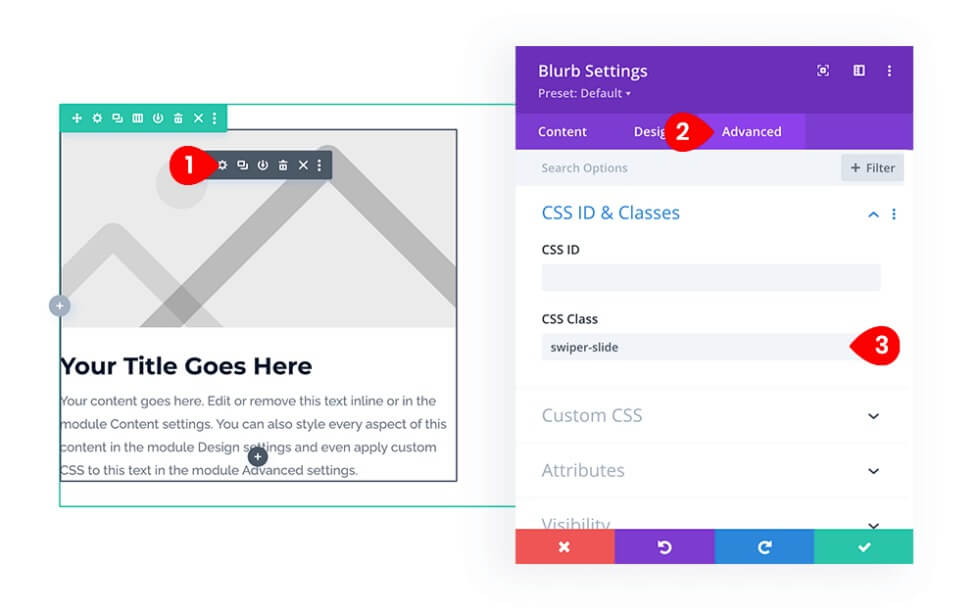
For customizing blurb module, open the module settings and nativage tot the advance tab. Then add swiper-slide to the CSS field.
Navigate to the Content tab and click the Text toggle.
Include title and body text.
Add a Background Image in the Background toggle.

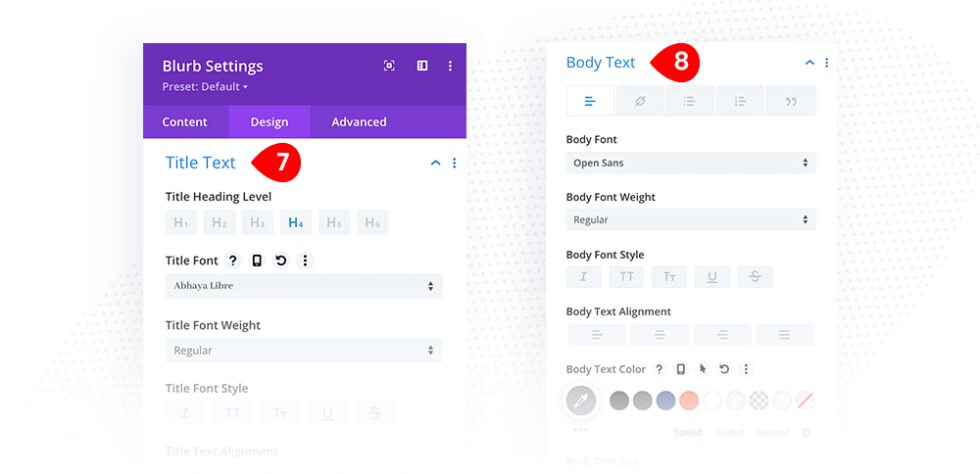
Now for the title text design, here are the settings -
- Title Font – Abhaya Libre
- Color – #415962
- Title Text Size – 26px and 22px on mobiles
For the body text, follow these settings.
- Title Font – Open Sans
- Color – #879296
- Body Text Size – 14px and 12px on mobiles
- Body Line Height: 1.5em
In this final stage, we'll add a Blurb Spacing and Custom CSS to give the content container a white backdrop and a zoom animation to the background picture.
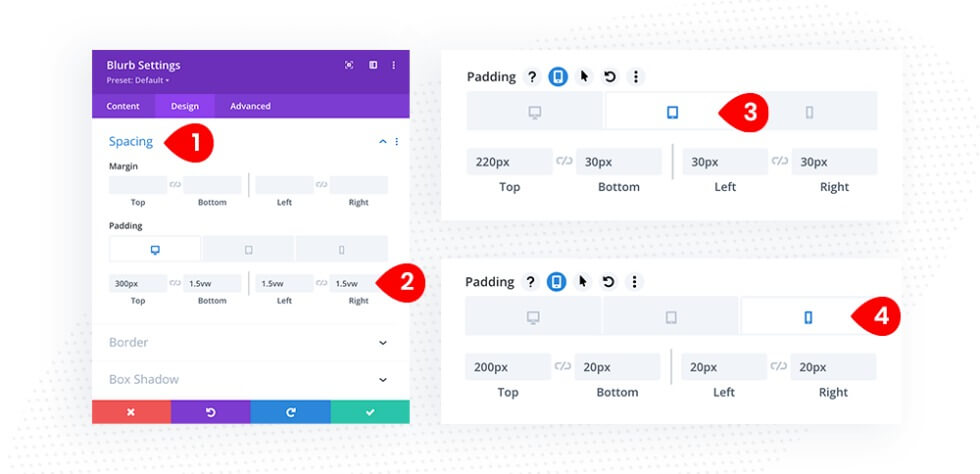
Toggle the Design Spacing toggle in Blurb settings.
- Padding for desktops should be added. 300px/1.5vw/1.5vw/1.5vw
- Padding for tablets should be added. 220px/30px/30px/30px
- Padding for mobiles should be added. 200px/20px/20px/20px
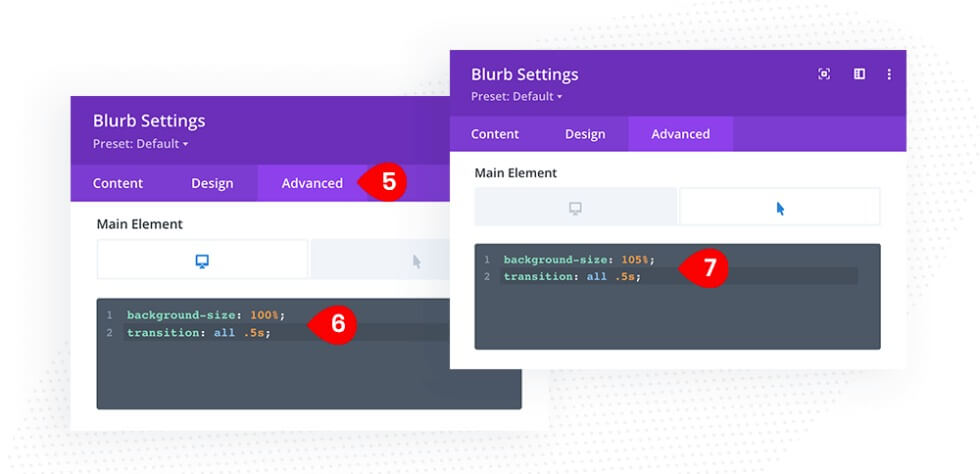
Navigate to the Advanced tab and select the Custom CSS checkbox.
Background-size: 100%.
Background-transition to Main Element field.
All transitions are .5s.
On hover, add a background size and transition to the Main Element.
105% background size; All transitions are .5s.
For the background color, paste this in the custom CSS field.
background-color: white;
padding: 30px 1.5vw;
Also, you need to add background color and padding to Blurb Content field on hover.
background-color: white;
padding: 30px 4vw;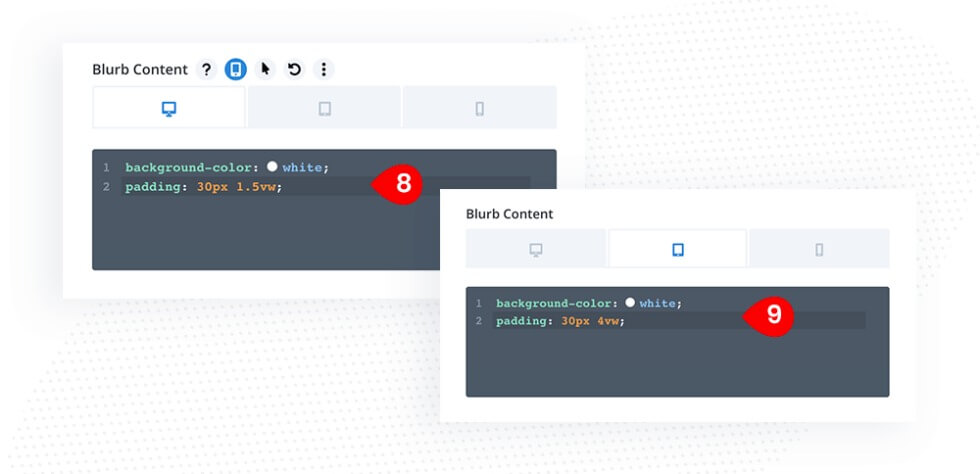
Now that we've completed the Blurb module, we may replicate it as many times as we like to add fresh blurbs to our carousel. You only need to replace the words and alter the background image in each copied module.
Our slider is nearly finished. Finally, we'll add some custom CSS to decorate our slider navigation and pagination. This code can be placed to the Divi/Theme Options/Custom CSS or the style.css file of your child theme.
/* DP Slider Navigation */

.dp-carousel .swiper-button-prev {
	transform: none;
    margin-top: -100px;
    top: 10px !important;
    margin-left: auto!important;
    right: 52px;
	font-size: 20px !important;
	background-color: #fff;
    padding: 25px !important;
}
.dp-carousel .swiper-button-next {
	transform: none;
    top: 10px !important;
    margin-top:-100px;
    right: 0px !important;
    background-color: #fff;
    padding: 25px !important;
}

/* Arrow Size and Style */
.swiper-button-next:after, .swiper-button-prev:after {
	font-size: 20px;
    color: #aed4e4;
}

/* DP Slider Pagination */
.dp-carousel .swiper-pagination-bullet-active {
	background-color: #fff;
}
.dp-carousel .swiper-pagination-bullet {
	background-color: #fff;
    top: 15px;
}
Now here is the final slide.
Final Words
Creating a carousel in Divi without using a plugin involves leveraging the built-in functionality and customization options provided by the Divi theme. By following this procedure, you can create a carousel tailored to your specific content and design preferences without relying on additional plugins.


