
Your website's logo and favicon are two of the most important brand identifiers - they allow visitors to recognize your site and remember it later. The logo is the main image that represents your brand, while the favicon is the little icon that appears next to page titles and in browser tabs. Over time, you may want to update these visual elements as part of a rebranding effort or just for a fresh new look.
In this beginner's guide, we'll walk through the steps for changing your logo and favicon in WordPress. We'll specifically cover how to update the logo using the popular page builder Elementor, and then how to upload a new favicon file through the WordPress Customizer. With just a few simple clicks, you'll be able to swap out these branding images and establish a consistent identity across your website.
Changing a Logo on a Standard WordPress Theme
A standard WordPress theme is a pre-made theme that is available for free or for purchase from the WordPress theme directory. These themes are designed to be easy to use and customize, and they come with a variety of features and options.
Standard WordPress themes are a great way to get a professional-looking website up and running quickly and easily. If you're not sure which theme is right for you, there are a number of resources available to help you choose, including the WordPress theme directory and blog posts from WordPress experts.
Create Amazing Websites
With the best free page builder Elementor
Start NowTo change the header logo for most standard WordPress themes, please follow these steps:
- Log in to your WordPress dashboard.
- Click Appearance > Customize.
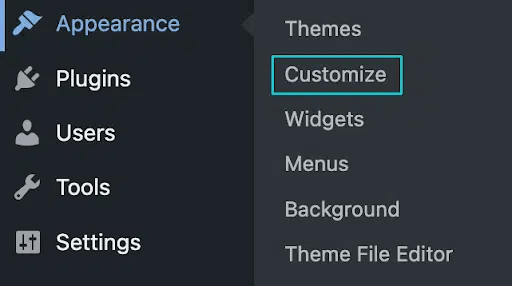
- In the Site Identity section, click Select Logo or Change Logo.
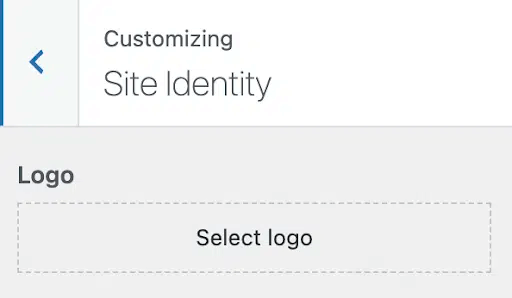
- Upload your logo file to the media library with a transparent background. You can also choose a preexisting logo file from the library.
- If prompted, crop your image to fit the header. You can also choose to Skip Cropping if you prefer to keep the image in its entirety.
- Click Save and Publish to see your new logo.
Changing the Logo on a Custom WordPress Theme
If you are working with a custom-built WordPress theme, it is especially important to start by making a backup of your website and testing your changes in a local development environment before deploying them to your live site.
To change the logo for a custom-built WordPress theme, please follow these steps:
- Upload your logo file with a transparent background to the WordPress media library.
- Access the theme's code by navigating to Appearance > Editor.
- Locate the header file. This is typically named
header.php. - Within the header file, identify the code that displays the logo. This will typically look like a small piece of HTML ending in
.img. - Replace the
srcattribute of theimgtag with the URL of your new logo file. - Save your changes and preview your website to ensure that the logo looks and fits well.
- If the logo looks as you intended, you can deploy your changes to your live site. If not, you may need to hire a WordPress developer to help you.
How To Change Logo In Elementor
Elementor is a popular WordPress page builder plugin that allows you to easily create and customize website pages and content using a drag-and-drop editor and pre-made templates.
To edit the header section of your website using Elementor, first access the editor by going to your website and clicking "Edit with Elementor" at the top of the screen. Then select "Header" from the panel at the top of the editing page.

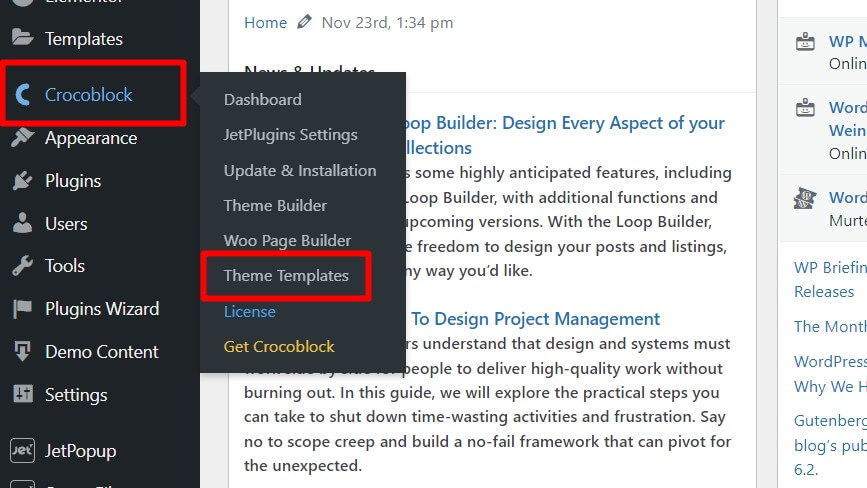
Alternatively, you can reach the header editor through the WordPress admin dashboard. Hover over the "Crocoblock" tab, go to "Theme Templates", and click "Edit with Elementor" for the Header template.
Once in the Elementor editor, you can replace the default logo image by clicking on the existing logo placeholder and uploading your own logo image files for standard and high resolution screens. If you prefer, you can also choose to display a text logo like your site name, or have both image and text logos shown together. Make any other changes needed to customize the header, like editing the menu, changing fonts and colors, or adding other elements.
When you are satisfied with how the header looks, simply click "Update" to publish your edits and see the customized header on your live website. The intuitive drag-and-drop interface and pre-made templates in Elementor make it quick and easy to customize your site's header and other pages exactly how you want them. Let me know if you need any clarification or have additional questions!
Change Favicon in WordPress
A favicon is a small icon that is displayed next to your website's title in the browser tab. It is also used in browser bookmarks, browser history, and on mobile devices as the app icon for your site.
In WordPress, the favicon is also known as the site icon. You can add a favicon to your WordPress website by following these steps:
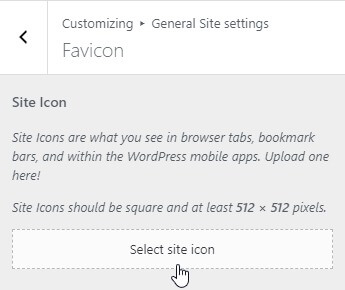
- Go to Appearance > Customize.
- In the General Site settings section, click Favicon.
- Upload your favicon file. The favicon file should be a small (512 × 512 pixels), square image with a transparent background.
- Click Save & Publish.
Final Words
Implementing a refreshed logo and favicon can signal change and growth for your brand over time. It's a quick update that pays dividends in terms of recognition and professional appearance. With the techniques outlined in this guide, you should feel equipped to upload new versions of these visual markers to keep your site design looking sharp.


