
Creating an engaging and user-friendly form is a vital aspect of any website's success, especially when it comes to gathering valuable information or generating leads. One effective approach to enhancing the user experience and improving form completion rates is by implementing a multi-step form with a progress bar. This dynamic form design breaks down lengthy or complex processes into manageable steps, guiding users through each stage while providing them with a clear indication of their progress.
If you're a WordPress user and interested in incorporating this powerful form feature into your website, you're in the right place. In this guide, we will walk you through the process of creating a multi-step form with a progress bar using the versatile capabilities of WordPress.
By leveraging WordPress's flexibility and its vast ecosystem of plugins and tools, you can easily create and customize multi-step forms to suit your specific requirements. Whether you want to collect user feedback, gather customer information, conduct surveys, or facilitate online purchases, a multi-step form with a progress bar can significantly enhance the user experience and increase form completion rates.
Importance Of Multi-step Form
Multi-step forms have gained significant popularity in web design and development due to their effectiveness in enhancing user experience and increasing conversion rates. Unlike traditional single-page forms, multi-step forms break down complex processes into smaller, more manageable sections, guiding users through a series of sequential steps.
Create Amazing Websites
With the best free page builder Elementor
Start NowThe main reason why multi-step forms have become so popular is their ability to improve user engagement and completion rates. By presenting information in a structured and progressive manner, these forms reduce cognitive overload and make the overall experience more intuitive and user-friendly. Users tend to feel less overwhelmed when faced with a long, intimidating form, resulting in higher completion rates and reduced form abandonment.
Moreover, multi-step forms provide an excellent opportunity to gather more detailed and accurate information from users. By segmenting the form into logical sections, each focusing on specific details, users are more likely to provide accurate responses and complete the entire form. This leads to better data quality and enables businesses to make more informed decisions based on the collected information.
In addition to user experience benefits, multi-step forms can significantly impact conversion rates. By breaking down the conversion process into smaller steps, businesses can strategically position compelling calls-to-action (CTAs) at the end of each section. This approach allows for better targeting, as the CTAs can be tailored to align with the user's progress and intention. Furthermore, by providing a progress bar or indicator, users are motivated to continue through the steps, increasing the likelihood of successful conversions.
Considering the significance of multi-step forms in improving user experience, boosting completion rates, and enhancing conversion rates, it is crucial for individuals involved in web development, particularly in WordPress, to possess the knowledge and skills to build such forms. Being able to create multi-step forms with progress bars in WordPress empowers developers and website owners to optimize their online forms, resulting in higher user satisfaction, increased conversions, and ultimately, better business outcomes.
Build Multi-Step Form with Progress Bar in WordPress
When it comes to creating a multi-step form in WordPress, utilizing one of the available WordPress plugins is the simplest solution. Among the numerous options, WPForms stands out as the ultimate tool for the job, making it the best WordPress contact form plugin in the market.
Renowned for its beginner-friendly approach, WPForms has already made its mark on over 5 million websites. This powerful plugin empowers you to build WordPress forms for various purposes effortlessly, eliminating the need for coding. Whether you seek user-friendly registration forms, signup forms, survey forms, file-upload forms, order forms, or application forms, WPForms has got you covered.
Thanks to its intuitive drag-and-drop form builder and an array of pre-built form templates, creating customized forms becomes a breeze. Moreover, WPForms offers convenient add-ons for popular payment processors like Stripe and PayPal, enabling seamless payment acceptance on your WooCommerce store.
In addition, WPForms seamlessly integrates with leading WordPress page builder plugins such as Elementor, Divi, and SeedProd. This ensures hassle-free form display on your website's front end, eliminating the need for manual coding or CSS.
While the free version of WPForms suffices for basic contact forms, the WPForms Pro version unlocks advanced functionality. By upgrading to WPForms Pro, you gain access to features like conditional logic, survey forms, advanced form templates, and, crucially, multi-step forms—essential for our tutorial.
For this guide, we will utilize the WPForms Pro version, equipped with all the necessary tools to effortlessly create multi-step forms in WordPress.
Create a New Multi-Step Form in WordPress
After successfully installing the WPForms plugin, you can easily access its features by navigating to the WPForms » Add New section within your WordPress dashboard. This action will promptly display the form templates page, granting you a selection of diverse form types to choose from.

Splitting any form into a multi-step form can be effortlessly achieved using the WPForms plugin. To elucidate this process, we will focus on transforming a contact form.
Begin by assigning a name to the newly created form, and then proceed to select the "Simple Contact Form" template.
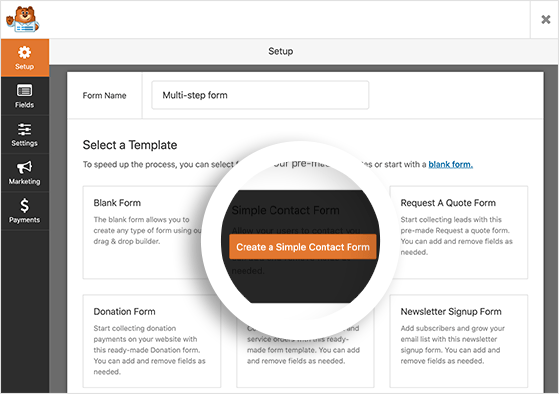
Upon selection, WPForms will proceed to load the designated template into its intuitive drag-and-drop form builder.
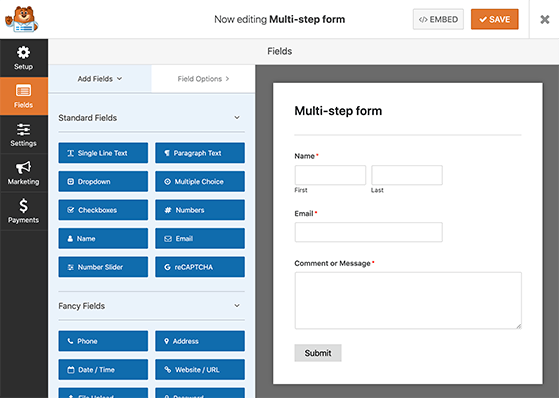
Upon observation, it becomes evident that the basic contact form already incorporates form fields for Name, Email, and Comment or Message. By employing the click, drag, and drop functionality, you have the flexibility to modify the sequence of these fields according to your preferences.
Furthermore, the process of supplementing additional text fields to the form is effortless. This can be accomplished by utilizing the left-hand panel to select the desired text field and subsequently placing it onto the right-hand side of the form. The designation of mandatory fields can be achieved by selecting a field and adjusting the corresponding settings.
Once content with the arrangement and selection of fields, kindly proceed to save the modifications and proceed to the subsequent step.
Split Your Form into Multiple Steps
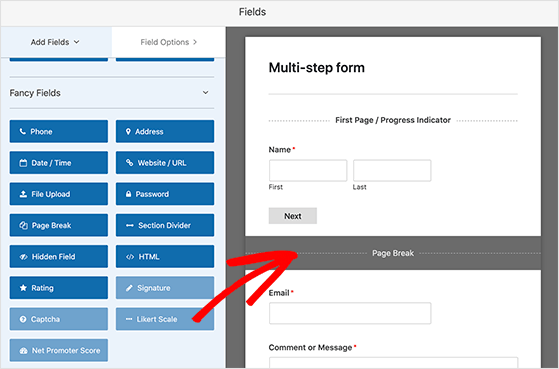
In order to partition your form into distinct stages, it is necessary to employ the Page Break form field.
To accomplish this, proceed to the Fancy Fields section located in the left-hand panel, and proceed to select the Page Break field. Subsequently, drag the chosen field to the desired location within your form.

In order to divide your form at a specific point, you have the option to strategically place a Page Break.
Please follow the aforementioned procedure to implement the desired page breaks within your form. Subsequently, you can augment those respective sections by incorporating supplementary fields to finalize the form creation process.
WPForms allows you the flexibility to generate multiple form pages according to your requirements. Nonetheless, it is advisable to exercise discretion and avoid inundating your website visitors with an excessive number of form sections. It is recommended to include only essential information requests, as any additional details can be gathered subsequently at a later stage.
Customize Your Multi-Page From the Progress Bar
In order to cater to your specific business and website requirements, you may consider implementing a progress bar on your forms. Progress indicators serve the purpose of informing users about the current stage they are at within the form and estimating the remaining time needed to complete it.
By displaying the progress to users, you provide them with a visual representation of their advancement, which can significantly motivate them to finalize and submit the form. This approach effectively addresses the common inclination of individuals to avoid leaving tasks incomplete.

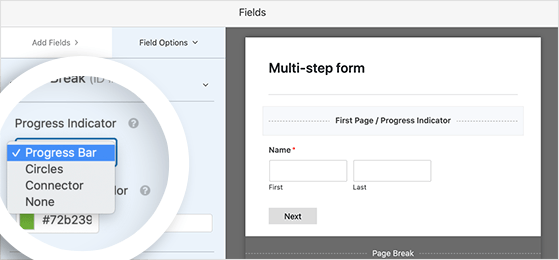
WPForms offers three distinct progress bars that can be incorporated into your multi-part form. These options include:
- Connectors: This style resembles a breadcrumb bar, which visually connects the various sections of your form through a series of bars displaying the corresponding page titles.
- Circles: This alternative features individual circles, each labeled with the title of the respective form step. Users can easily track their progress by observing the filled circles.
- Progress Bar: With this option, a partially colored bar is employed to illustrate users' advancement within your form. This dynamic visual aid provides a clear indication of their current position.
To enable and customize the progress bar on your multi-step form, simply click on the First Page break section. From there, you can access the necessary settings to modify its appearance according to your preferences.
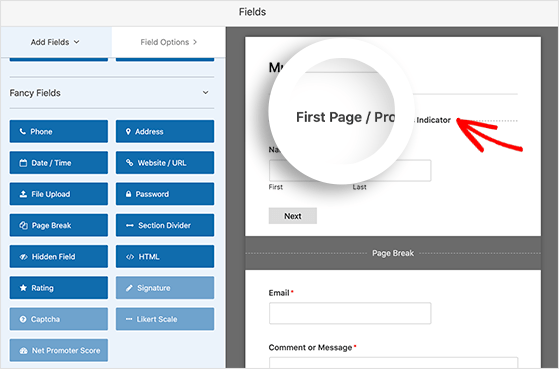
Upon accessing the form builder, a new panel will become visible, enabling you to select your preferred style and color for the progress indicator.
In the event that you opt for either the Connectors or Circles progress indicator style, you will have the ability to modify the page title, thereby indicating to users which stage of the form they are currently in.
Alternatively, the Progress Bar style provides a conventional progress bar that guides users through the remaining steps required to complete the form.
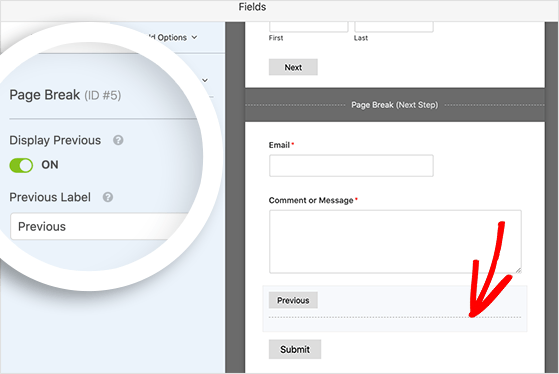
To personalize the title of the next page and the Next button, which directs users to the subsequent section of the form, simply click on the Page Break section that was inserted during the initial setup of the form. The options for customization will be displayed in the left-hand panel of the form builder.

In order to provide users with the option to navigate to the preceding page, it is possible to incorporate a "Previous" button. This can be accomplished by activating the "Display Previous" checkbox and subsequently customizing the button's title to suit your preference.
Once you have finalized the placement of page breaks and progress indicators to your satisfaction, it is advisable to proceed by selecting the "Save" button.
Configure Your Multi-Step Form Settings
In this particular phase, we shall examine the configuration options for your multi-part form. Initially, proceed by clicking on the "Settings" tab and subsequently selecting the "General" option.
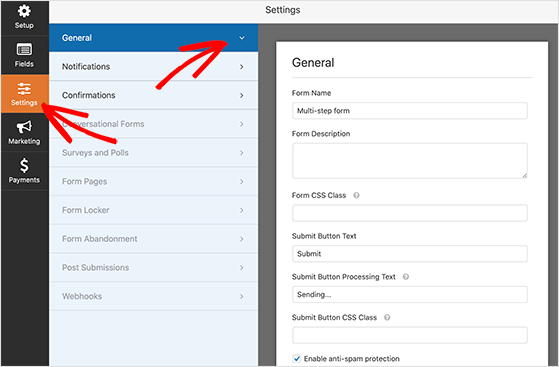
Within this interface, you have the ability to assign a fresh name and provide a description for your form. Moreover, customization of the submit button is also feasible, along with the option to activate anti-spam functionalities such as Google Recaptcha.
Additionally, you have the option to enable AJAX settings and disable the storage of information to ensure compliance with GDPR regulations.
Once you have satisfactorily adjusted your desired settings, kindly remember to save your changes by clicking the "Save" button.
Set Up Your Form Notifications
Please navigate to the Notifications section located on the left-hand side of the settings page within WordPress. In this section, you will find the options to configure notifications for your multi-page form.
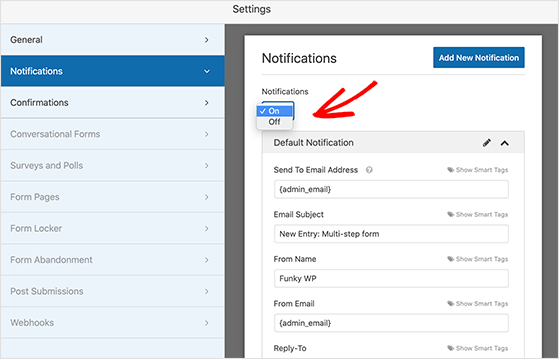
Notifications refer to the email messages that are sent to you whenever users submit a form on your website. By default, WPForms enables notifications. However, if you prefer not to receive email notifications, you can select the "Off" option from the dropdown menu.
Furthermore, you have the option to utilize Smart Tags, which allow you to send an email to each user's provided email address upon form submission. This feature can be beneficial in assuring users that their responses have been received. Particularly for forms with multiple stages, users may greatly appreciate this confirmation, as it eliminates any uncertainty about whether their form submission was successful.
Once you have configured your desired form notifications, remember to click the Save button to apply the changes.
Confirmation Message
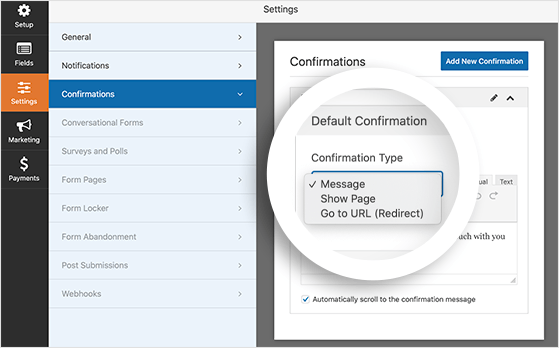
The subsequent step involves selecting the confirmation messages for your multi-stage form. To access the options, navigate to the Settings page and click on the Confirmations heading.
Form confirmations serve the purpose of informing users that their form submission was successful and provide instructions regarding the subsequent actions they need to undertake.
Within WPForms, there exist three available confirmation types:
- Message: This is the default confirmation type, which displays a straightforward success message upon users' form submission.
- Show Page: By utilizing this confirmation type, users will be directed to a different page on your website, such as a thank you page.
- Go to URL (Redirect): By employing this confirmation message, you can redirect users to a page on a separate website from your own.
Now, proceed to select your preferred confirmation type from the provided dropdown menu and proceed to customize it by adding your desired message or URLs.
Once you are satisfied with the appearance and settings, kindly click on the Save button.
Add Multi-Step Form to WordPress
After creating your multi-step form, the next step is to incorporate it into your WordPress website. WPForms offers the flexibility to add your form to various sections of your website, such as a page, post, sidebar, or even within your WordPress theme by using a shortcode.
The most commonly used approach is to embed the form within a WordPress post or page. Let's now explore the process of achieving this.
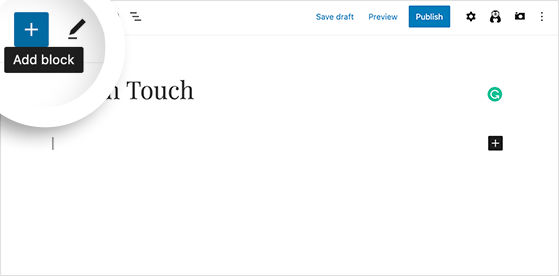
To begin, either create a new post or page in WordPress or select an existing one and click on the "Edit" option. Once you're inside the WordPress editor, click on the plus (+) icon to add a new content block.
Scroll down the popup menu until you reach the "Widgets" section, and then click on the WPForms widget to embed the block into WordPress.
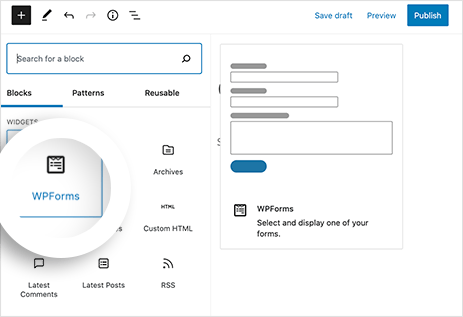
Following that, click on the dropdown menu and choose your desired multi-step form.
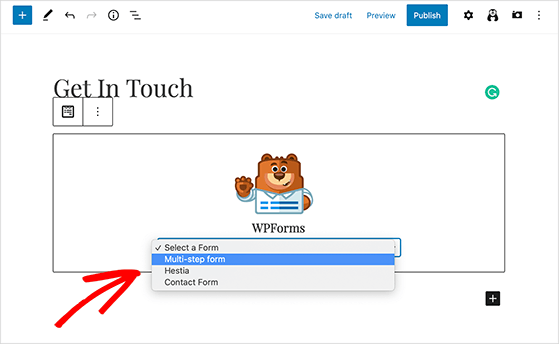
WPForms will present the form within the WordPress editor, allowing you to preview its appearance before publishing.
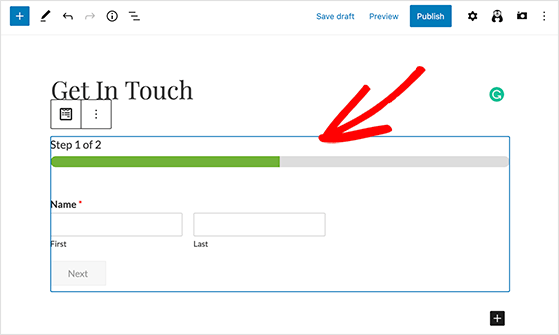
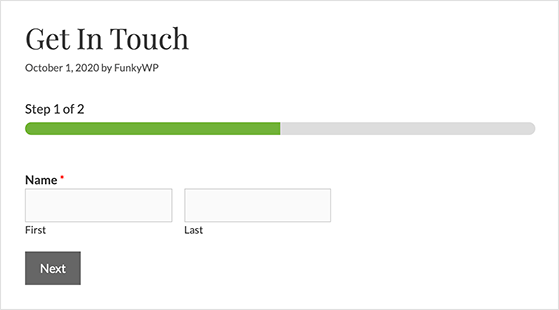
Lastly, click on "Publish" or "Update" to make your form live. Here's an example of how it will be displayed to your users:
Wrapping Up
Multi-step forms have proven to be an effective means of enhancing form conversions within the realm of WordPress. By segmenting the form into distinct stages, users are presented with a more approachable and manageable experience, thereby reducing feelings of being overwhelmed and increasing the likelihood of form completion. Empirical research has demonstrated substantial improvements in conversion rates with the implementation of multi-step forms, particularly when the form comprises more than three fields.
In conclusion, we trust that this article has equipped you with the knowledge necessary to create multi-step forms in WordPress. What's even more remarkable is that you can achieve this without the need to delve into a single line of code! WPForms, a renowned WordPress plugin, provides a user-friendly platform for effortlessly generating multi-step forms, making the process even more seamless and convenient.


