
Do you want writers to be able to only modify their own posts in WordPress?

If you have a multi-author site or allow guest articles, it's a good idea to limit contributors to just seeing their own blog entries in the dashboard and to prevent them from reading other authors' pieces before they're published.
In this article, we'll teach you how to restrict writers in the WordPress dashboard to just seeing and managing their own posts.
Why should authors be limited to their own posts?
By default, your WordPress website will display all posts and pages to all users, regardless of their admin user status. You can read all of the articles if you are an author, editor, contributor, or administrator.
Create Amazing Websites
With the best free page builder Elementor
Start NowIf the writers are part of your organization or team, this is typically not an issue.
However, restricting people's ability to read their own posts might be helpful in some instances. For example, if you run a multi-author website, it may be beneficial to prevent authors from viewing other writers' pieces under review.
That being stated, let's look at how you may restrict authors from viewing their own articles in the WordPress admin.
Using a Plugin, Authors Can Only Write Their Own Posts
You may simply allow writers to read just their own posts without altering code by using a WordPress plugin.
We'll be utilizing the PublishPress Permissions plugin for this lesson. It's a free plugin that allows you to control WordPress permissions and limits writers to their own articles out of the box.
There is also a paid version included in the PublishPress Pro bundle that provides more permission options, such as who may access the media collection. You can, however, begin with the free version.
To begin, install and activate the PublishPress Permissions plugin. For more information, see our article on how to install a WordPress plugin.
When the plugin is activated, it will only show posts to their authors.
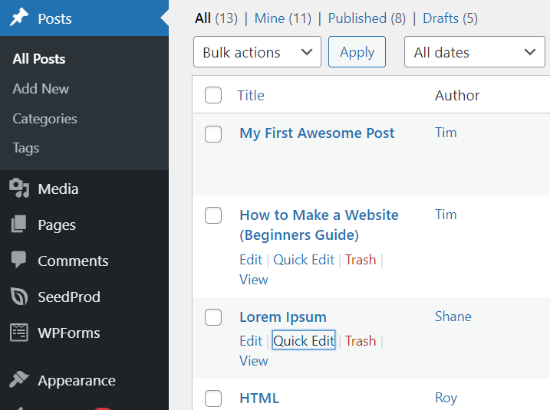
For instance, if you are logged in as the administrator and navigate to Posts > All Posts from your dashboard, you will see all of the posts.
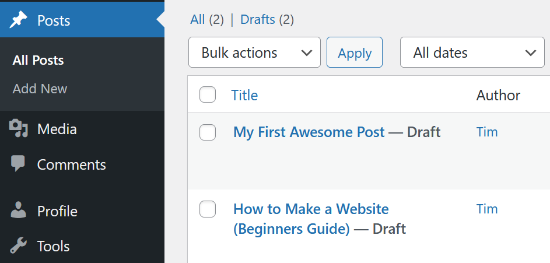
However, if you log in to the WordPress admin section using an author's account, you'll find that just the author's posts are accessible.
What if you want your editors to have access to all of the postings so they can evaluate them? Let's see what you can come up with.
How to Give Editors Access to All Posts
The disadvantage of utilizing the above technique is that only administrators have access to all posts.
Editors are in charge of editing content submitted by other writers and guest contributors on many WordPress sites. Using this plugin, editors will be limited to just their own posts.
However, you may allow editors to examine the material of various writers by utilizing a plugin such as the PublishPress Capabilities plugin or by adding code to your site's theme files. We'll demonstrate both ways.
Making Use of the PublishPress Capabilities Plugin
Another plugin developed by PublishPress is PublishPress Capabilities. We will be utilizing the free version for the sake of this tutorial. There is also a pro edition available if you sign up for a PublishPress Pro account.
To begin, install and activate the PublishPress Capabilities plugin on your WordPress website. You may install a WordPress plugin by following our step-by-step instructions.
After you've activated the plugin, go ahead and click on 'Capabilities' in your WordPress admin menu. This will take you to the 'Role Capabilities' page, where you may alter the permissions for various user roles.
Then, in the top left corner, pick the user role you wish to modify from the dropdown menu.
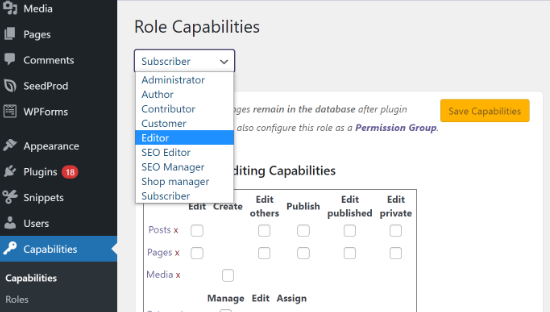
After you've selected the 'Editor' role, ensure sure the checkbox for 'Edit others' is activated under the Editing Capabilities settings.
Editors will be able to modify other postings as a result of this.

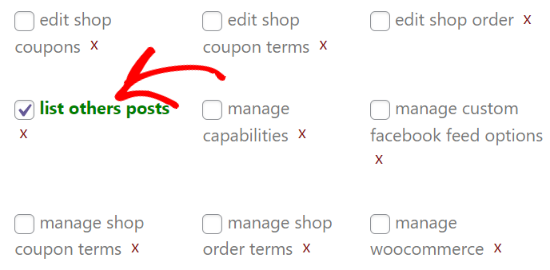
Then, scroll down to the Additional Capabilities area and tick the ‘list other posts' item.
Anyone with the editor role will be able to read postings from other writers in this manner.
Now, save your changes and log in as an editor to access the Posts area of your website. If you can see and modify other writers' posts, it implies you've successfully configured the settings.
How to Include Custom Code in Your Theme
Adding custom code to your theme files is another method to allow editors to see all posts. However, because it involves changing code, we do not suggest this technique for novices.
To begin, place this code in your theme's functions.php file or in a site-specific plugin.
function posts_for_current_author($query) {
    global $pagenow;

    if( 'edit.php' != $pagenow || !$query->is_admin )
        return $query;

    if( !current_user_can( 'edit_others_posts' ) ) {
        global $user_ID;
        $query->set('author', $user_ID );
    }
    return $query;
}
add_filter('pre_get_posts', 'posts_for_current_author');
This code enables any user who has the ability to modify other people's postings to access all posts. This implies that all posts will be visible to editors and administrators. Users with other roles, such as contributors or writers, will only be able to read their own postings.
If you employ specific user roles on your site, bear in mind that users who can modify content published by other users will see them featured in the dashboard as well.
Restrict Author to views specific posts or pages
You may also restrict particular blog posts and pages from being seen, edited, or deleted by authors, editors, contributors, and other user roles.
You can simply determine which particular articles and pages users may access on your website dashboard by using the PublishPress Permissions plugin.
Install and activate the PublishPress Permissions plugin on your website to begin. You can find instructions on how to install a WordPress plugin in our tutorial.
Let's assume you want a certain article to be changed just by the website's editor and no one else.
You can do so by editing that post. Simply scroll down to the ‘Permissions: Edit this Post' meta box once you're in the WordPress block editor.
Following that, choose the ‘Blocked' option from the dropdown box for all other user roles. The permission will be set to ‘default: Yes' by default, allowing everyone to modify the post.
After that, make sure that the editor's setting is set to 'Enabled' or 'default: Yes'. When you've finished configuring the permissions, be sure to edit your blog post.
Change who has access to see and edit particular posts.
We hope this article was useful in teaching you how to limit authors to their own posts in the WordPress admin area. Don't forget to share this post with your friends or to follow us on Facebook or Twitter.


