
Do you want to design visually appealing and professional-looking layouts for your WordPress posts? Do you wish to make your material more visually appealing and varied? Do you want to do all of that without writing any HTML code?
This blog post is for you if you answered yes to any of these questions. I'll teach you how to add multi-column content to WordPress articles without using any HTML code in this blog post.
Multi-column content is an excellent approach to presenting your material in several sections and styles.
Multi-Column content can help you with the following:
Create Amazing Websites
With the best free page builder Elementor
Start Now- Break up long and boring blocks of text into smaller and easier-to-read chunks
- Highlight important points or features of your topic
- Compare and contrast different aspects or options of your topic
- Showcase images, videos, testimonials, or other media elements
- Create more space and balance on your page
Why Should you add Multi-Column Content on your WordPress Website?
You may increase the readability and usability of your content by including multi-column content in WordPress posts. You may also improve the attractiveness and engagement of your content for your visitors.
But, without utilizing HTML code, how can you add multi-column content to WordPress posts? Is it conceivable? Is it simple?
Yes, it is both possible and simple. In truth, there are two simple methods for adding multi-column content to WordPress articles without creating any HTML code.
In this blog post, I'll walk you through each of these two ways step by step. You will be able to design stunning and responsive layouts for your WordPress content with only a few clicks by the conclusion of this blog post.
Are you ready to learn how to add multi-column content in WordPress posts without using HTML code? Then let’s get started!
Method 1: Using the Columns Block in the Block Editor
The block editor, often known as Gutenberg, is WordPress's default content generation interface. It enables you to add and rearrange various types of blocks in order to create rich and fascinating content. The Columns block is one of these, and it allows you to divide your material into many columns with a few clicks.
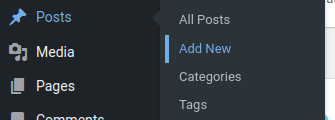
You must make a new post or update an existing one to use the Columns block.
To create a new post, go to Post >> Add New
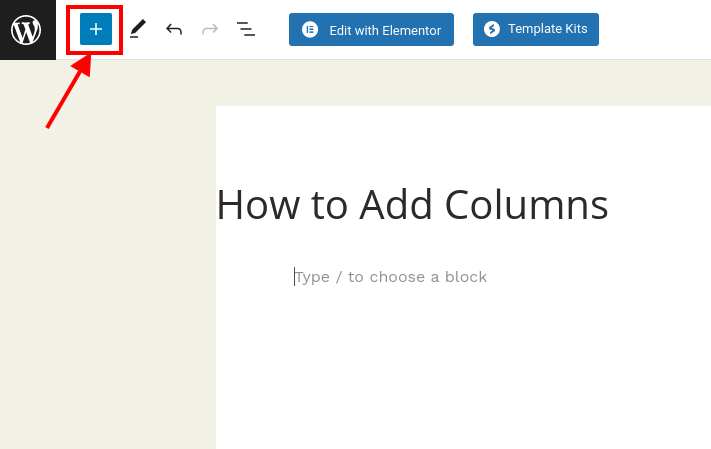
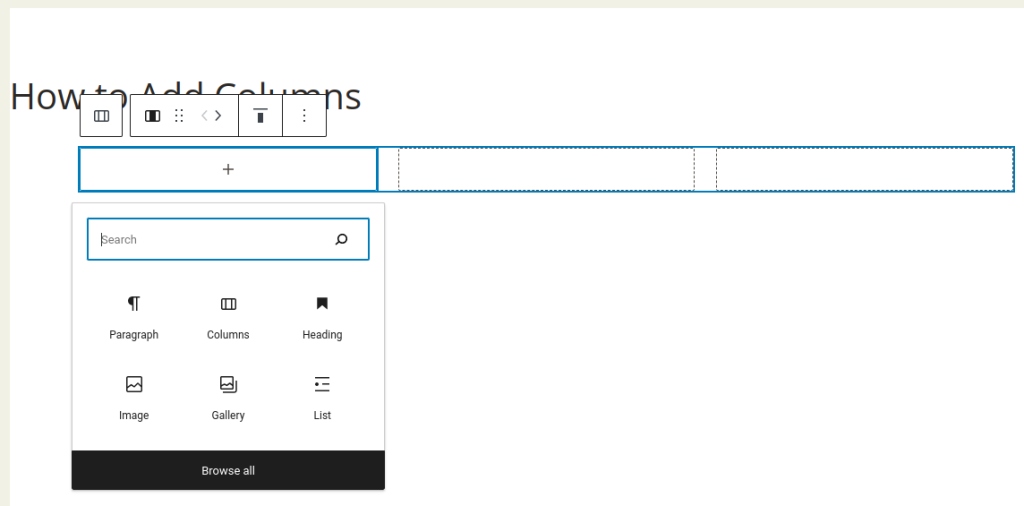
To add a new block, enter the block editor and click the plus (+) icon at the top.
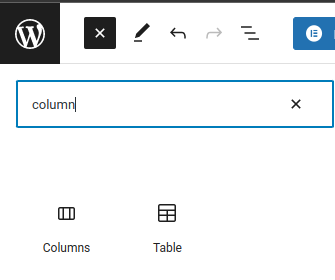
Then, on the Design menu, look for and pick Columns or search for it on the search bar.
When you click on the column block, you will see many column layouts to choose from.
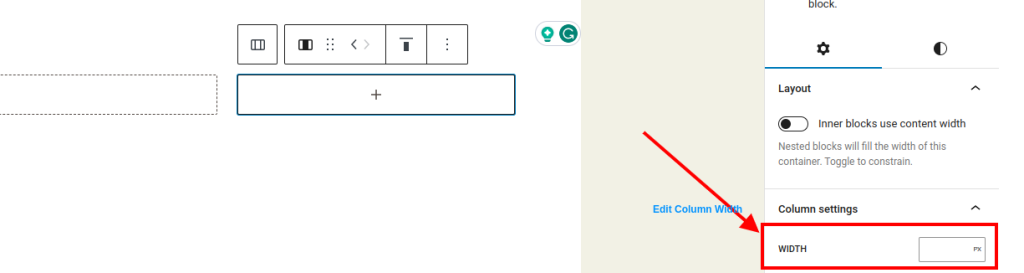
You can pick from various options, such as 50/50, 33/66, 25/75, and more. You can also adjust the width of each column by dragging the slider.

After choosing a layout, you can start adding blocks inside each column. You can add any type of block, such as a Paragraph, Heading, Image, Video, List, and more. You can also customize each block’s settings in the right panel of the editor.
The block settings will also be shown in the options panel in the right column of the post-edit screen. You can change the width of the columns here.
In addition to text, photos, and videos can be included in WordPress columns.
To add a block, simply move the cursor to one of the columns and click the '+' button. You can also add a block by typing '/' followed by the name of the block.
As you can see, using the Columns block is a simple and intuitive way to add multi-column content in WordPress without writing any HTML code.
Method 2: Using a Plugin
You can use a plugin instead if you like the original editor or want additional flexibility and functionality for your multi-column layouts. There are numerous plugins available to assist you in creating multi-column content in WordPress, but Page Builder from SiteOrigin is one of the most popular.
SiteOrigin's Page Builder is a free plugin that lets you create flexible and adjustable layouts for your WordPress articles and pages. It is compatible with any theme and offers live editing and previews.
To use Page Builder by SiteOrigin, you need to install and activate the plugin from your WordPress dashboard.
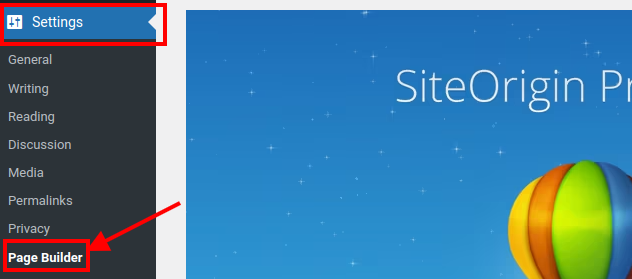
Then, go to Settings > Page Builder and enable it for posts and pages.
Next, create a new post or edit an existing one. You will see a new tab called Page Builder next to the Visual and Text tabs in the editor. Click on it to switch to the page builder mode.

You will be presented with a blank canvas on which to build your layout by adding rows and widgets.
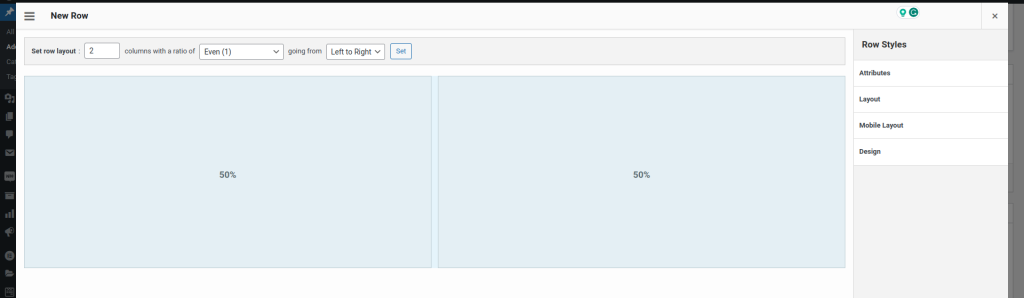
To add a row, go to the top and click the Add Row button.

A popup box will appear where you may specify the number of columns and their widths for your row. You can also change the padding, margin, background color, and other row parameters.
After you've added a row, you can begin adding widgets to each column. Click inside the column and then on the Add Widget button at the top to add a widget.
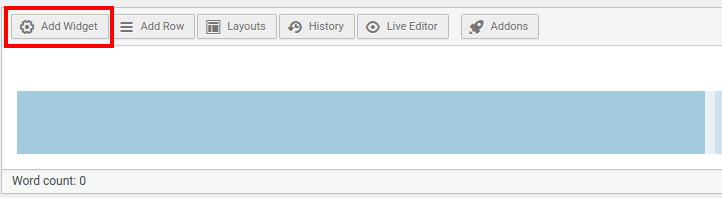
You will see a list of widgets that are available for usage with your content.
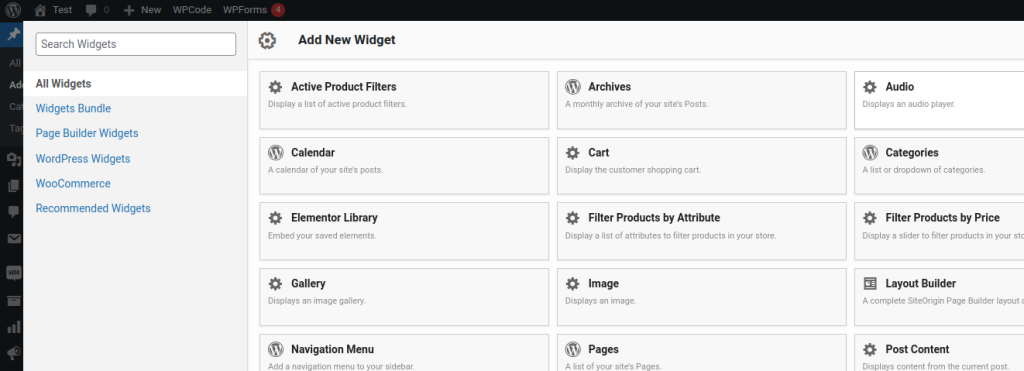
You can select between simple widgets like Text, Image, Video, Button, and so on, or complex widgets such as Slider, Accordion, Tabs, and so on.
As you can see, using Page Builder by SiteOrigin is another easy and powerful way to add multi-column content in WordPress without writing any HTML code.
Conclusion
Using multi-column content in WordPress posts can help you develop more appealing and engaging content layouts. It can also increase your visitors' readability and usability.
In this blog post, I demonstrated two simple approaches for adding multi-column content to WordPress without using HTML code:
- Method 1: Using the Columns Block in the Block Editor
- Method 2: Using a plugin like Page Builder by SiteOrigin
Both approaches are straightforward and effective, and you can select the one that best meets your requirements and tastes.
Today, I hope you found this blog article useful and learned something new.


