
Promoting a business throughout the globe can be as simple as using images and other forms of visual media. Increasing your efforts and securing new clients can be made easier with the help of the correct graphics. It's easy to see why: visuals can draw in new customers, educate them, and help them visualize things in the way they like.

When it comes to user experience and website interaction, photos are the only marketing tool that can constantly enhance the user experience by displaying the most recent updates immediately on your website.
Any page on your website can have photos added to it. A landing page, portfolio page, or a gallery page, for example. You could lose a lot of time and effort if you follow a manual process. Using WordPress and its accessible page builder plugins, such as Elementor, for example, makes this process easier in terms of quickly developing visually attractive designs.
The good news is that adding an image gallery to your WordPress website and making it more attractive isn't as difficult as you would think. Because the Elementor image gallery widget makes things easy.
Create Amazing Websites
With the best free page builder Elementor
Start NowDesign Procedure
In order to use the Elementor picture gallery widget, you must first construct a web page. Any of the existing pages may also be used to immediately display a gallery of images.
Go to your page and add a gallery widget.

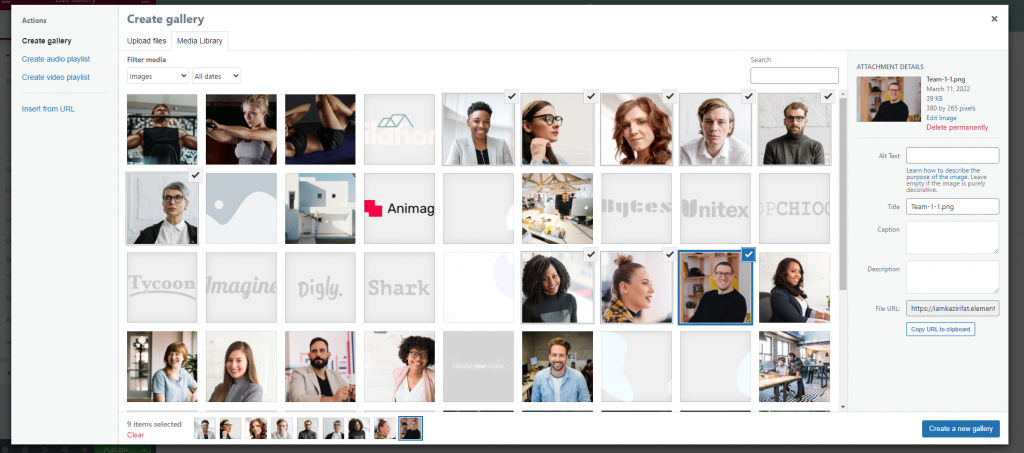
Now let's select images from the media files. Remember you can always change this later.
Here we have our gallery. Don't worry about the spacing and the layout.

Put 3 images per column. This way the gallery will look more engaging. Also, set the link option to none.

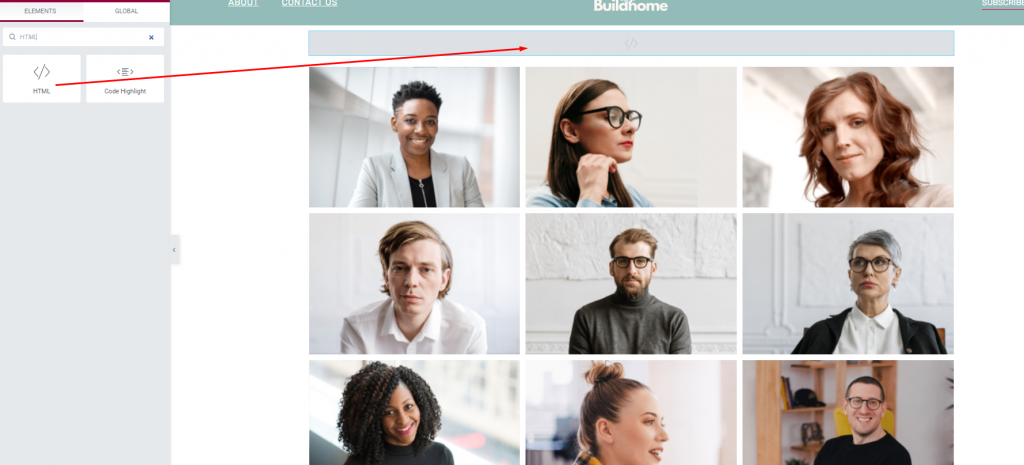
Now look for an HTML widget and add it above the gallery widget.
Paste the following code into the code box.
<style>.e-gallery
    -item{cursor: pointer;} </style>
<script>
document.addEventListener('DOMContentLoaded', function () {

var filteredImages = document.querySelectorAll('.e-gallery-item');

//Edit the links HERE
var links = [
'https://codewatchers.com/en',
'https://codewatchers.com/en',
'https://codewatchers.com/en',
'https://codewatchers.com/en',
'https://codewatchers.com/en',
'https://codewatchers.com/en',
'https://codewatchers.com/en',
'https://codewatchers.com/en',
'https://codewatchers.com/en',
];

var _loope = function _loope(i) {
    if (links[i].length > 4) {
    filteredImages[i].style.cursor = "pointer";
filteredImages[i].addEventListener('click', function () {
location = links[i];
});
}
};

for (var i = 0; i < filteredImages.length; i++) {
_loope(i);
}

});

</script>
And we are done. Although we have put the same links on each image, don't forget to change it according to your need.

Voila! You have successfully created a gallery with a different link on each image.
Final Words
Web design drills have changed a lot throughout the years. Marketers are doing everything they can to get their message over to their intended audience. With the appropriate images and a better organization, you can achieve this goal. You can expect stunning outcomes if you locate the proper layout for incorporating the photographs.
Using the Elementor image gallery widget, you can accomplish this in a minute. Elementor also allows you to create stunning design schemes with a minimal amount of coding. It doesn't matter if it's a commercial website or just a personal portfolio site; it will always deliver the greatest results.


