
You’ve seen them everywhere! Those eye-catching ribbons make you want to click on a product, sign up for a newsletter, or grab a deal. You know they work. You know they can boost your conversions. But you also know they’re a pain to create with Elementor.

You’ve tried to add them to your WordPress website, but you’ve ended up frustrated and disappointed. You’ve wasted hours tweaking the settings, adjusting the margins, and fiddling with the code. You’ve wondered why Elementor doesn’t have a simple widget for ribbons. You’ve wished there was an easier way.
Well, guess what? There is.
In this blog post, I’m going to show you how to add custom ribbons on WordPress using Elementor in minutes. No coding is required. No plugins needed. Just a few simple steps and some creative CSS with VERY LITTLE HTML.
Create Amazing Websites
With the best free page builder Elementor
Start NowSounds too good to be true, right?
By the end of this post, you’ll be able to create stunning ribbons for any purpose, any style, and any position. You’ll be able to make your website stand out from the crowd and attract more attention, clicks, and sales.
Are you ready to learn how to add custom ribbons on WordPress using Elementor?
Let’s begin.
Why Should You Use Ribbons?
Ribbons are used to tell the visitor about a sale or a discount as soon as they arrive at your website.
Ribbons are a great way to instantly attract your visitors when you are making an announcement. For example, you have announced a discount on a certain product and then you apply the discount ribbon on that product's thumbnail, it will immediately get the user to click on the product.
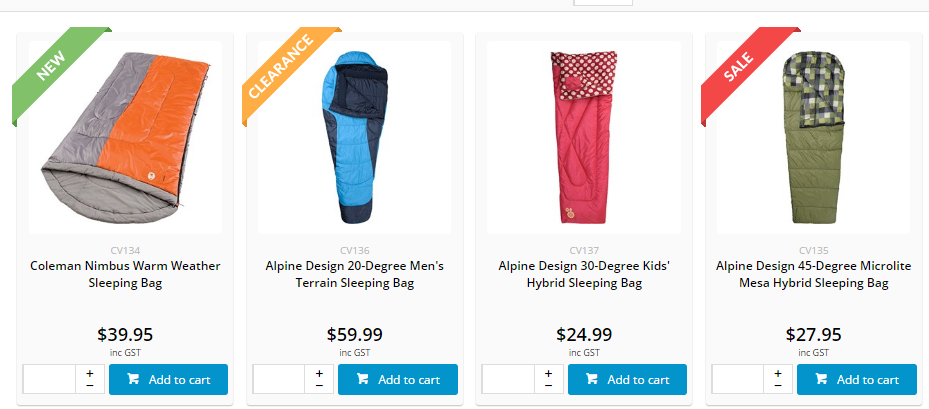
Ribbons are visually appealing when used in a certain manner. They can help the user go through unrelated products and improve the conversions and sales of your website.
How To Add Custom Ribbons Using Elementor
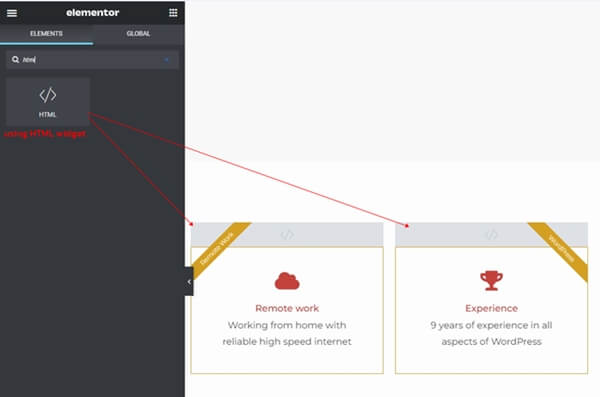
Below is an image of what you will be doing.

To start the process, you need to add an Inner section where we will add the widgets.
In essence, your section has two columns that you build. You can add any kind of widget to the column, including images and icon boxes. The HTML code widget is then added at the column's start. Lastly, we applied CSS and HTML code to style the ribbon as it is seen above.
We'll utilize the HTML widget to create the ribbon. We'll make two ribbon directions in this post. The upper left corner of the column has one. In the upper right corner of the column is another.
At the start of the column, add an HTML widget. The column container will house the HTML widget.
Now update the HTML widget with the following CSS and HTML code. This code will generate the ribbon located in the upper left corner of the column.
Top-Left Ribbon:
/* create the ribbon box */ .ar-ribbon-left-box { position: absolute; z-index: 1; top: 0; left: 0; width: 150px; /* it needs to create the square box */ height: 150px; /* it needs to create the square box */ overflow: hidden; /* it will hide the element when it is overflow */ } /* rotate the ribbon */ .ar-ribbon-left-box .ar-elementor-ribbon-rotate { /* rotate ribbon at top left of column */ /* you may change the value of both translateX() to meet your need */ -webkit-transform: translateY(-50%) translateX(-50%) translateX(45px) rotate(-45deg); -ms-transform: translateY(-50%) translateX(-50%) translateX(45px) rotate(-45deg); transform: translateY(-50%) translateX(-50%) translateX(45px) rotate(-45deg); /* add margin-top for the ribbon. it pushes the ribbon from the left corner */ margin-top: 45px; /* set text line-height */ line-height: 2; /* set center aligment */ text-align: center; /* set font and color */ color: #fff; font-size: 11px; font-weight: 300; background-color: #d5a021; }Save the changes after you are done to see the result of the left-side ribbon.
Top-Right Ribbon:
If you would like to add the ribbon to the column's upper right corner. The HTML code that follows will be added to the HTML widget.
/* create the ribbon box */ .ar-ribbon-right-box { position: absolute; z-index: 1; top: 0; right: 0; width: 150px; height: 150px; /* it needs to create the square box */ overflow: hidden; /* it will hide the element when it is overflow */ } /* rotate the ribbon */ .ar-ribbon-right-box .ar-elementor-ribbon-rotate { /* rotate ribbon at top right */ /* change translateX(50%) translateX(-45px) to fit your text */ -webkit-transform: translateY(-50%) translateX(50%) translateX(-45px) rotate(45deg); -ms-transform: translateY(-50%) translateX(50%) translateX(-45px) rotate(45deg); transform: translateY(-50%) translateX(50%) translateX(-45px) rotate(45deg); /* put the ribbon from the corner */ margin-top: 45px; /* set text line-height */ line-height: 2; /* set center aligment */ text-align: center; /* set font and color */ color: #fff; font-size: 11px; font-weight: 300; background-color: #d5a021; }Save the changes after you are done to see the result of the right-side ribbon.
Remove the space that exists between the widget below and the ribbon.
Because the div tag for our ribbon was added. It will make the gap appear between the widget and our ribbon. You can set the widget's negative margin top to eliminate the space.
In my instance, I made the Icon Box widget's ribbon. So, I positioned the HTML widget above the widget for the icon box.
Then, using "Advanced tab>Layout," I adjusted the Icon Box widget's margin-top to -20px. I no longer have any room between the Icon Box widget and the ribbon.
Conclusion
You’ve made it to the end of this blog post. Congratulations! You’ve learned how to add custom ribbons on WordPress using Elementor in minutes. You’ve mastered the art of using HTML and CSS to create stunning ribbons for any purpose, any style, and any position.
You may be feeling proud of yourself right now. And you should be. You’ve just added a powerful tool to your WordPress arsenal. You’ve just leveled up your Elementor skills. You’ve just made your website more attractive, more engaging, and more profitable.
But you may also be feeling a bit nervous. You may be wondering if you can do this on your own. You may be doubting your abilities. You may be thinking that this is too hard, too complicated, or too time-consuming.
Don’t worry. You’ve got this.
You’ve already done the hard part. You’ve already followed the steps and seen the results. You’ve already proven to yourself that you can do this. All you need to do now is practice, experiment, and have fun
So what are you waiting for?
Go ahead and unleash your inner ribbon master. Go ahead and make your website shine. Go ahead and wow your visitors, impress your clients, and grow your business.


