
Sometimes it is quite difficult to load different pages to display different content and this is why Elementor allows you to create a content switcher to your WordPress website.

A Content Switcher is a toggle button that allows the user to switch between content while staying on the same page. This makes users' experience flawless and saves time as well. In this tutorial, we will understand how to add a Content Switcher on WordPress with Elementor.
How To Create A Content Switcher Using Elementor
To begin with, make sure you have decided the two elements that you want to switch between and place them on the same page.
Then using the Elements tab in the left menu, head over to the HTML option.
Create Amazing Websites
With the best free page builder Elementor
Start Now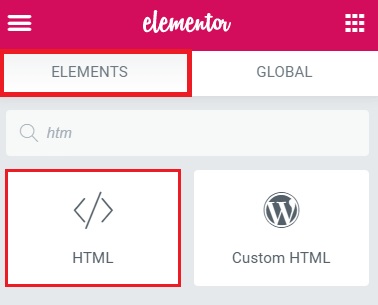
There are two ways to use the Content Switcher i.e. for the whole website and for two elements on the same page.
- If you want to add the Content Switcher to your website, use the following HTML code in the footer.
- If you want to add the Content Switcher between two elements on the same page, paste the following code at the bottom section of your page.
<script>
if (!(document.querySelector('.elementor-editor-active'))){
    let toggleSwitches = document.querySelectorAll('.toggle_switch');
    toggleSwitches.forEach((e,i) => {
        let shown = e.closest('.elementor-element').nextElementSibling;
        let toBeShown = shown.nextElementSibling;
        toBeShown.style.display = 'none';
        e.addEventListener('change', function(){
            if (e.checked){
            shown.style.display = 'none';
            toBeShown.style.display = 'block';
            } else {
            shown.style.display = 'block';
            toBeShown.style.display = 'none';
            }
        });
    });
}
</script>
<style>
   /* css for the toggle all switch */
   .toggle_switch {
   opacity: 0;
   }
   .toggle_switch::-moz-selection, .toggle_switch:after::-moz-selection, .toggle_switch:before::-moz-selection, .toggle_switch *::-moz-selection, .toggle_switch *:after::-moz-selection, .toggle_switch *:before::-moz-selection, .toggle_switch + .toggle_switch-button::-moz-selection {
   background: none;
   }
   .toggle_switch::selection, .toggle_switch:after::selection, .toggle_switch:before::selection, .toggle_switch *::selection, .toggle_switch *:after::selection, .toggle_switch *:before::selection, .toggle_switch + .toggle_switch-button::selection {
   background: none;
   }
   .toggle_switch + .toggle_switch-button {
   outline: 0;
   display: block;
   width: 4em;
   height: 2em;
   position: relative;
   cursor: pointer;
   left: 50%;
   transform: translateX(-50%);
   -webkit-user-select: none;
   -moz-user-select: none;
   -ms-user-select: none;
   user-select: none;
   }
   .toggle_switch + .toggle_switch-button:after, .toggle_switch + .toggle_switch-button:before {
   position: relative;
   display: block;
   content: "";
   width: 50%;
   height: 100%;
   }
   .toggle_switch + .toggle_switch-button:after {
   left: 0;
   }
   .toggle_switch + .toggle_switch-button:before {
   display: none;
   }
   .toggle_switch:checked + .toggle_switch-button:after {
   left: 50%;
   }
   .toggle_switch-ios + .toggle_switch-button {
   background: #808285;
   border-radius: 2em;
   padding: 2px;
   -webkit-transition: all .4s ease;
   transition: all .4s ease;
   border: 1px solid #e8eae9;
   }
   .toggle_switch-ios + .toggle_switch-button:after {
   border-radius: 2em;
   background: #fbfbfb;
   -webkit-transition: left 0.3s cubic-bezier(0.175, 0.885, 0.32, 1.275), padding 0.3s ease, margin 0.3s ease;
   transition: left 0.3s cubic-bezier(0.175, 0.885, 0.32, 1.275), padding 0.3s ease, margin 0.3s ease;
   box-shadow: 0 0 0 1px rgba(0, 0, 0, 0.1), 0 4px 0 rgba(0, 0, 0, 0.08);
   }
   .toggle_switch-ios + .toggle_switch-button:hover:after {
   will-change: padding;
   }
   .toggle_switch-ios + .toggle_switch-button:active {
   box-shadow: inset 0 0 0 2em #e8eae9;
   }
   .toggle_switch-ios + .toggle_switch-button:active:after {
   padding-right: .8em;
   }
   .toggle_switch-ios:checked + .toggle_switch-button {
   background: #5BCBF5;
   }
   .toggle_switch-ios:checked + .toggle_switch-button:active {
   box-shadow: none;
   }
   .toggle_switch-ios:checked + .toggle_switch-button:active:after {
   margin-left: -.8em;
   }
</style>
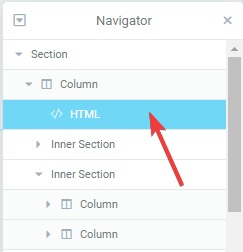
Next, you need to add the below-given HTML code right before the two elements or sections that you want to switch between.
<input id="content_switcher" class="toggle_switch toggle_switch-ios" type="checkbox" />
<label class="toggle_switch-button" tabindex="0" for="content_switcher"></label>
The toggle button i.e. the Content Switcher will now be functional on your website and will offer a quicker user experience. This is how using Elementor you can create a Content Switcher on WordPress. Indeed, with Elementor Pro you can be as creative as you want for your website design and outlook.
That's all from us for this tutorial. Make sure to follow us on our Facebook and Twitter to never miss out on our posts.


