
Have you forgotten your WordPress login information?

There are instances in which hackers will remove your admin account from the database, thereby locking you out of your own site.
With the steps here, you should be able to add a new MySQL account with "admin" privileges to your WordPress database and regain access.
Importance Of Adding an Admin User to the WordPress Database
Once, we had a problem where a hacker had compromised a user's site and removed their database admin access. Consequently, they were suddenly unable to access their WordPress site.
Create Amazing Websites
With the best free page builder Elementor
Start NowBy adding a new user as an administrator directly in WordPress, we were able to help them gain access to their site. This was accomplished with the help of phpMyAdmin, a web-based utility for managing MySQL databases in a web browser.
You may do the same if hackers have locked you out of your WordPress admin area or if you have simply forgotten your password.
Before making any changes to MySQL, however, you should always create a backup of your database. Then, once you've regained access to your account, you may want to read through our WordPress hack repair instructions for newbies.
So, let's check out how to add an admin user to the WordPress database via the MySQL interface.
Adding an Admin User to the WordPress Database With phpMyAdmin
Most reliable WordPress hosting providers automatically install PhpMyAdmin. When logged into your hosting account's cPanel, look for the Databases section.
This is a snapshot of the Bluehost dashboard:
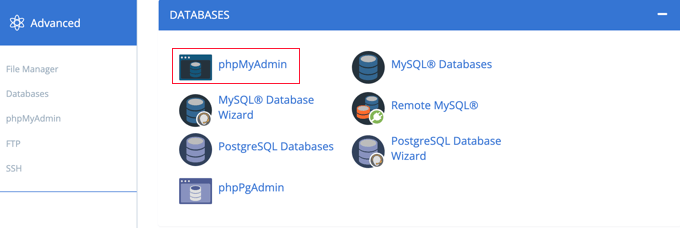
When you click on the icon, the phpMyAdmin control panel will load. From the left column, choose your WordPress database.
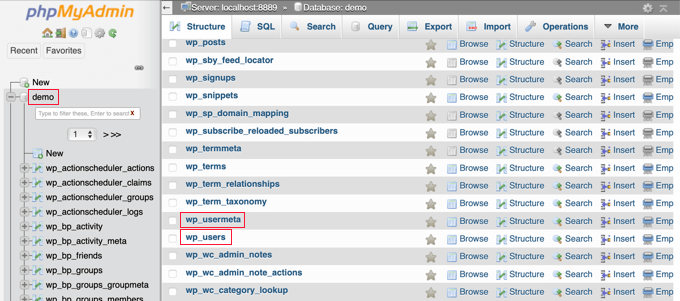
Once you do so, phpMyAdmin will show you all of the tables stored in your WordPress database. The wp_users and wp_usermeta databases will be the target of your edits.
Adding a User to the wp_users Table
To begin, navigate to the wp users table and select it. To view the users currently included in the table, click here.
Take a look at the screenshot below to see that our example website's table has two user IDs, 1 and 2. To demonstrate how to create a new user, we'll use ID3.
To add a new administrator, go to the 'Insert' tab at the top of the screen.

To the fields on the Insert form, please include the following data:
ID: pick a unique number (in our example, we’ll use 3)user_login: the username that will be used when logging inuser_pass: add a password, and make sure to select MD5 in the function menu (see the screenshot below)user_nicename: the user’s full name or nicknameuser_email: the user’s the email addressuser_url: your website addressuser_registered: select the date and time the user was registered using the calendaruser_activation_key: leave blankuser_status: set this to 0display_name: the user’s full name or display name
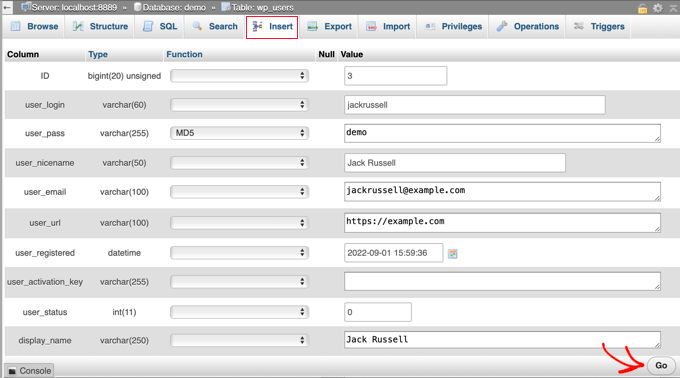
When you're done, hit "Go" to save the new user's information.
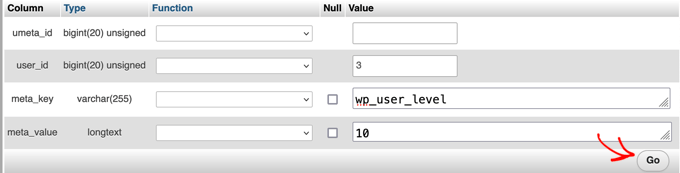
Adding a User to the wp_usermeta Table
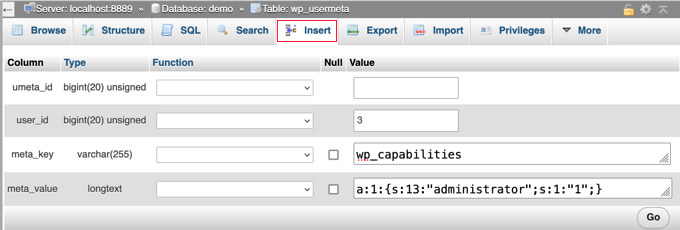
Now, you need to navigate to the wp_usermeta table. Then, proceed to step one by selecting the 'Insert' tab.
Following that, fill out the Insert form with the following data:
unmeta_id: leave this blank (it will be auto-generated)user_id: the user ID you used in the previous stepmeta_key: this should bewp_capabilitiesmeta_value: add this:a:1 {s:13:"administrator";s:1:"1";}
You should then see the second row's fields as you scroll down. This is what you need to include:
unmeta_id: leave this blank (it will be auto-generated)user_id: the user ID you used in the previous stepsmeta_key: you need to enterwp_user_levelmeta_value: 10
Once you're done filling in the fields, you may send your data by clicking the "Go" button. You have successfully made a new administrator account.
The user you created should now be able to log in to WordPress with the credentials you gave them.
You should immediately go to Users > All Users and click on your newly generated login.
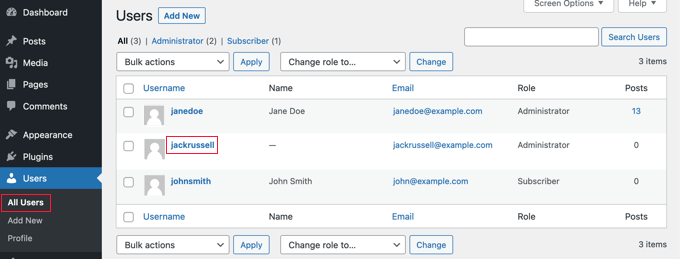
Now, without making any changes, go to the page's end and click the "Save" button.
In doing so, you'll give WordPress the opportunity to tidy up the newly formed user and fill in any missing details.
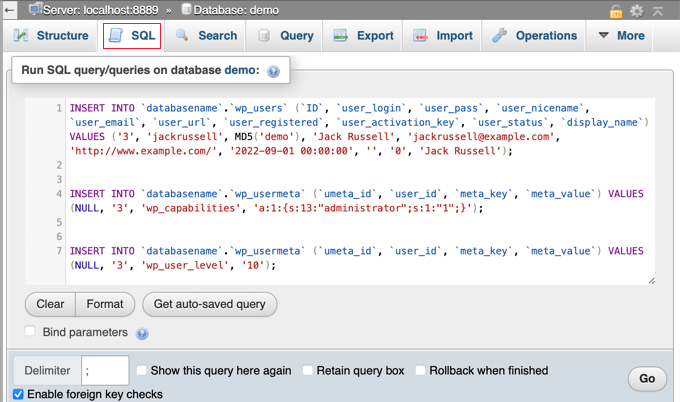
Adding an Admin User to the WordPress Database Using a SQL Query
If you are a programmer, you can automate some of the steps to save time.
If you want to use this SQL query in your database, just enter it.
INSERT INTO `databasename`.`wp_users` (`ID`, `user_login`, `user_pass`, `user_nicename`, `user_email`, `user_url`, `user_registered`, `user_activation_key`, `user_status`, `display_name`) VALUES ('3', 'demo', MD5('demo'), 'Your Name', '[email protected]', 'http://www.example.com/', '2022-09-01 00:00:00', '', '0', 'Your Name');


INSERT INTO `databasename`.`wp_usermeta` (`umeta_id`, `user_id`, `meta_key`, `meta_value`) VALUES (NULL, '3', 'wp_capabilities', 'a:1:{s:13:"administrator";s:1:"1";}');


INSERT INTO `databasename`.`wp_usermeta` (`umeta_id`, `user_id`, `meta_key`, `meta_value`) VALUES (NULL, '3', 'wp_user_level', '10');
Make sure that "databasename" is replaced with the actual name of the database you're accessing. As we mentioned in a first way, you should also update the other settings to reflect the preferences of the new user.
Wrapping Up
We hope you found this guide helpful in learning how to create a MySQL database user for WordPress's administrative interface. Want to learn WordPress from the ground up? See what's new in CodeWatchers' extensive content collection, broken down by topic, and then tell your friends about it.


