
Does your WordPress site need a table of contents?

An article's search engine optimization (SEO) and user experience (UX) can benefit from a table of contents. Yet, they are not always easy to make, especially for newcomers.
Create a table of contents for your WordPress posts and pages with the help of this tutorial.
Why is A Table of Contents important?
Tables of contents are commonplace in encyclopedias like Wikipedia. Long articles on WPBeginner, like the definitive guide to WordPress speed and performance, also benefit from them.
Create Amazing Websites
With the best free page builder Elementor
Start NowTo facilitate navigation within a lengthy article, a table of contents can be added to posts in WordPress.
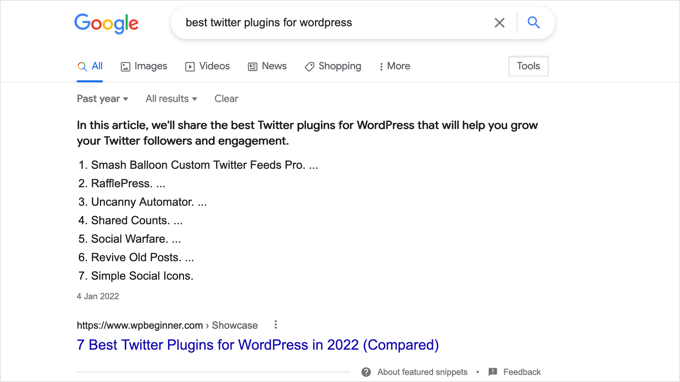
Both the user experience and WordPress SEO will benefit from these additions. Since Google can use the table of contents to generate "jump to section" links in the search results, this is the case.

Including a table of contents in your post can also improve its chances of being selected as a featured snippet, which would appear above the fold in SERPs. Because of this, you'll be able to maximize the organic search engine traffic to your site.
So, let's examine how to make a table of contents for WordPress articles and pages. We'll demonstrate both the automated method using a plugin and the conventional method using anchor links: Automatically and Manually.
Adding a Table of Contents Automatically
The finest SEO plugin for WordPress is All in One SEO (commonly known as AIOSEO), which includes a block to create a table of contents.
As an added bonus, the table of contents that is generated for you is fully editable and will save you time because it is based on your subheadings.
Installing the free All-in-One SEO Lite plugin is the first step. See our detailed tutorial on installing a WordPress plugin for more information.
Although the free version of AIOSEO is all you need to create a table of contents, the paid version, AIOSEO Pro, has many more capabilities to improve your site's visibility in search engine results.
After AIOSEO is activated, the plugin setup wizard must be used to configure the plugin. Consult our guide on how to properly install the All in One SEO Pack for WordPress for more information.
Table of Contents with AIOSEO
In order to add a table of contents, you must first create or update the post or page that will include the table of contents. After that, go to the 'AIOSEO - Table of Contents section by clicking the blue '+'icon.
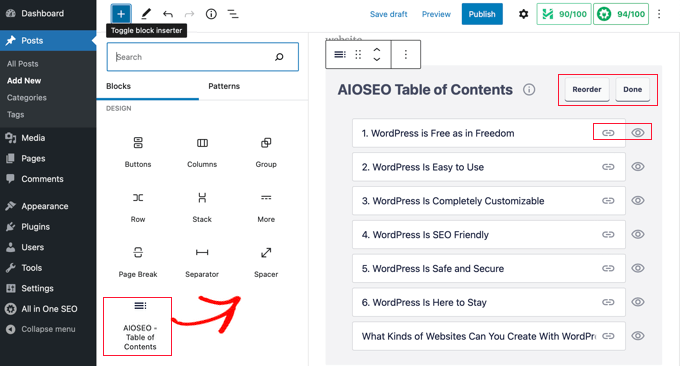
If you want a table of contents in a certain post or page, just drop the block there.
The plugin can analyze the page's structure and add appropriate headings to the table of contents without any manual intervention. Indentation of subheadings is used to demonstrate the hierarchy of your content when multiple heading levels are used (for example, H2, and H3).
When you add a heading to your post or page while you're still editing it, it will appear in the table of contents automatically.
Customizing the Table of Contents
The table of contents can be modified in a few different ways. It's possible, for instance, to give a different name to a section simply by clicking on it. In doing so, the table of contents heading will be updated, but the article itself will remain the same.

Anchor links for each heading will be generated mechanically by AIOSEO. If you click the Link button, you may modify the anchor text, which updates the table of contents and the headline of the post itself.
To temporarily conceal a heading, just click on the little eye icon to the right of that heading. The table of contents block in AIOSEO Pro allows users to rearrange the headings. The table of contents titles will be reorganized, but the article itself will not be affected.
The block's settings can also be accessed from the sidebar. Table of contents formats includes bulleted and numbered lists, both of which are available here.
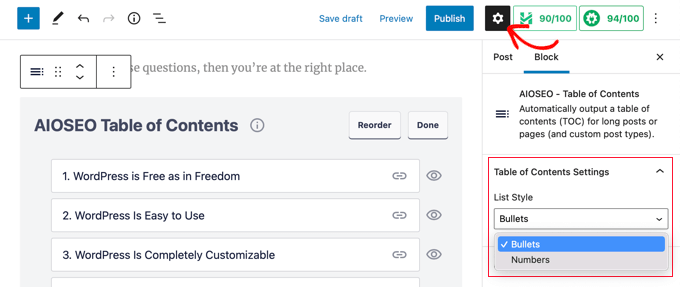
To finish up your customized table of contents, simply click the "Done" button.
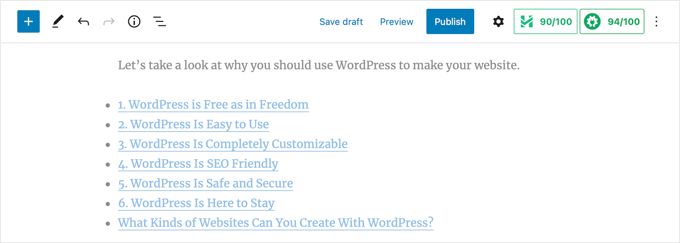
You can now preview the contents page as it will appear to your readers.
A headline or paragraph placed above the table of contents is recommended. To your readers' benefit, this will signal that they have stumbled onto a table of contents.
If a reader chooses to navigate to a certain section of the article based on its header, they will be sent there immediately upon clicking the corresponding link in the table of contents. As a result, readers can quickly access the material that piques their interest.
Unlike another table of content plugins for WordPress, AIOSEO's table of content functionality allows you to modify the headings and selectively hide them as needed.
It's a shame that most similar table of contents plugins lack this essential feature.
Adding a Table of Contents Manually
A plugin is not required to make a table of contents; instead, you can use anchor links. This, however, will necessitate additional work and time.
Typing the Table of Contents
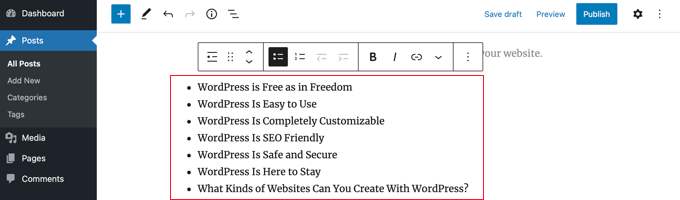
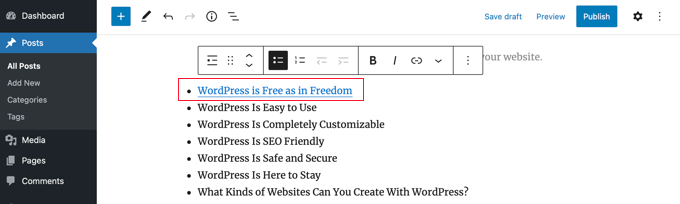
In order to create the table of contents, you must first insert a 'List' block and label its items with appropriate titles. The list's heads can be entered manually or copied and pasted directly from the article's text.
How to Add Anchor Text to Heading Blocks
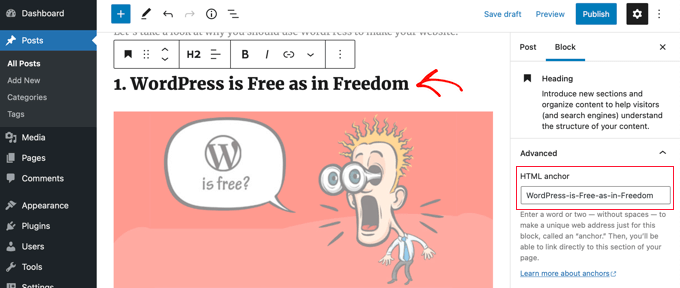
After that, you should equip each heading in the TOC with an anchor property. When a user hits a section heading in the table of contents, WordPress will be able to take them to the specified location automatically.
The H2 or H3 heading should be the first link you click. When that happens, the arrow next to "Advanced" in the block settings window must be clicked to reveal those options.
Then, in the field labeled "HTML anchor," type a distinct word or phrase without any spaces. Hyphens may be used to denote a space between words if desired.
The same procedure can be followed for the inclusion of additional headers in the table of contents.
Adding Anchor Links
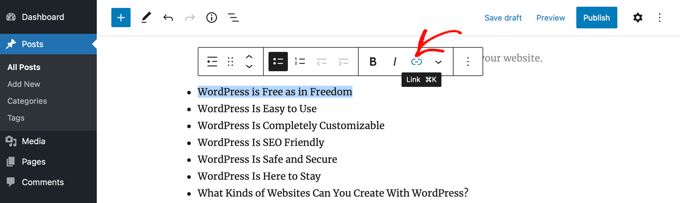
The final action is to connect the table of contents heads to the HTML anchors.
After selecting the first item in your List block, select the 'Link' button from the toolbar.
Once you've decided on a hashtag (#), you may begin typing the anchor text for that section.
A WordPress post can be quickly navigated to a specific part using the # symbol. The domain name and any other parameters in the URL are not included.
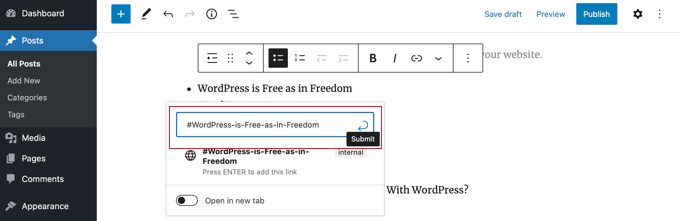
When you are ready to build the link, press the Enter key or click the Submit button.
Inserting the anchor into your table of contents. Any readers who click this will be transported directly to the section of the post or page where that heading appears.
These procedures can be used again and again to link various sections of the table of contents.
Wrapping Up
To that end, we've put together this guide to assist you in learning how to make a table of contents for your WordPress posts and pages. You may add a table of contents to your blog post or page in two different ways. Send it forward to your pals without hesitation!


