
Looking to enhance the functionality of your WordPress website and provide a seamless shopping experience for your customers? Look no further! In this comprehensive guide, we'll show you how to "Add a Shipping Calculator to Your WordPress Site." Shipping costs can often be a make-or-break factor for online shoppers, and by integrating a shipping calculator into your website, you can eliminate uncertainty and boost user confidence.

Whether you're running an e-commerce store, a blog with affiliate links, or any other WordPress site that requires shipping cost transparency, this step-by-step tutorial will walk you through the process. Say goodbye to abandoned shopping carts and hello to satisfied customers who know exactly what they'll pay for shipping. Let's dive in and make your WordPress site even more user-friendly and conversion-driven.
What is a Shipping Calculator

A shipping calculator is a tool or feature used on websites, particularly e-commerce platforms, to calculate the cost of shipping for a product or order. It provides users with an estimate of how much they will need to pay for shipping based on various factors such as the destination, the weight and dimensions of the items, and the chosen shipping method.
The primary purpose of a shipping calculator is to give customers transparency and convenience during the online shopping process. It helps them make informed decisions about their purchases by displaying the shipping cost before they complete the checkout process. This transparency can reduce cart abandonment rates and increase customer satisfaction.
Create Amazing Websites
With the best free page builder Elementor
Start NowIn essence, a shipping calculator simplifies the shopping experience by eliminating uncertainty about shipping costs, making it easier for customers to decide whether to proceed with their purchase. It's a valuable tool for both online businesses and their customers.
How To Add a Shipping Calculator to WordPress Site
Use Formidable Forms to add a general shipping calculator to your WordPress website if you don't have a WooCommerce store.
It is a well-liked WordPress contact form plugin that enables the creation of sophisticated and intricate forms. For example, you can use the plugin to add a contact form, calculators, surveys, directories, and web applications.
We'll utilize the Formidable Forms Pro package for this lesson because it offers more customization choices and pricing fields.
The Formidable Forms Lite and Formidable Forms Pro plugins must first be installed and activated. The premium plugin enhances the functionality of the free Lite plugin by adding more sophisticated capabilities.
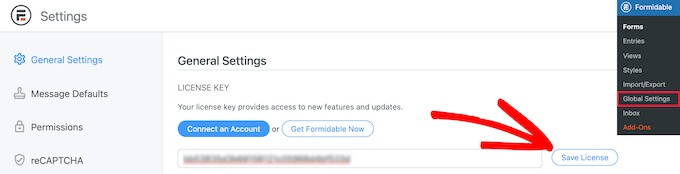
You must access Formidable » Global Settings from the WordPress dashboard after activation. The 'Click to enter a license key manually' link can be clicked from here.

The license key must then be entered, followed by a click on the "Save License" button.
The license key is located in the area of your Formidable Forms account.
The next step is to add a new form by going to Formidable » Forms.
The '+ Add New' button is located at the top.

Then, Formidable Forms will display a variety of templates for you to select from. There are several categories to pick from, including business processes, calculators, conversational forms, and more.
There isn't a shipping calculator pre-built template available in Formidable Forms. To make one, though, you can use a blank form template.
Pick the 'Blank Form' template now.
You must give your form a name on the following screen.
The ability to insert the template into an application is also available. For this lesson, you can, however, use the default configuration.
Click the 'Create' button after entering the form's name.

The drag-and-drop form builder will appear after that.
Any form field from the menu on the left can be easily added to the template by dragging and dropping it there.

For instance, you can include form fields in the template such as name, email, phone number, and more.
You can add a 'Product' form field in the Pricing Fields section on the left to create a shipping calculation.
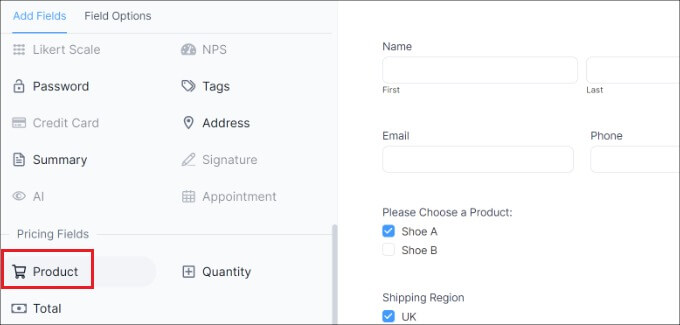
The product form field can then be chosen and further customized.
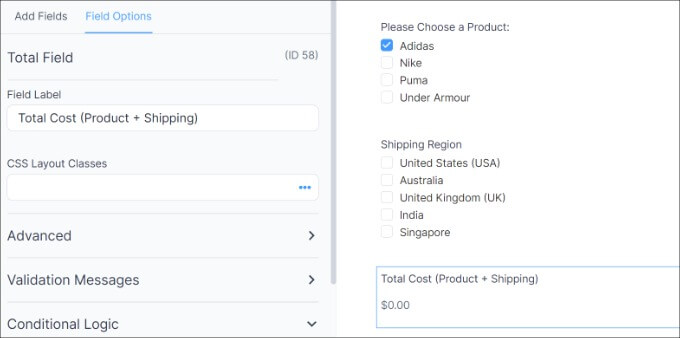
For instance, we altered the product type and field labels. You can display products using Formidable Forms as checkboxes, dropdown menus, radio buttons, single products, or user-defined options.
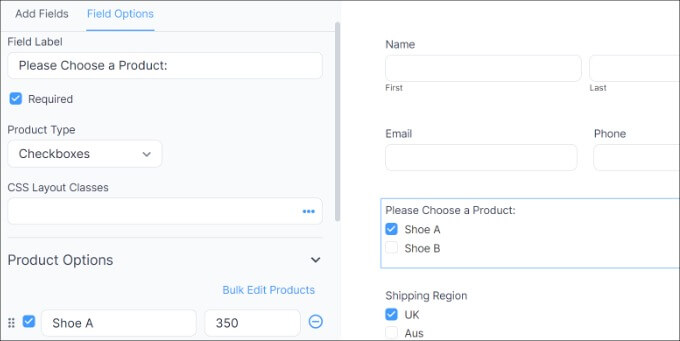
Additionally, under the heading "Product Options" in the menu on the left, you can add your products and their prices.
The next step is to enter your shipping areas and fees after you've placed your products. You can once more add a Product form field in the Pricing Fields area of the menu on the left to accomplish that.
The label and product type must then be changed, and each region's delivery cost must then be entered separately.
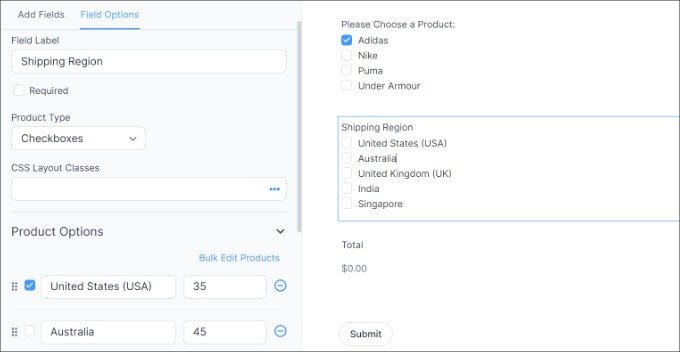
We modified the label in the screenshot above to Shipping Regions and the Product Types to Checkboxes. From there, we expanded the Product Options section to include additional shipping zones and their associated costs.
You'll need to display a total for your shipping calculator after this is finished. Simply add the Total form field from the Pricing Fields section to the template to accomplish this.

The Total form field can then be chosen and its label, description, and other options modified.
With Formidable Forms, you can also provide the form fields conditional logic so that they display based on user input.
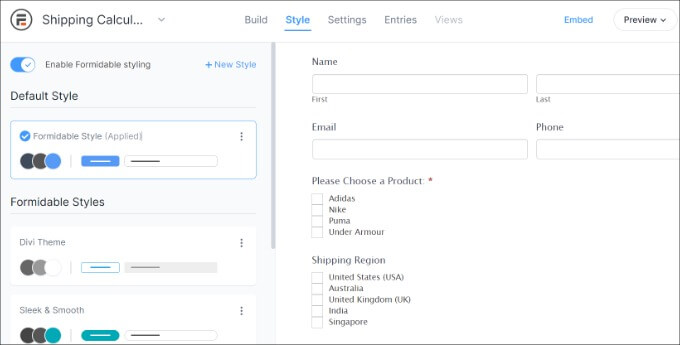
The 'Style' tab is then accessible from the top.
Pre-built forms are available for your form from Formidable Forms. Simply decide on one or invent a brand-new look. We'll apply the Formidable Style's default settings for this tutorial.
Next, Formidable Forms also allows you to modify form options.
Just select the 'Settings' tab from the menu. You can change the form title, add a description, and more using these common settings.
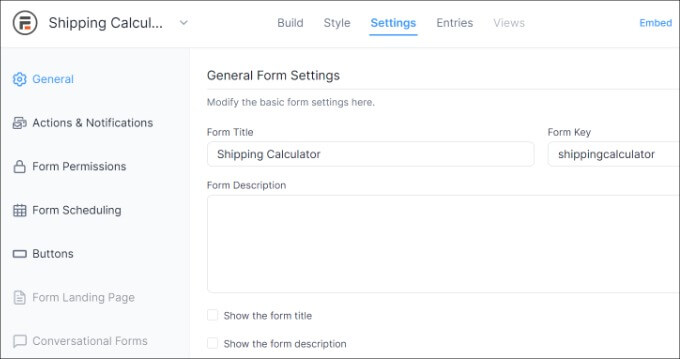
Additionally, actions and notifications, permissions for the form, and scheduling of the shipping calculator form are all choices.
Save your changes once you've finished configuring the options. Your calculator can now be placed anywhere on your website.
Start by selecting the 'Embed' button in the form builder's top-left corner. You will then have a choice of adding the form to an existing page, making a new page, or manually inserting it.

We shall select the 'Create new page' option for the sake of this tutorial.
You can then click the "Create page" button after giving your new page a name.

From from point on, the WordPress post editor will display a preview of the shipping calculator form.
Go ahead and publish your page, then invite people to your website to use the shipping estimator.

Wrapping Up
In conclusion, integrating a shipping calculator into your website, especially with page builder like Elementor, is a smart move. It enhances user experience by providing transparency in shipping costs, reducing cart abandonment rates, and ultimately boosting customer satisfaction. With this valuable tool, you empower your customers to make informed decisions, leading to increased conversions and a more successful online presence. So, don't hesitate to add a shipping calculator to your website today and watch your business thrive.


