
Pipedrive is a well-known sales CRM that lets you produce and manage leads all in one location. It has a visual sales pipeline technique that lets you drag and drop transactions across stages.

This will make it simple for potential clients to get in touch with you. In this tutorial, we will understand how to simply develop a custom Pipedrive form for your WordPress website.
Why Should You Add A Pipedrive Form
Despite the fact that your Pipedrive CRM account aids you in maintaining control over the sales process, you must still manually add contacts or deals to your account.
That's why you need to create a custom Pipedrive form and embed it in your WordPress site for the best results. Then, using Zapier, you can link the form to your Pipedrive account.
Create Amazing Websites
With the best free page builder Elementor
Start NowAs a result, every time someone fills out the form, a new contract is made in your Pipedrive account. This will make it simple for potential clients to get in touch with you. With lead capturing, it will also help you save time and enhance productivity.
How To Create A Custom Pipedrive Form
Now that you know why you need a Pipedrive form for your WordPress with WP Forms. The following steps will help you create the Pipedrive form.
1. Create A WP Form
Installing and activating the WPForms plugin on your website is the first step. WP Forms is a fantastic plugin that allows you to quickly construct a variety of forms.
Once you have installed and activated WP Forms, to make a new form, go to WPForms and then press Add New on your admin panel's left sidebar.

We'll make a simple lead-generating form with some key elements like name, email, subject, and message for the purpose of this tutorial. To make changes to any field, simply click on it. You may also adjust the notice and confirmation settings under the form settings.
Click the Save button in the top-right corner of your screen to save your changes.
2. Test Your WP Form
Next, you must add at least one entry to your form once it has been created in order to test the connection between WPForms and Pipedrive. Begin by inserting your form into a website page or sidebar. You can also generate a new form entry by using the form's preview option. So go to WPForms and then to the All Forms.
Then, with your mouse cursor placed over the title of your Pipedrive form, click the Preview option. Your form will open in a new tab in your web browser. To make a new item for testing purposes, fill in the form and click the Submit button.
3. Install And Activate Zapier
Moving on, you will need to install the Zapier addon on your WordPress to integrate with WP Forms. Zapier allows you to connect WPForms to over 1300 applications and automate a variety of operations. It may be used to make a To-do list, add events to Google Calendar, create a Zoho contact record, and much more.
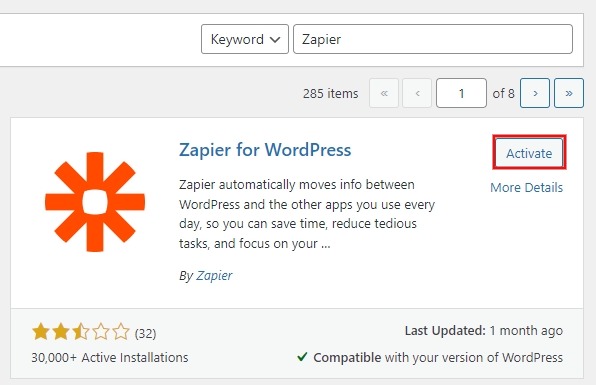
To install the plugin, navigate to WPForms and then Addons. Go to that page and search for Zapier, then install and activate the addon.
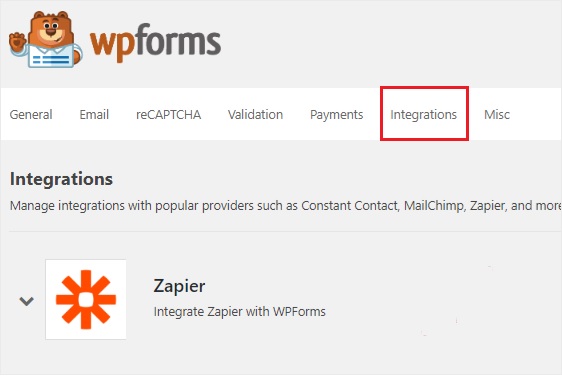
Then go to WPForms, Settings, Integrations, and click on the Zapier icon to retrieve the Zapier API key. We'll use this API key to connect Zapier to WPForms, so keep this page open.
4. Make A New Zap
Zapier allows you to construct zaps that link two or more applications to perform a continuous activity. A trigger is also required for the zap to do a specified function. In our situation, the action is to transfer those leads to the Pipedrive account once someone fills out our Pipedrive form.
Log in to your Zapier account by going to the website. If you don't already have a Zapier account, you can sign up for one for free. To make a new zap, go to the top-right corner and click the Make a Zap button. This will take you to a new page where you can begin the configuration process.

Making a zap is comprised of two steps. WPForms must be configured as the trigger app first, and then Pipedrive must be configured as the action app.
5. WP Configuration As The Trigger App
The first step in continuing to build up your Pipedrive WordPress form is to use the choose a Trigger App search box to look for WPForms. Then click it to advance to the next stage.

You must now select a trigger choice. The sole trigger option in WPForms is New Form Entry. So choose it and then click Save + Continue.

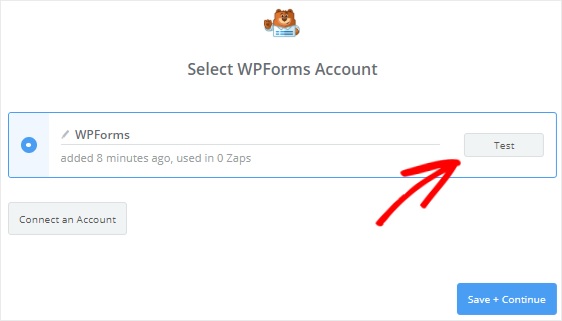
You'll need to link Zapier to your WPForms account in the following step. To begin the procedure, click the Connect an Account option. This will prompt you to input your website URL and the Zapier API key in a popup window. Return to step 3 to learn how to obtain the Zapier API key.
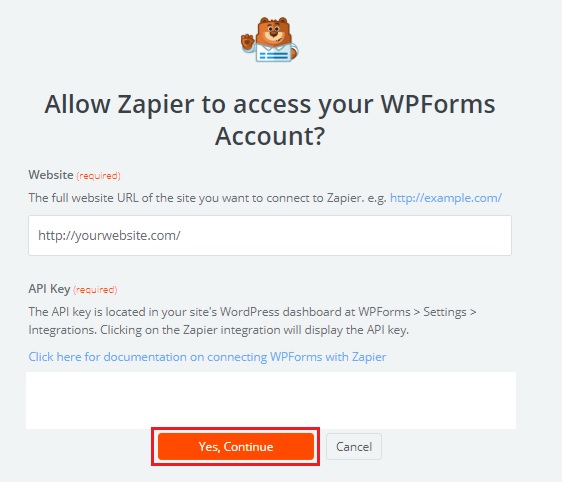
Close the popup box by clicking Yes, Continue to connect WPForms to Zapier. You can also use the Test button to test the connectivity between the two applications. If you receive a success message, click Save + Continue to continue.
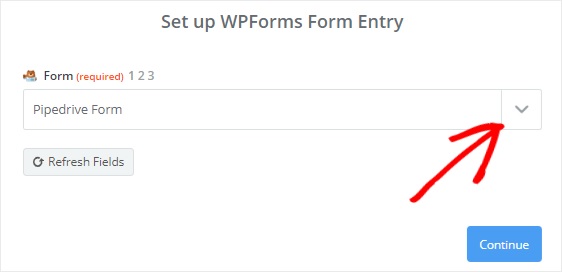
Now, Zapier will fetch all of your website's online forms. Go ahead and click the Continue button after selecting the Pipedrive form from the selection box.
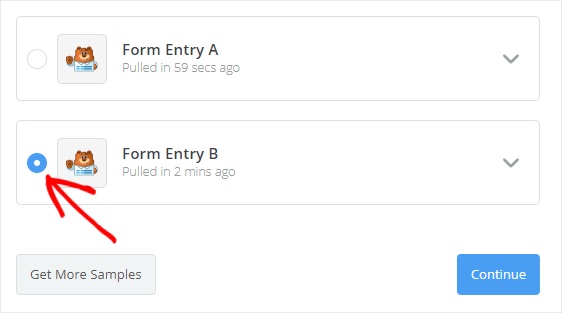
The entries of the form you've chosen will then be displayed by Zapier. To advance to the next stage, choose any one of the form entries for testing purposes and click Continue.
6. Set Pipedrive As An Action App
WPForms was specified as the trigger app in the previous phase of setting up your Pipedrive WordPress form. Now is the time to make Pipedrive our action app. Select "Your Zap currently lacks an action step." from the drop-down menu. To begin, click the "Add one now!" option.

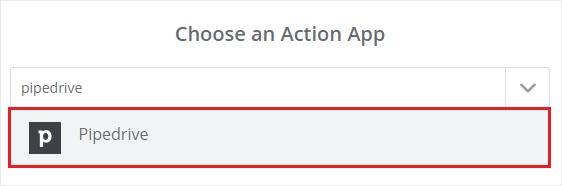
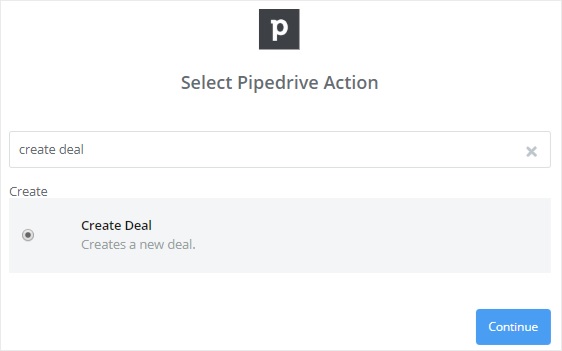
To begin, use the Choose an Action App search box to find the Pipedrive app and then click it to continue.
After that, you'll be prompted to select a Pipedrive action for when a WordPress form entry is submitted. Select Create Deal and then Continue because we want to make a new deal.
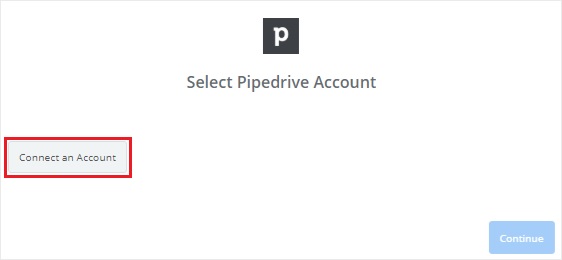
By pressing the Link an Account option, you can now connect your Pipedrive account to Zapier. This will prompt you to input your API token in a popup window.
To obtain the API token, go to the Pipedrive website, log in to your account, and choose your name from the dropdown menu in the top-right corner of your screen. After that, select Settings from the drop-down menu.

You must choose API from the Other section of the settings page. The API token for your Pipedrive account will now be visible.
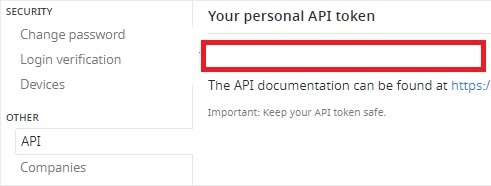
Proceed to copy the API token and paste it into the popup box's API Token textbox.
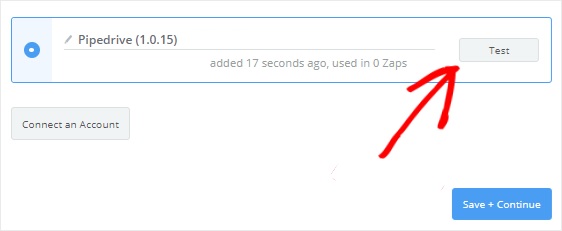
After that, click the Yes, Continue button to allow Zapier access to your Pipedrive account and do other operations.
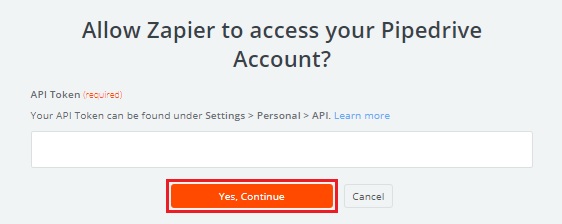
Then, to validate the connection between Zapier and Pipedrive, click the Test option. When you see the success notification, click Save + Continue.
7. Build A Pipedrive Template
You'll now be required to form a template for a new Pipedrive deal. Zapier will use this template to generate a deal on your Pipedrive account whenever someone fills out your form.
The Title textbox is the most significant field in this design. To add the Subject field, click the "Insert a Field" icon and choose it.

While the remainder of the fields is optional, certain of them must be filled out in order to construct a legitimate deal.
The Stage selection box allows you to select the stage where the new offers will be shown. So, pick Lead In from the dropdown box. Some of the information will be collected from your Pipedrive account, while the rest will be retrieved through your WordPress form.
Now is the time to put up the Person field in this template. You'll need the name and email address of the individual who contacted you. Scroll down to the Person box and select the Add a Search Step button to do so. This will display a modal box alerting you that a new step will be added between the trigger and action procedures.

Because we want to see if the individual already exists in our Pipedrive account list, we'll need to take an additional step. We'll create a new contact with the information we have if they aren't. So, click Ok, and then add it to create a new step in Pipedrive to create a template for finding people.
Click the "Insert a field" icon and then pick Name from the selection box for the Name field. This information will be used by Zapier to find the individual in your Pipedrive account.
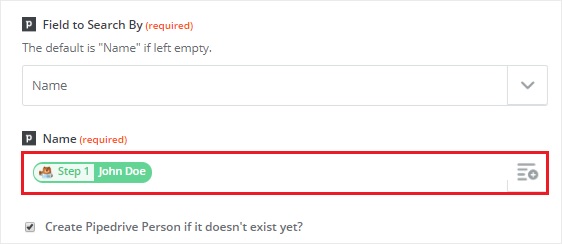
Then, immediately beneath the Name field, choose the "Create Pipedrive Person if it doesn't exist yet?" checkbox. This will bring up some new custom fields in your Pipedrive account that you'll need to create a new contact. Don't worry, everything you need from your WordPress form will be transferred to Pipedrive.
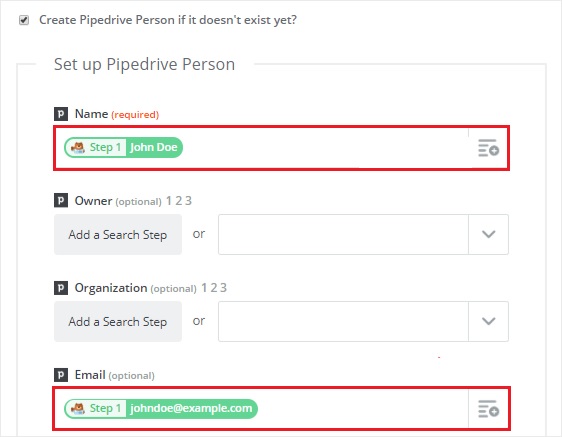
Select a name and email address from the Name and Email dropdown menus, respectively. The field tests are optional, so select Continue to go further.
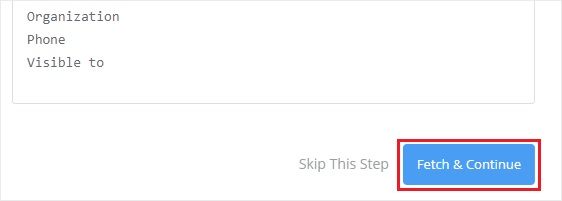
You must click the Fetch & Continue button to test this template. If everything goes well, you'll receive a success message on your screen.
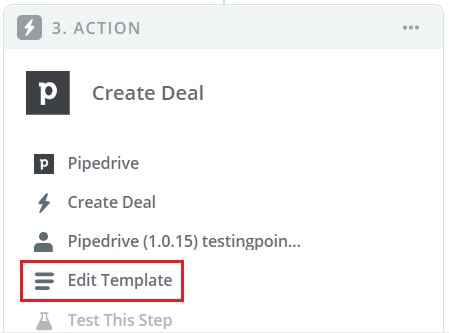
Then, on the left side of your screen, click the Create Deal step, and then select Edit Template.
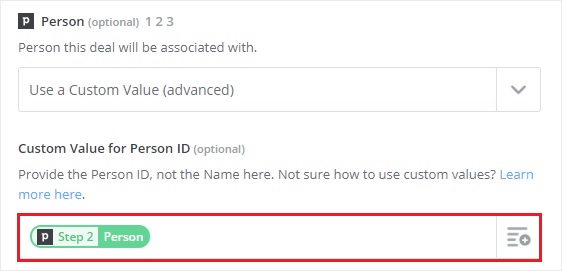
You will be taken back to the "Pipedrive Deal Setup" page. A new field called "Custom Value for Person ID" appears just below the Person field. And the value of our new step will be automatically filled in.
To test the connection between WPForms and Pipedrive, scroll down to the bottom of the page and click Continue, then Send Test to Pipedrive. A new deal will be generated in your Pipedrive account if everything is operating well.

To finish the procedure, click the Finish button after receiving the success message.
Last but not least, make sure your Zap is turned on. When a form entry is submitted, this will ensure that a new lead is produced in your Pipedrive account.
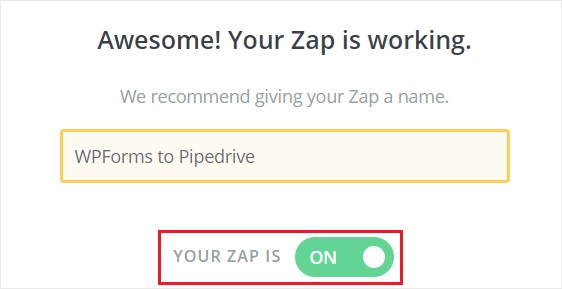
You may also name your Zap anything you like. That successfully concludes the process. To create a new deal, you've successfully connected your WordPress form to Pipedrive.
We hope this tutorial will help you in making your WordPress experience smoother and simpler. Make sure to join us on our Facebook and Twitter to keep getting updates about WordPress tutorials.


