
In modern web design, dynamic elements greatly help increase user engagement and interactivity. Among these dynamic components, a dynamic music player is a key feature in giving your website visitors an immersive audio experience while browsing your site.

In this tutorial, we will discuss the technical aspects of integrating a dynamic music player into the Elementor framework with the power of the JetEngine plugin. Our aim is to help web developers and designers acquire the knowledge and skills needed to integrate a dynamic music player smoothly on their websites.
Prerequisites
Before diving into implementing a dynamic music player in Elementor, you must ensure that you have the necessary prerequisites in place. Here are the key requirements to get started:

Elementor and JetEngine Plugins: Ensure your WordPress website has both Elementor and JetEngine plugins installed and activated. These plugins will be the foundation for creating and managing dynamic content, including the music player.
Create Amazing Websites
With the best free page builder Elementor
Start NowBasic Knowledge of HTML, CSS, and JavaScript: While you don't need to be a coding expert, a fundamental understanding of HTML, CSS, and JavaScript will be beneficial for customizing and enhancing the functionality of the dynamic music player.
MP3 Audio Files for the Music: Prepare the MP3 audio files that you intend to use for the music player. Ensure that these files are properly formatted and named according to your organizational preferences.
By ensuring these prerequisites are met, you'll be well-equipped to follow the tutorial and successfully implement a dynamic music player in Elementor.
Setting Up Audio Files
Setting up your audio files correctly is crucial before integrating a dynamic music player in Elementor. Follow these steps to ensure smooth integration:
Begin by uploading your MP3 audio files to your WordPress website's media library. Ensure that all audio files are uploaded in the same folder for integration into the music player.
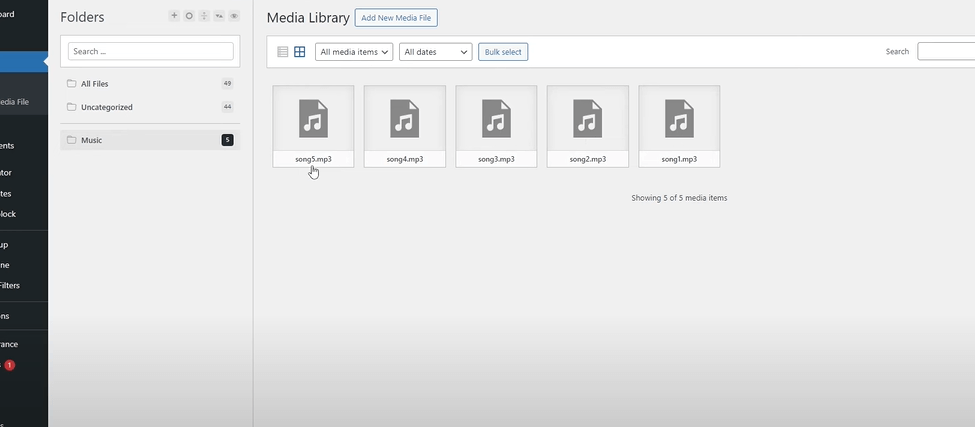
Adopt a consistent naming convention for your audio files to maintain organization and clarity. Choose names that reflect the content of each song and make it easier to identify and select them within the Elementor interface. My media library may look different from yours because I use a Happy Files plugin.
Use folders or categorization methods within the media library to organize your audio files effectively. This will streamline the process of selecting and integrating the desired songs into the dynamic music player.
Enabling JetEngine Module
To enable seamless integration of dynamic content within Elementor, activating the modules within the JetEngine plugin is essential. Follow these steps to enable the JetEngine module:
Accessing JetEngine Settings: Navigate to the settings section of the JetEngine plugin within your WordPress dashboard. Here, you'll find options to customize and configure various aspects of the plugin's functionality.
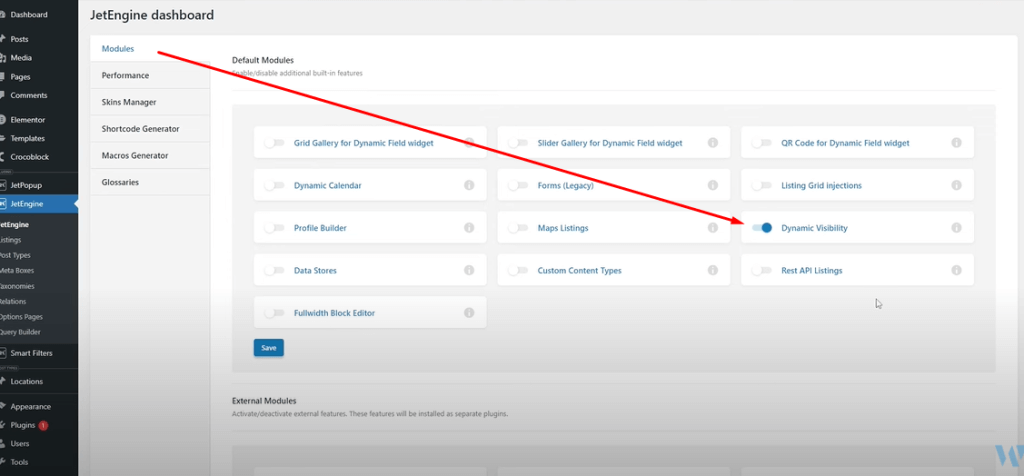
Enabling the "Dynamic Visibility" Module: Locate the "Modules" tab within the JetEngine settings and ensure that the "Dynamic Visibility" module is enabled. This module is crucial for implementing dynamic conditions and controlling the visibility of elements based on specific parameters.
Enabling the "Dynamic Visibility" module in JetEngine will unlock powerful capabilities for creating dynamic and interactive content within your Elementor-powered website.
Front-End Implementation
Now that we've configured the necessary settings and modules, it's time to dive into the front-end implementation of the dynamic music player within Elementor. Follow these steps to integrate the music player into your website's front end seamlessly:
Creating the Layout in Elementor: Launch the Elementor editor and design the layout where you want to place the dynamic music player. Utilize Elementor's drag-and-drop interface to create a visually appealing and user-friendly design.
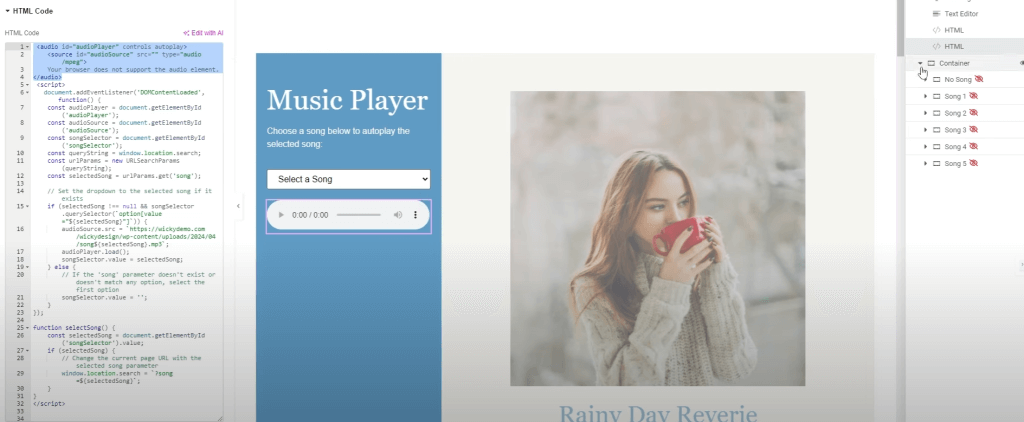
Using HTML and JavaScript for Dynamic Functionality: Incorporate HTML and JavaScript code snippets to implement the music player's dynamic functionality. This includes rendering the audio player, handling song selection events, and updating song information in real-time.
HTML Code for Audio player -
<select id="songSelector" onchange="selectSong()">
    <option value="">Select a Song</option>
    <option value="1">Rainy Day Reverie</option>
    <option value="2">Cozy Corner Melodies</option>
    <option value="3">Hazy Afternoon Serenade</option>
    <option value="4">Chill Cafe Atmosphere</option>
    <option value="5">Mellow Evening Glow</option>
</select>

<audio id="audioPlayer" controls autoplay>
    <source id="audioSource" src="" type="audio/mpeg">
    Your browser does not support the audio element.
</audio>
And here goes the JS code -
<script>
   document.addEventListener('DOMContentLoaded', function() {
    const audioPlayer = document.getElementById('audioPlayer');
    const audioSource = document.getElementById('audioSource');
    const songSelector = document.getElementById('songSelector');
    const queryString = window.location.search;
    const urlParams = new URLSearchParams(queryString);
    const selectedSong = urlParams.get('song');

    // Set the dropdown to the selected song if it exists
    if (selectedSong !== null && songSelector.querySelector(`option[value="${selectedSong}"]`)) {
        audioSource.src = `https://domain.com/song${selectedSong}.mp3`;
        audioPlayer.load();
        songSelector.value = selectedSong;
    } else {
        // If the 'song' parameter doesn't exist or doesn't match any option, select the first option
        songSelector.value = '';
    }
});

function selectSong() {
    const selectedSong = document.getElementById('songSelector').value;
    if (selectedSong) {
        // Change the current page URL with the selected song parameter
        window.location.search = `?song=${selectedSong}`;
    }
}
</script>
By following these steps, you can seamlessly integrate a dynamic music player into your website's front end using Elementor and JavaScript.
Dynamic Conditions with URL Parameters
Dynamic conditions with URL parameters play a crucial role in controlling the behaviour and visibility of elements within your Elementor-powered website. You can dynamically update content based on user interactions or external factors by leveraging URL parameters. Follow these steps to implement dynamic conditions with URL parameters effectively:
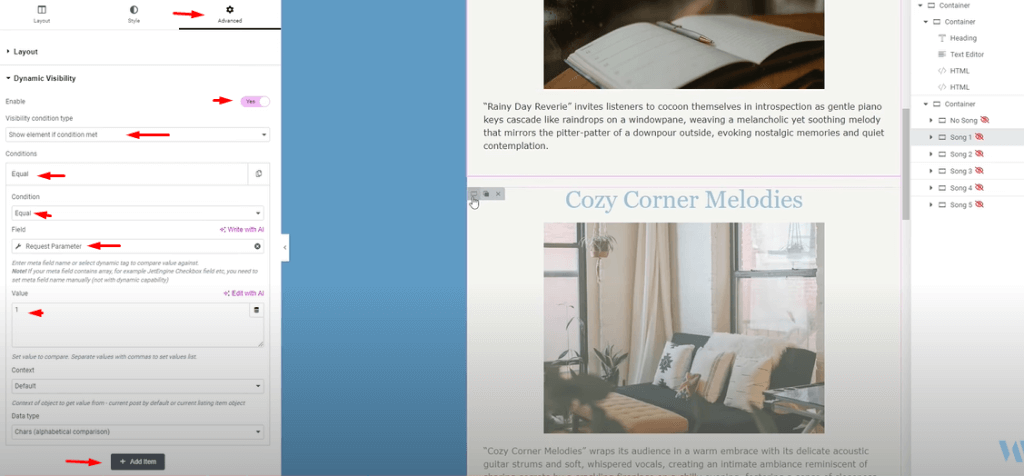
Understanding URL Parameters: URL parameters are key-value pairs appended to the end of a URL, allowing you to pass data from one page to another. For example, a URL parameter such as "?song=1" signifies that the value of "song" is set to "1".
Implementing Dynamic Conditions in Elementor: Within Elementor, utilize the dynamic visibility feature to control the visibility of elements based on URL parameters. This feature allows you to show or hide elements dynamically based on specific conditions.
Showing Elements Based on URL Parameters: Configure dynamic conditions to show elements when specific URL parameters are met. This ensures that relevant content is displayed to users based on their interactions or preferences.
Hiding Elements Based on URL Parameters: Configure dynamic conditions to hide elements when certain URL parameters are present. This allows for a personalized and tailored user experience, where unnecessary content is dynamically hidden based on user actions.
By effectively implementing dynamic conditions with URL parameters, you can enhance the interactivity and relevance of your Elementor-powered website, providing users with a seamless and personalized browsing experience.
Wrapping Up
As you continue to explore and experiment with Elementor and JetEngine, don't hesitate to customize and tailor the dynamic music player to suit your specific needs and preferences. Whether you adjust the layout, add new features, or fine-tune the functionality, the flexibility of these tools allows for endless customization possibilities.
Remember to embrace creativity and innovation as you embark on your journey to create dynamic and immersive web experiences. Experiment with different design elements, explore advanced functionalities and push the boundaries of what's possible with Elementor and JetEngine.


