
If you work in marketing, you understand the importance of emails. Improving sales, increasing traffic, and developing targeted content are just a few of the ways email marketing campaigns may help your business flourish. Some may tell you that email marketing is dead and that you should focus on other ways to contact your consumers. That is far from the case. In fact, 99 percent of people check their email at least once every day. You're missing out if you're not using email marketing for your business. We'll teach you how to set up email marketing campaigns on Cloudways with Divi hosting, either using an email provider or the FluentCRM plugin, in this post.

Divi Hosting by Cloudways
Divi's connection with Cloudways makes it an excellent choice for hosting your Divi website. Cloudways Divi hosting is quick and has some outstanding features such as an SSL certificate, bot protection, backups, excellent support, and the possibility to install Divi in one click. In addition to these features, Cloudways, as a cloud hosting service, can handle massive amounts of traffic. You can also arrange for your server to handle transactional and marketing emails by configuring your own SMTP using a variety of provider alternatives. Cloudways has you covered if you want to grow your business through email marketing campaigns.
Create Website With Divi Cloudways Hosting
When you join up with Cloudways for Divi Hosting, your server is configured and prepared for you to install your new Divi website. We'll assume you've already signed up for a Cloudways account and set up a server for this guide.
To begin, sign in to your Cloudways account. Then, on the main menu, click the Plus icon. Then, select Add Application.
Create Amazing Websites
With the best free page builder Elementor
Start Now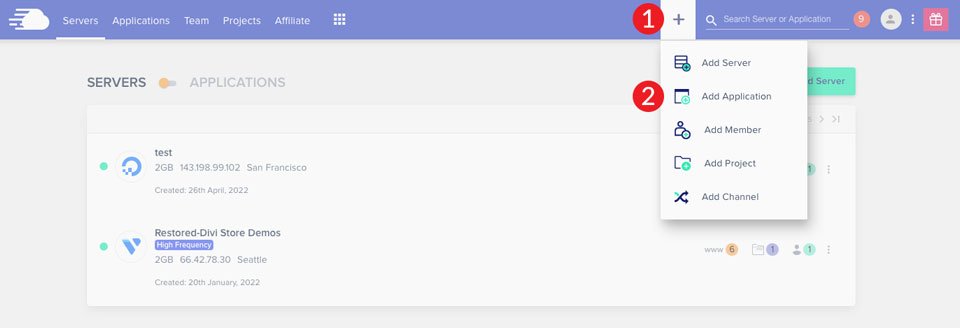
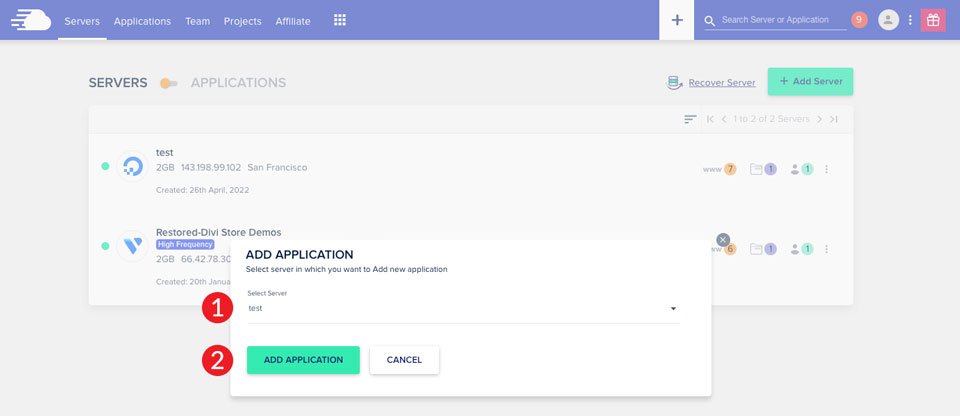
Select your server from the selection menu, then click the Add Application button.
Finally, from the dropdown option, select Divi Bundle, name your application, pick your project, and then click Add Application.
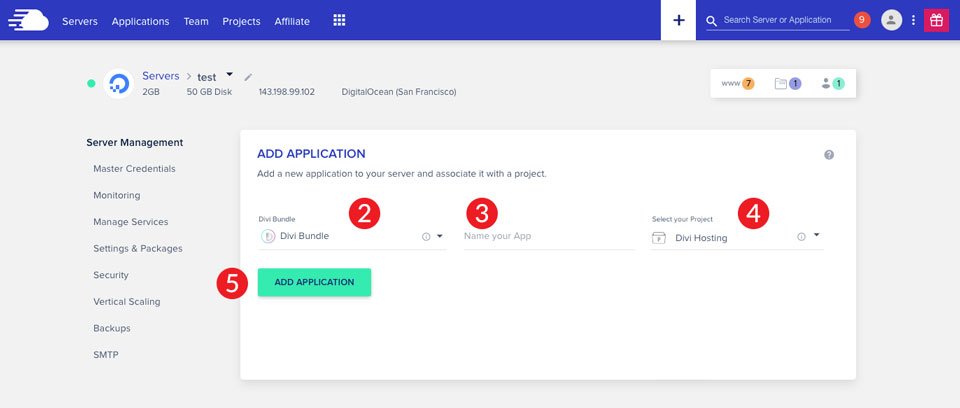
In most cases, creating a new application will take about 2-3 minutes. When the procedure is finished, you'll have a new WordPress site with Divi already installed. Following that, we'll go over SMTP and the options for setting up email marketing campaigns in Cloudways.
Explaining SMTP
The Simple Mail Transfer Protocol (SMTP) is commonly regarded as the industry standard for sending email over the internet. SMTP employs authentication, which increases the likelihood that your email messages will be sent correctly. When email marketing is a top concern for your company, it's critical to select a good SMTP server that can manage massive volumes of user-triggered emails. Your transactional and marketing emails could be lost without SMTP, costing you money. Fortunately, Cloudways integrates with several of the top-rated SMTP email services, including MailGun, Mandrill, Elastic Mail, and SendGrid. In addition, we'll teach you how to use Cloudways' SMTP mail add-on. All of them are excellent choices for email marketing campaigns on your Cloudways server.
Selecting The Best Email Marketing Campaign Service on Cloudways
Before selecting an email provider, you must first determine your project requirement. To begin, consider what you want your email service to perform for you. Do you need to send a huge number of emails? If you have an eCommerce website, it should be considered while choosing a supplier. Let's take a look at the email providers that easily interact with Cloudways to help you decide.
MailGun
MailGun is a good alternative for individuals that need to send a huge number of emails while maintaining high deliverability rates. It works smoothly with WordPress and requires very little setup time in Cloudways. Furthermore, MailGun is very scalable, allowing you to change your strategy as your company grows. Having said that, MailGun isn't the easiest to set up. It's quite complicated and takes some getting used to.
SendGrid
SendGrid is another service provided by Cloudways. It is a popular marketing tool and one of the best on the market. Newsletters, delivery notices, password resets, and promotional emails can all be created and sent. SendGrid is simple to connect to Cloudways and does not require any SMTP plugins.

Mandrill
Mailchimp has an SMTP add-on called Mandrill. It facilitates the sending of transactional emails, which are automated emails used to send eCommerce communications, as well as account activity emails. White-labeling split testing, and audience management is just a few of its powerful features. Integrating Mandrill with WordPress, like MailGun and SendGrid, is a simple way to send email marketing campaigns through Cloudways.
Elastic Email
Elastic Email is a free SMTP service that you can easily integrate into your Cloudways account. It can perform email automation tasks as well as send transactional emails. There are also essential elements added that will allow marketers and developers to simply design campaigns. The setup process is simple, and you may combine A/B testing, email verification, developer tools, and marketing automation. Elastic Email is a Cloudways add-on that has plans starting at.10 cents per 1000 emails.
Gmail via the Cloudways SMTP Add-On
Finally, Gmail is a reasonable solution if you have a small business or freelance website. Gmail has its own SMTP server, which is simple to configure in Cloudways. Business email, online storage, calendars, and other capabilities are available. The main drawback of using Gmail is that you'll need to use a premium service like Mailchimp to send newsletters or promotional emails.
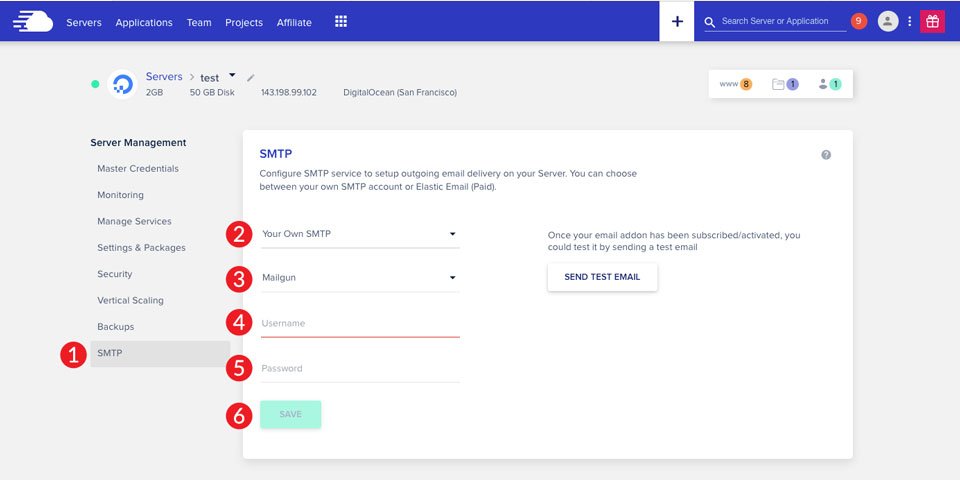
SMTP Set Up for Email Marketing Campaigns in Cloudways
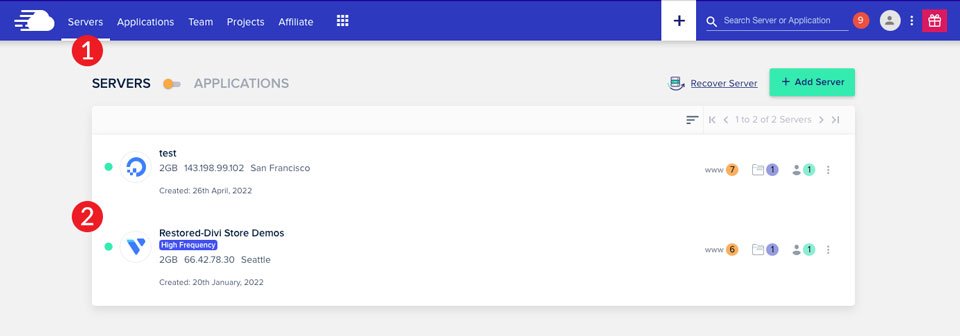
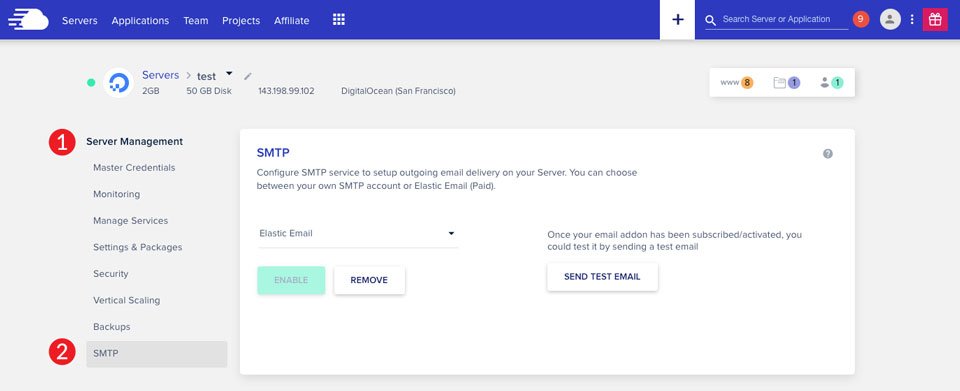
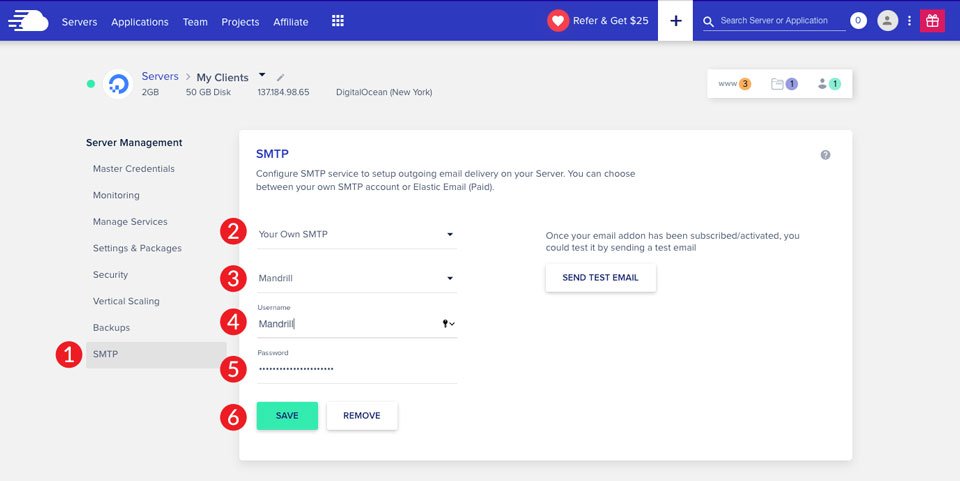
In Cloudways, configuring SMTP for email marketing is a simple task. Once you've decided on a provider, you'll be able to send emails from your server in no time. To begin, sign in to your Cloudways account and select Servers from the main menu.
Next, select which provider to utilize for your SMTP service under Server Management > SMTP. You can use your own SMTP server or Elastic Mail. We'll go over the MailGun, Mandril, SendGrid, and Elastic Mail choices.
MailGun Configuring for Email Marketing Campaigns
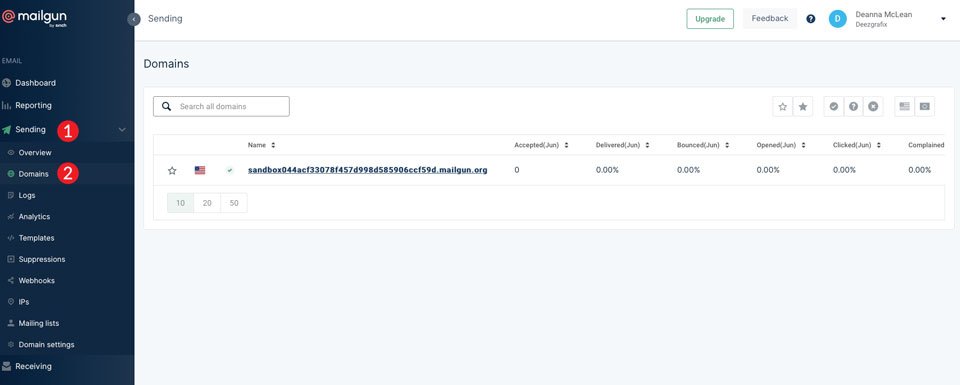
To integrate MailGun with Cloudways, you must first obtain your MailGun SMTP credentials. Log in to your MailGun account to do so. Then, on the navigation bar to the left, go to sending. Domains should be chosen. If you have multiple domains in MailGun, you must select the one that will be associated with your Cloudways application. Keep in mind that we're utilizing a sandbox account with a temporary domain in this lesson, so keep that in mind as we go.
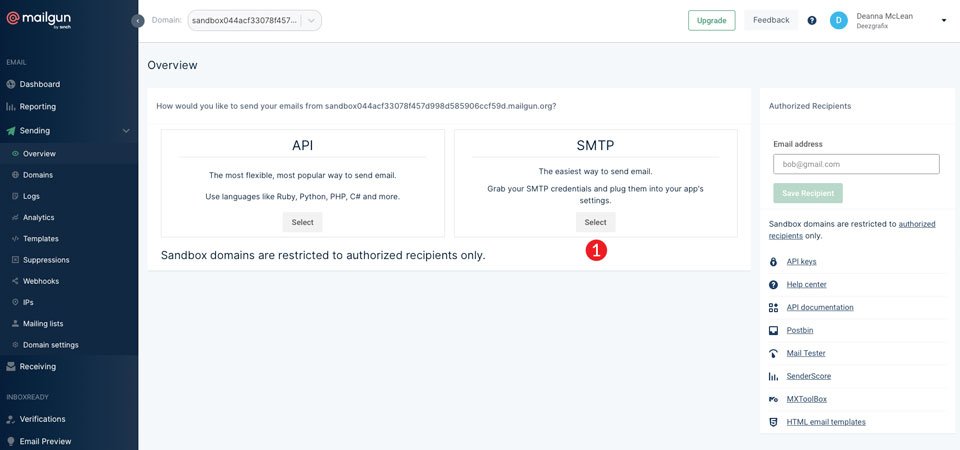
To obtain your credentials, click on your domain. Select the SMTP option, then click OK.
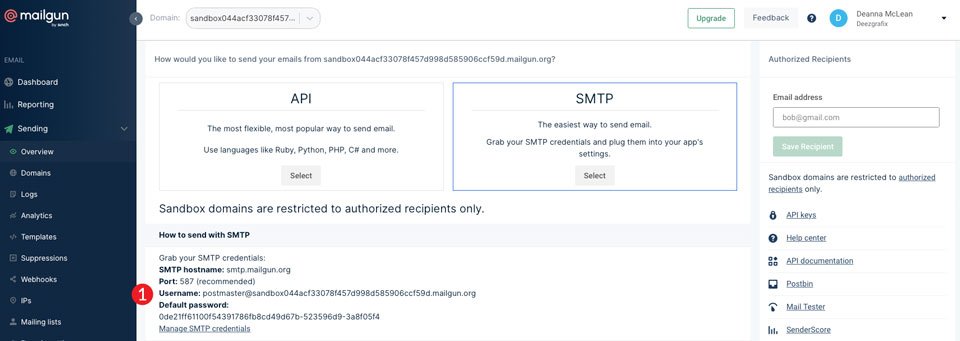
Copy and save the information supplied to you in order to set up your Cloudways connection.
Return to your Cloudways account. Select Your Own SMTP from the server management > SMTP screen, then MailGun from the dropdown menu. Copy and paste your MailGun login and password into the appropriate areas, then click Save.
After you've connected MailGun, send a test email to check the setup was successful.
SendGrid Configuration for Email Marketing Campaigns
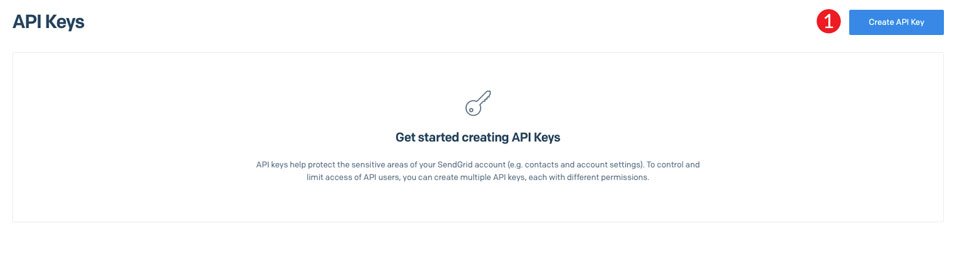
Log in to your SendGrid account to begin integrating SendGrid to Cloudways. Then, on the left navigation bar, select settings. In the dropdown list, select API Keys.
To link Cloudways to your SendGrid account, you'll need to generate a new API key. Click the Create API Key button.
Create an API Key Name first. You can call it whatever you like. Select Full Access under API Key Permissions. Finally, press the Create & View button.

Then, click done to copy your freshly created API key. Make a copy of this and paste it somewhere else because we'll need it in the next phases.

Backtrack to Cloudways. Select Your Own SMTP from the server management > SMTP menu. Then, from the dropdown option, choose SendGrid. Enter your SendGrid login, which could be an email address depending on how your account was set up. You can also enter your new API key into the area. Enter your SendGrid password next. Use your SendGrid password if you used your API key as the username. However, if you use your username, use your API key as the password. Finally, click the Save button.

As previously stated, it's a good idea to send yourself a test email to ensure everything is in order.
Mandrill Configuration for Email Marketing Campaigns
Sign in to your Mandrill account or create a new one to get started. Scroll down to the bottom of the screen and click on the account icon.
Select Accounts & Billing from the dropdown menu.
Then, select extras. Select API Keys from the dropdown menu.
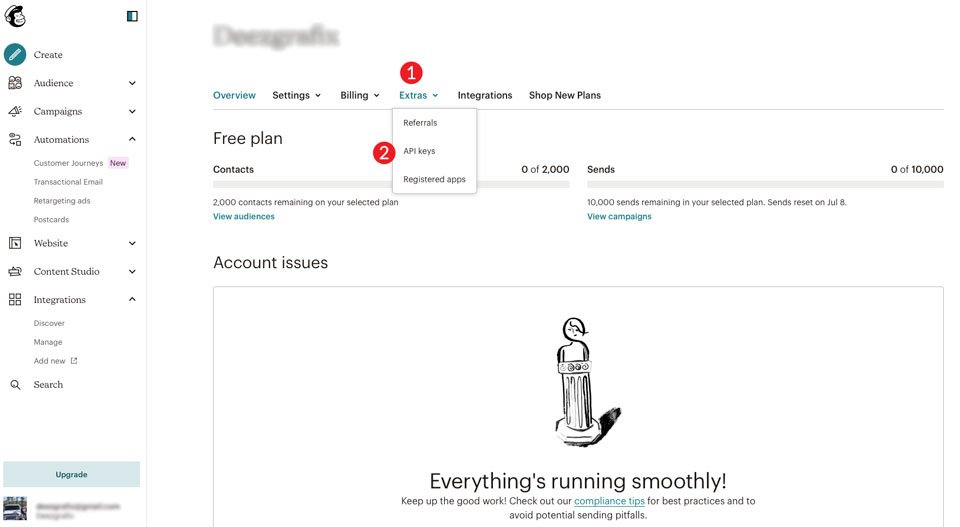
Scroll down to Your API keys after the page has refreshed. Create a Mandrill API Key by clicking the button.

You will be taken to Mandrill. Log in with Mailchimp by clicking the Log in with Mailchimp button.

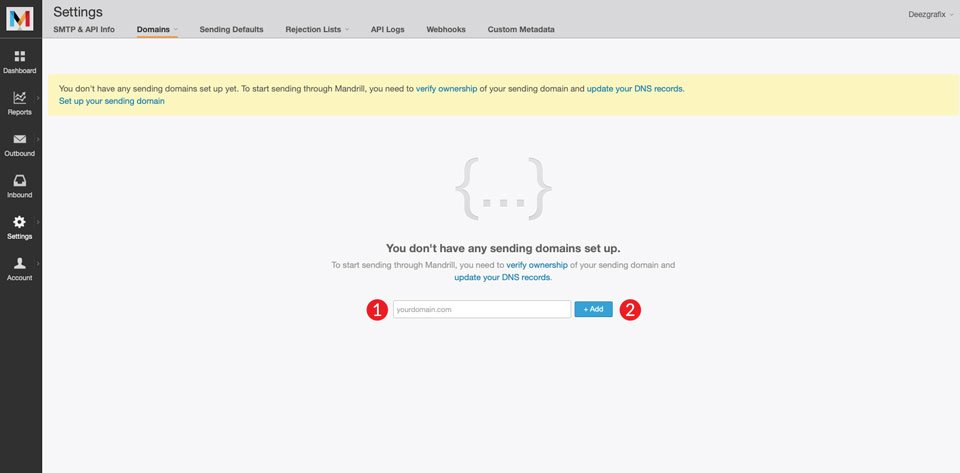
If you haven't already, Mandrill will ask you to add a domain. Set up your sending domain in the yellow bar at the top of your screen to do so. Enter your domain name and click the +Add button.
Modifying Registrar DNS Records
Mandrill will require you to validate domain ownership by adding a few TXT entries to your registrar's DNS. To begin, add a TXT record to verify the domain. Use TXT for the type, @ for the name, and this for the value:
mandrill_verify.1tFI4uR0BLH4nLt-0as5LQFollowing that, you must include a DKIM TXT record. Choose TXT as the type, mandrill. domainkey.example.com as the name, and enter the following code as the value (replace example.com with your domain when adding the DKIM record.):
v=DKIM1; k=rsa; p=MIGfMA0GCSqGSIb3DQEBAQUAA4GNADCBiQKBgQCrLHiExVd55zd/IQ/J/mRwSRMAocV/hMB3jXwaHH36d9NaVynQFYV8NaWi69c1veUtRzGt7yAioXqLj7Z4TeEUoOLgrKsn8YnckGs9i3B3tVFB+Ch/4mPhXWiNfNdynHWBcPcbJ8kjEQ2U8y78dHZj1YeRXXVvWob2OaKynO8/lQIDAQAB;
Finally, you must provide an SPF TXT record. TXT for the type, @ for the name, and this for the value:
v=spf1 include:spf.mandrillapp.com ?all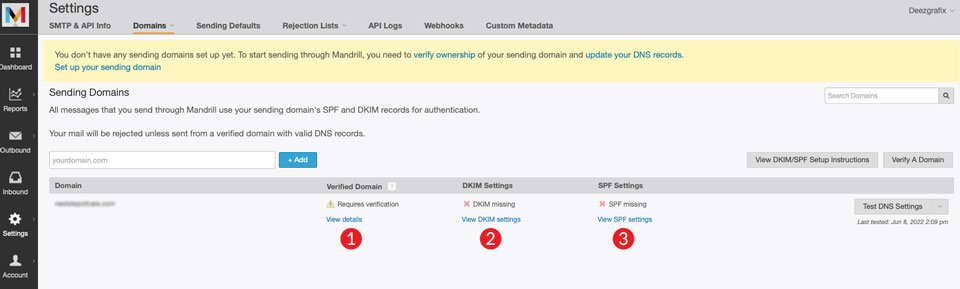
To add the records in this tutorial, we'll use GoDaddy. Go to your domain in your registrar, then select manage DNS.
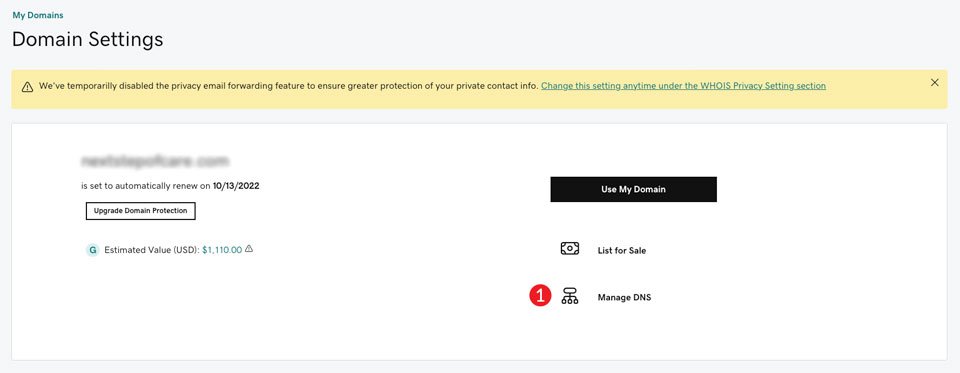
Add the three TXT files listed above. Your DNS should now have the following three records:

Return to Mandrill to test your DNS settings after you've uploaded the records. Choose the Test DNS Settings button to begin. Green check marks will appear next to your settings if everything is in order.
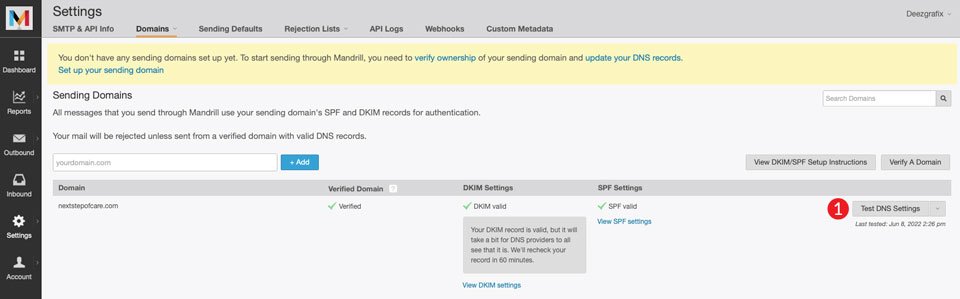
Now that your DNS is in place, we can generate the API key and link Mandrill to Cloudways. To generate an API key, click the +API Key button.

To finish the process, we'll need to obtain the SMTP login information as well as the API key.
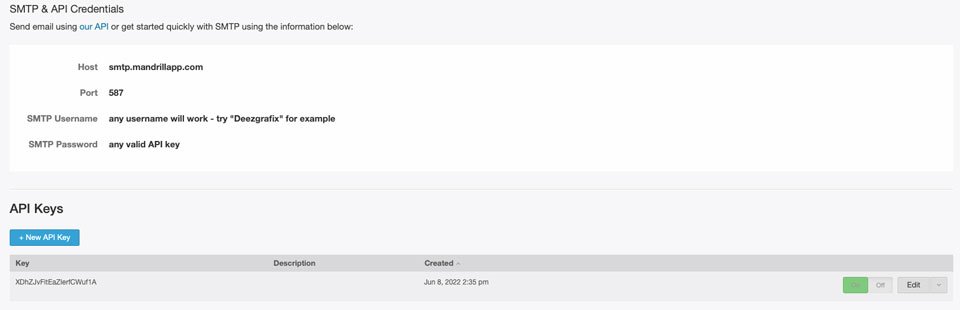
Finally, return to Cloudways. Select Your Own SMTP in the first dropdown and Mandrill in the second. In the username field, you can enter whatever you like. Mandrill will be used in this scenario. Then, for the password, enter the API key you generated. Save the file. Remember to test your settings by sending yourself a test email.
Elastic Mail Configuration for Email Marketing Campaigns
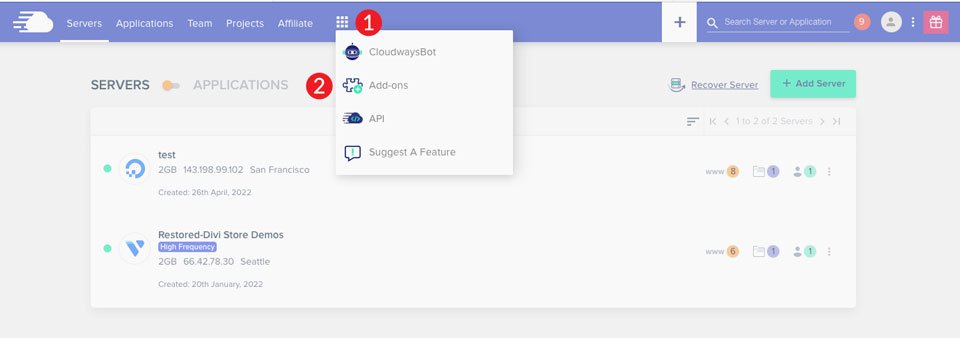
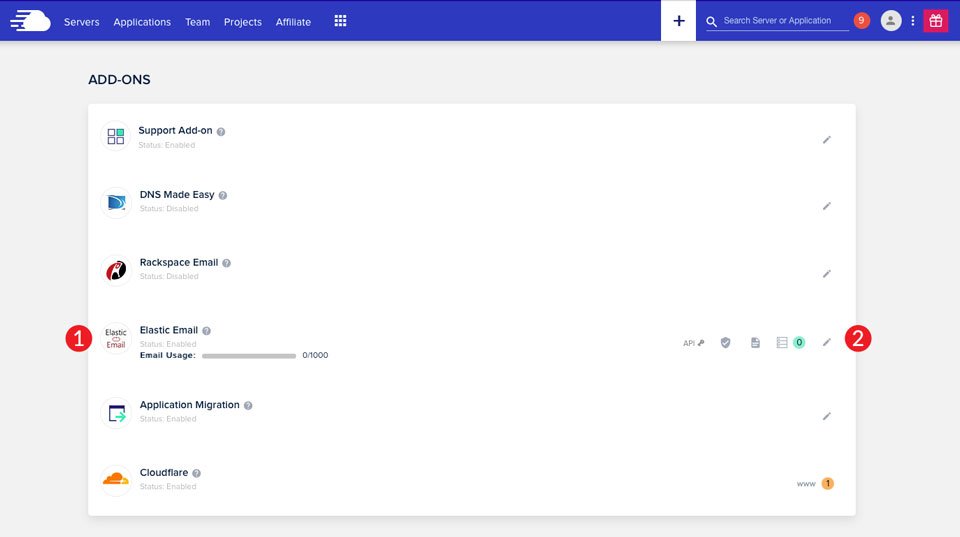
Constructing Elastic Email in Cloudway is the most straightforward solution we've discussed. Because Cloudways integrates directly with Elastic, there are simply a few steps to take. To begin, you must add Elastic Email to your hosting account. To do so, go to the main menu and click the grid symbol, then select Add Ons from the dropdown menu.
To utilize Elastic Email as your SMTP service, you must first subscribe to it. As previously stated, plans begin at.10 per 1000 emails sent. To enable Elastic Email, click the pencil icon.
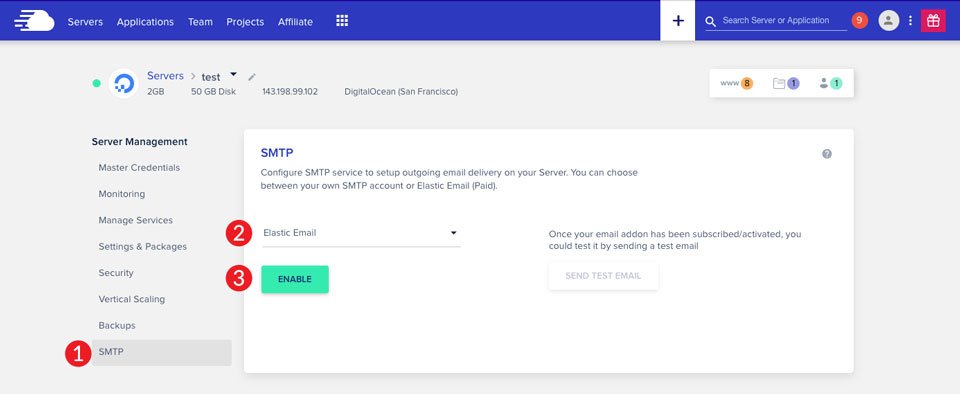
Finally, go to server administration > SMTP. Select Elastic Email from the dropdown menu. Then select the enable option. As previously stated, in order to use Elastic Email in Cloudways, you must add DNS entries for DKIM and SPF to your domain's registrar.
Cloudways SMTP Add-On Configuration
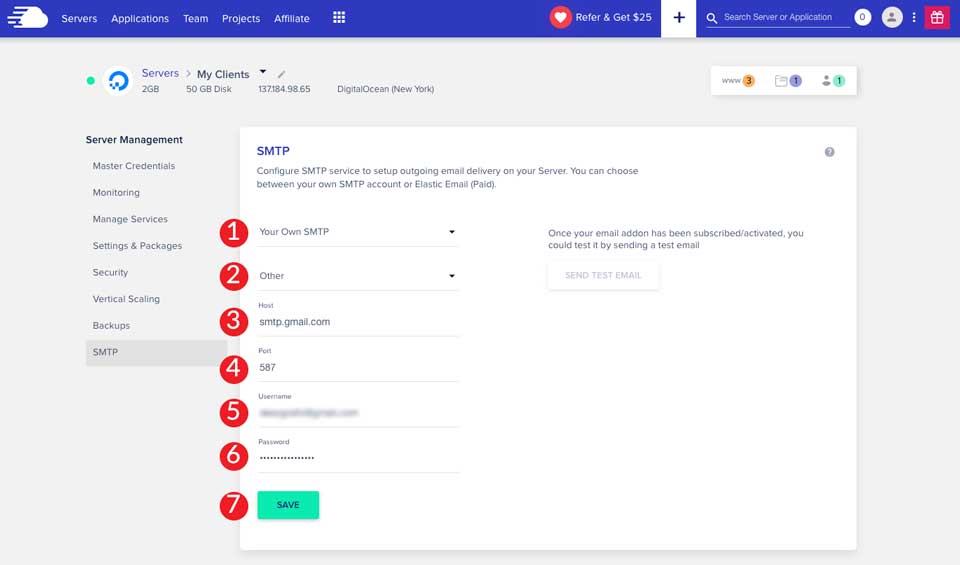
You can configure your own SMTP with Cloudways' SMTP add-on option in addition to using one of the providers listed above. It allows you to use whatever SMTP provider you want. Gmail is one of the simplest to set up. Gmail is incredibly easy to set up because it includes an SMTP server.
To begin, obtain your Gmail login credentials, as well as the server and port information that Gmail uses. Navigate to server administration > SMTP. Select Your Own SMTP from the dropdown menu, as before.
Select Other from the second dropdown menu. After the screen refreshes, enter smtp.gmail.com as the server and 587 as the port. Then, for the username, enter your Gmail login email address. Finally, in the password section, enter your Gmail password. Save the file.
Connect SMTP Server to FluentCRM
Now that we've linked SMTP to the server, we'll teach you how to use the FluentCRM plugin to generate email marketing campaigns on Cloudways. FluentCRM is a WordPress automation plugin that is self-hosted. From the WordPress dashboard, you can manage customer leads, build email campaigns, track user actions, and more.

FluentCRM is free to try, so there's plenty of reason to do so. If you fall in love with it, as we believe you will, a single site license is only $129 USD. That's a very excellent value when you consider you're receiving a complete marketing solution that's simple to administer and includes contact segmentation, email sequencing, and email marketing automation to help you manage your business and customers. FluentCRM integrates with over 30 other plugins, including WooCommerce, LearnDash LMS, Easy Digital Downloads, Zapier, and, most importantly, Divi.
FluentCRM Setup In Divi
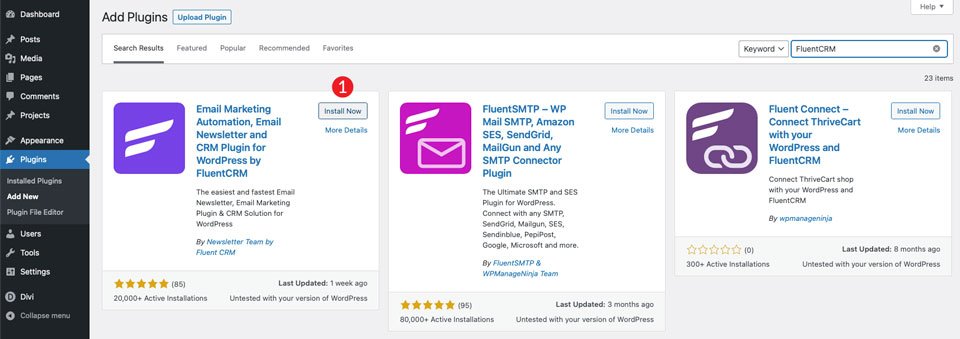
First, start your new Divi site and go to the WordPress admin panel's plugins section. Then, select Add New.
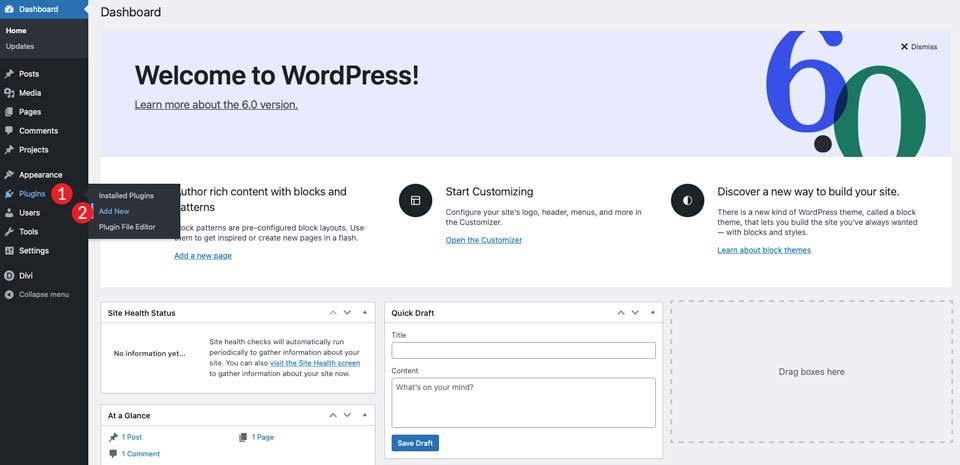
First, start your new Divi site and go to the WordPress admin panel's plugins section. Then, select Add New.
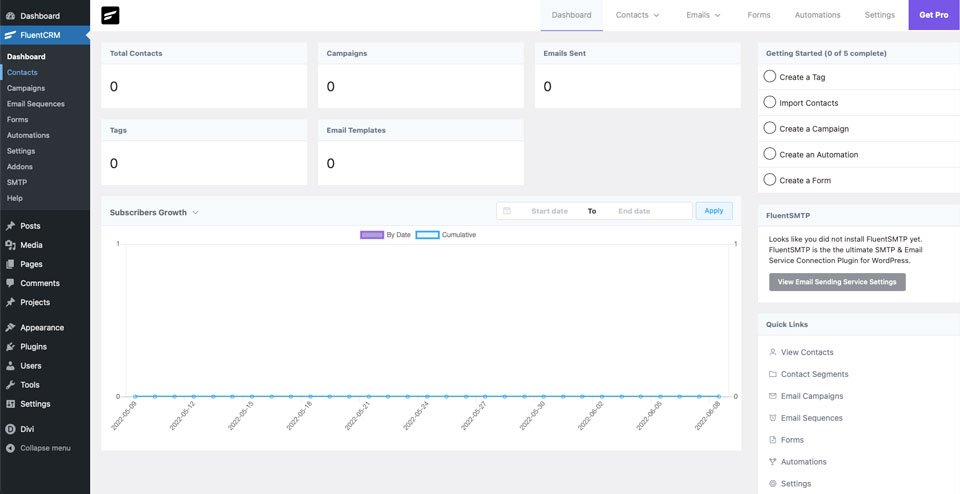
After you enable the plugin, you can begin configuring your automation. In the WordPress dashboard, navigate to the FluentCRM tab.
Rather than using Cloudways to configure your SMTP connection, you can use their FluentSMTP Plugin to connect your WordPress site directly to SMTP. The processes are essentially the same as if you were performing them on the server-side. MailGun, SendinBlue, SendGrid, Google Workspace, Amazon SES, and many other services are available. If you wish to configure a separate SMTP provider for particular Cloudways applications, this could be a viable solution for you.
In the WordPress dashboard, go to FluentSMTP > Settings > SMTP/Email Service Settings to get started. The FluentSMTP plugin will be installed automatically. Install the FluentSMTP Plugin (it's free). It is, indeed, free.
Wrapping Up
Cloudways with Divi provides several options for configuring SMTP in order to develop email marketing campaigns. You may easily include SMTP in email automation, promotional mail, and other applications using MailGun, Elastic Mail, SendGrid, and others. Furthermore, with FluentCRM's amazing capabilities, you can forego the requirement for extra subscriptions such as Mailchimp to have a full-service marketing automation setup with a very low initial cost.
Check out other Divi tutorials for further assistance.


