
WordPress form submissions play a crucial role in gathering valuable information from website visitors and establishing effective communication channels. By incorporating user-friendly forms into your WordPress site, you can collect data, receive inquiries, process orders, and facilitate various interactions with your audience. Whether you're running a business, managing a blog, or maintaining an online presence, understanding how WordPress form submissions work is essential for engaging with your visitors and providing them with a seamless user experience.

In this guide, we will explore the ins and out of WordPress form submissions, and get insights on how to effectively manage and leverage the data you gather. Get ready to unlock the full potential of WordPress form submissions and enhance your website's functionality.
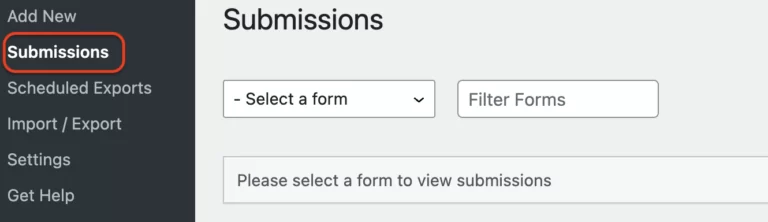
Access Form Submissions in WordPress
At Ninja Forms, users are provided with the freedom and flexibility to collect and access their form submission data effortlessly. Unlike many competitors in the market, Ninja Forms offers free access to form submission data without any limitations. Users can benefit from receiving an unlimited number of submissions from their WordPress forms, without any caps or restrictions imposed.
There are two simple ways to access form entries on a WordPress site using Ninja Forms. The first method involves navigating to the Ninja Forms Dashboard and clicking on the gear icon corresponding to the desired form to view the form submissions.
Create Amazing Websites
With the best free page builder Elementor
Start Now
Alternatively, users can access their submissions by clicking on the Submissions tab and selecting the desired form from the dropdown menu. This allows easy access to view and manage form submissions conveniently.
With Ninja Forms, users can enjoy seamless access to their form submission data, empowering them to make informed decisions and optimize their WordPress forms efficiently.
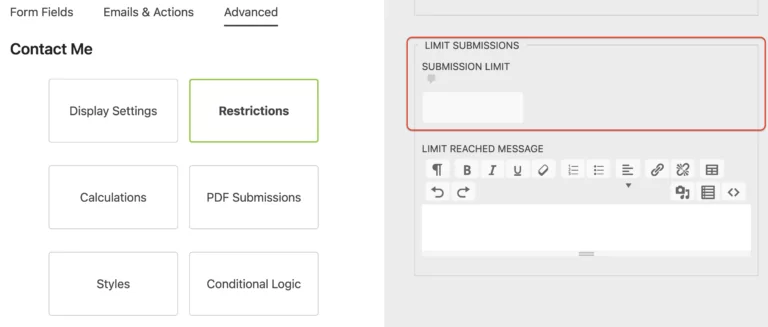
Limit Submission Entries
The process of limiting form submissions using Ninja Forms is straightforward and user-friendly. There are multiple methods available to restrict the number of entries on your form, with the most popular being to set a limit on the total number of submissions.
Even in the free version of Ninja Forms, you have the ability to specify a maximum limit for the number of submission entries received on your form. Furthermore, you can customize a message that will be displayed to the user once the submission limit has been reached.
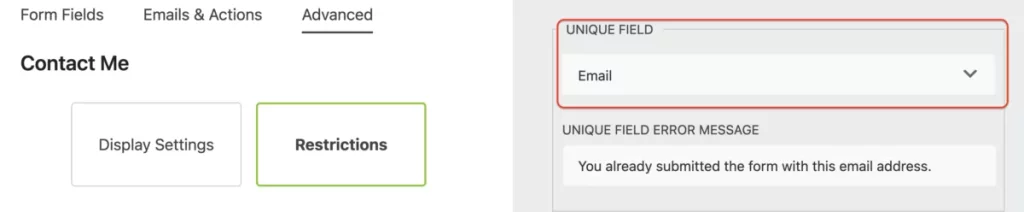
Another effective way to restrict form submissions is by email address. By navigating to the Restrictions tab in Ninja Forms, you can access this feature. If you don't see this option, ensure that Developer Mode is enabled. Once enabled, locate the Unique Field option and select Email. This setting will prevent duplicate entries on your form, making it useful for various purposes, such as creating single-use coupon codes and more.
By implementing these restrictions, you can efficiently manage and control the number of form submissions received through Ninja Forms, ensuring a seamless and organized user experience.
Export Form Submissions
Reviewing submission entries within the WordPress dashboard can be inconvenient, especially when you need to analyze and share the data with your team. However, with Ninja Forms, you can bid farewell to the limitations of the WordPress dashboard. The free core plugin of Ninja Forms allows you to export your form submissions into a CSV file without the need for any add-ons.
To export your submissions to a CSV file, simply follow these steps:
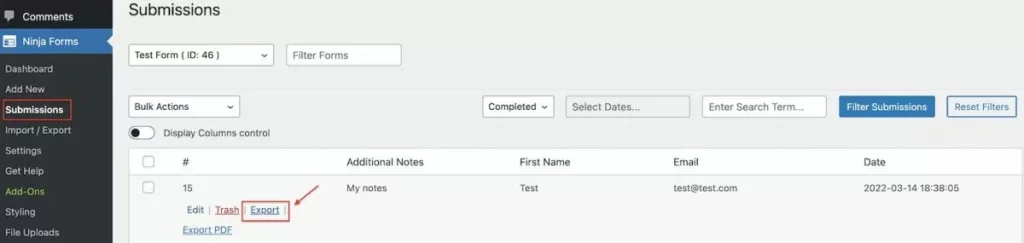
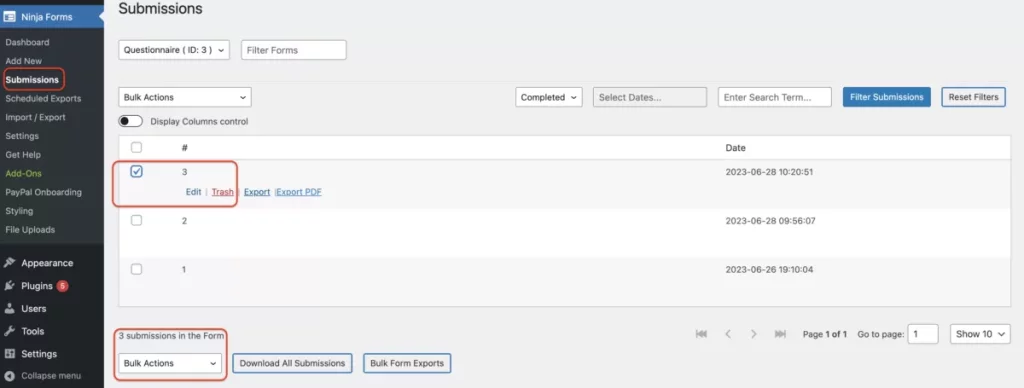
- Navigate to Ninja Forms > Submissions in your WordPress admin area.
- Select the form from which you want to export submissions.
- Hover over the submission entry you wish to export, and click on the "Export" option.
- By doing this, a CSV file containing the submission entry will be automatically downloaded.
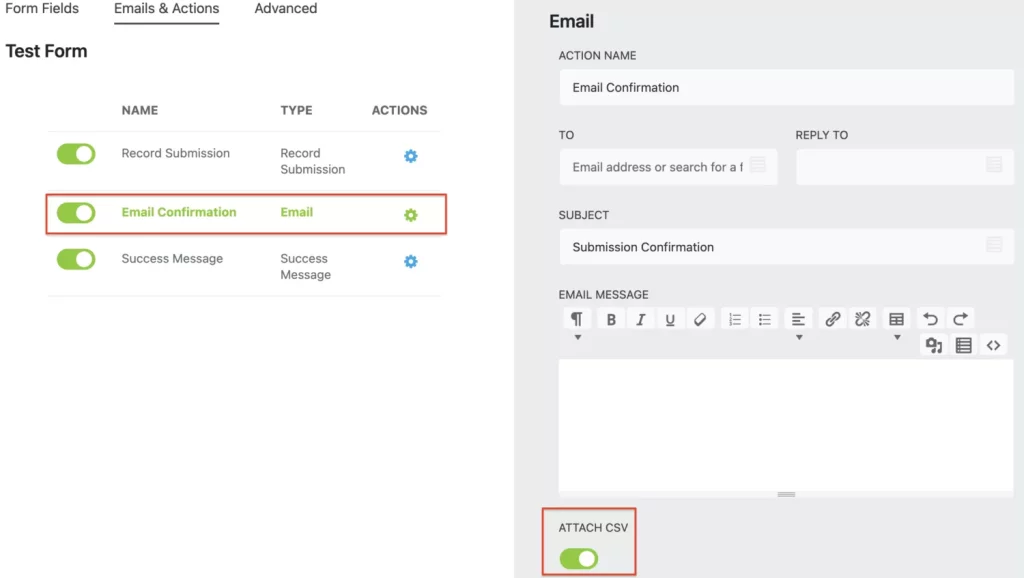
If desired, you can even attach the CSV file of the submission to the email confirmation. To set this up, go to the "Email confirmation" section under the "Emails & Actions" tab in Ninja Forms.
In addition to CSV exports, Ninja Forms offers the flexibility to export form submissions to other file formats such as PDF or Excel. Furthermore, you can integrate your submission entries with Google Sheets, allowing you to conveniently store and analyze your data. It's important to note that these advanced features are part of the paid version of Ninja Forms.
With Ninja Forms, you can easily export your form submissions to CSV files, facilitating efficient data analysis and sharing. Upgrade to the paid version for even more export options and seamless integration with popular tools like Google Sheets.
Edit Submissions
If you want to give your users the ability to review and edit the content of their previously submitted forms, the Ninja Forms User Management add-on is here to help. This add-on incorporates User Access functionality, which goes beyond restricting access to just the administrator user role.
With the Ninja Forms User Management add-on, you can empower your users by allowing them to access and modify their form submissions. This means they can review their submitted information, make necessary edits or updates, and ensure their data is always up to date.
Display Submissions On The Front
When it comes to displaying form entries on the front end of your WordPress website, you have two options with Ninja Forms: the Submissions Table Block (free) and the Front-End Posting add-on (paid).
Delete Form Submissions
There are two ways to delete form submissions from your WordPress site. You can either delete individual submissions or delete submissions in bulk.
To delete individual submissions, follow these steps:
- Navigate to the Submissions dashboard on your WordPress site.
- Locate and select the form for which you want to delete submissions.
- Look for the specific submission you wish to delete and select it.
- Click on the "Trash" option. This will delete the selected form submission.
If you want to delete all submissions from the same form in bulk, here's what you need to do:
- Go to the Submissions dashboard in WordPress.
- Find and select the specific form you want to delete submissions from.
- Look for the checkbox located next to "#". Mark this checkbox to select all submissions.
- Scroll down to the bottom of the page and click on the "Bulk Actions" button.
- From the options that appear, choose the "Move to Trash" option.
- Click on the "Apply" button. This action will delete all submissions for the selected form in bulk.
By following these instructions, you can effectively delete form submissions from your WordPress site using the two available methods.
Set Submissions To Expire
Working with form submissions can be time-consuming. When you receive a large volume of submissions, it can be challenging to review and analyze the data, especially if you need to identify and delete submissions containing sensitive information. However, there is a solution that can help streamline this process.
By utilizing our core plugin, you can automate the deletion of your form submission data effortlessly. No longer will you need to manually delete each submission. The plugin offers a free feature called "Set Submissions to Expire" which handles auto-deletion seamlessly.
To access this feature, navigate to the "Emails & Actions" section of your form builder, specifically under "Record Submission." Once you enable this action to store your WordPress form submissions, proceed to the "Advanced Settings" and toggle on the "Set Submissions to Expire" option.
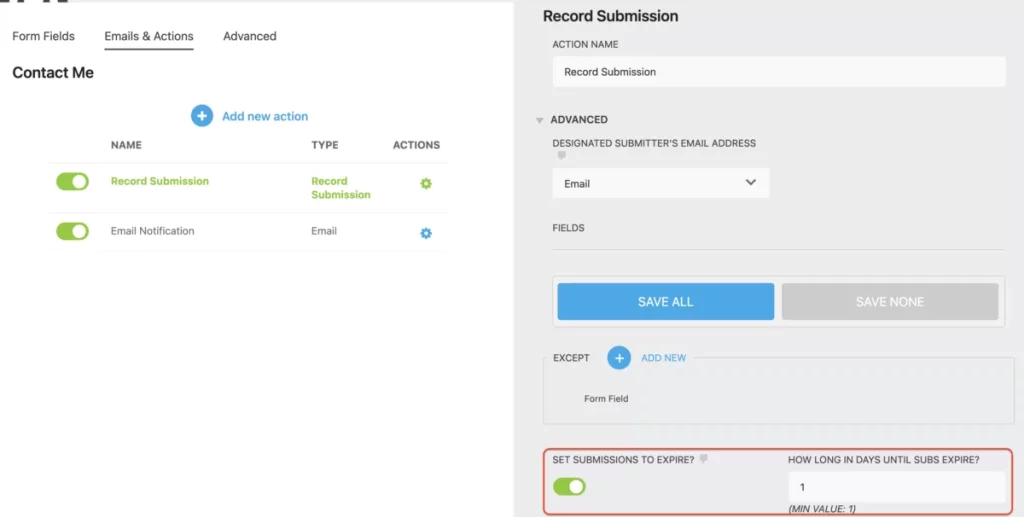
To set the expiration period, simply enter the desired number of days after which you want the submissions to be automatically trashed. Please note that the minimum value you can enter is one day. Keep in mind that once you enable this setting, it will affect all existing and new form submissions.
It's important to note that this setting only deletes the form submission records and does not delete any uploaded files. The uploaded files will remain in your system even after the form submission has been trashed.
By utilizing the "Set Submissions to Expire" feature in our plugin, you can save time and effort by automating the deletion of form submissions containing sensitive information.
Schedule Export
Managing form submission records is an essential part of any workflow. Whether you're dealing with multiple websites or handling form entries for clients, the time spent logging in and checking submissions can quickly become overwhelming. Additionally, relying on email notifications for each submission entry can make retrieving a daily or weekly summary a tedious task.
Fortunately, there's a solution: Scheduled Submissions Export. This feature allows you to automate form submission management effortlessly. You can easily schedule regular digests of all submissions from any WordPress form, choosing from hourly, daily, or weekly intervals. This not only saves time but also streamlines the process of sharing submission data with team members or clients.

With the scheduling add-on, you have the flexibility to customize the schedule to meet your specific needs or those of your clients. This centralized approach to managing schedules, provided by Ninja Forms, simplifies your workflow and ensures efficient form submission management.
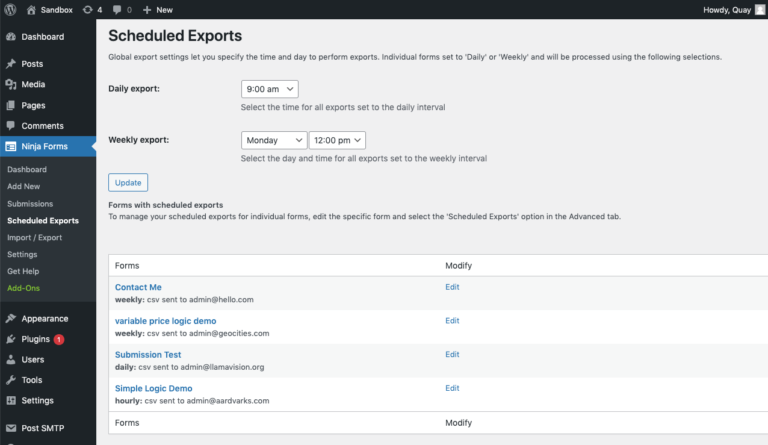
By implementing Scheduled Submissions Export, you can free up valuable time and focus on the tasks that require your creativity and vision to drive your business toward success. Even small time-saving measures can make a significant difference in your overall productivity.
Prevent Spam
This blog post about WordPress submissions would not be complete without addressing the problem of unwanted spam submissions. The battle is real, but there are ways to reduce contact form spam in WordPress. Here are some tips to help you:
- Honeypot Technique: One effective method to combat spam is by using the honeypot technique. This involves adding a hidden field to your form that is only visible to bots. Since bots automatically fill in all form fields, including the hidden one, you can easily identify and discard submissions that have this field filled out.
- Anti-Spam Field: Another approach is to include an anti-spam field in your form. This field can contain a simple question that is easy for humans to answer but difficult for bots. For example, you could ask a math question like "What is 2 + 2?" Bots typically struggle with such questions, while humans can easily provide the correct answer.
- Google reCAPTCHA v2 and v3: Google reCAPTCHA is a widely used service that helps protect websites from spam and abuse. It offers two versions: v2 and v3. With reCAPTCHA v2, users are required to click on a checkbox to prove they are human. In reCAPTCHA v3, there is no user interaction required, as it uses advanced algorithms to detect and block spam submissions automatically.
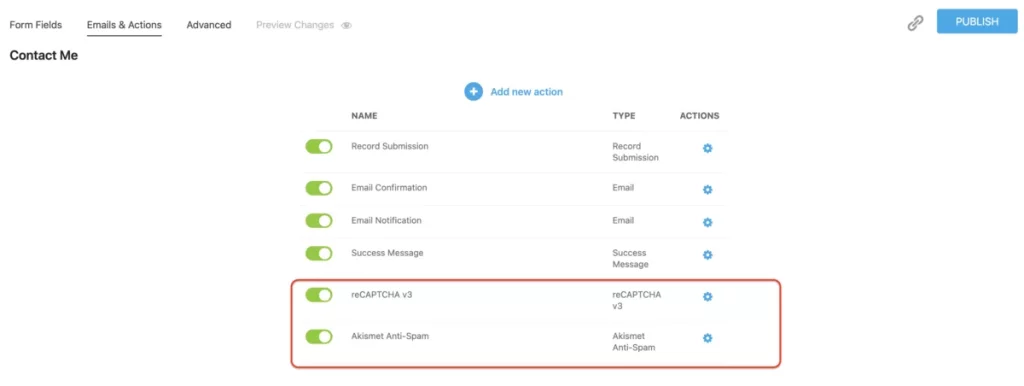
By implementing these measures, you can significantly reduce the number of spam submissions you receive through your WordPress contact forms. Even the free version of various plugins, including Ninja Forms, offers features such as Honeypot, Anti-Spam field, and integration with Google reCAPTCHA v2 and v3 to help you combat spam effectively.
Merge Tags
Before we delve into the specific functionality of merge tags in your forms, let's first discuss what merge tags are and how they work. Merge tags, a feature available in various form plugins, including Ninja Forms, allow you to retrieve and display data from different sources within your WordPress site and populate it in specific locations where the merge tags are placed.
To get a better understanding of how merge tags work in your forms, let's consider an example. Imagine we have a multi-step form with several fields, such as email, name, and phone number. We can create a summary page for this form and add merge tags for each of the existing form fields within the WordPress form.
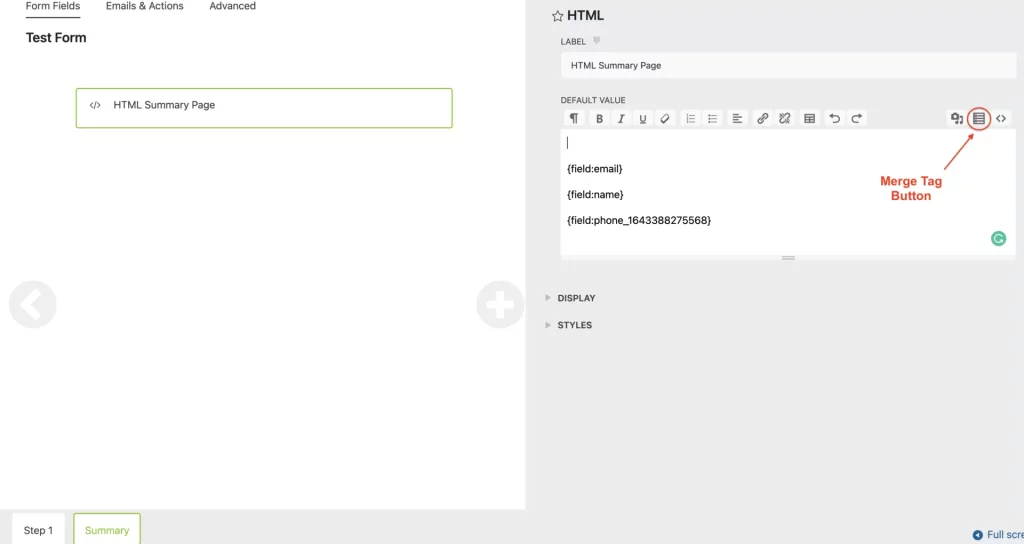
Using the Merge Tag button, we can insert the appropriate merge tags for the email, name, and phone number fields into the HTML field on the summary page. The merge tag functionality dynamically fills in the data that users enter in the corresponding form fields. This means that when users preview the form on the summary page, they will see the actual data they provided, such as their real email address, name, and phone number, instead of seeing placeholders like {field:email}.
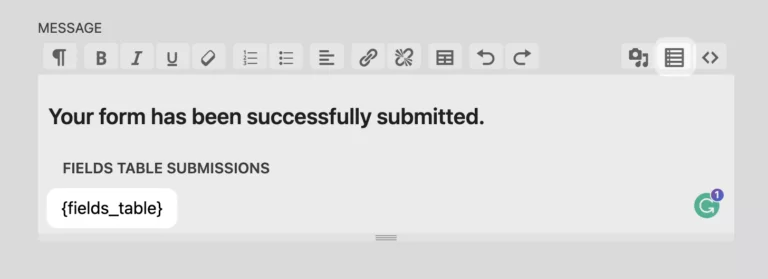
One popular way to utilize merge tags is by incorporating them into your email notifications or success messages. By using the merge tag {all_fields_table}, you can display a table in your email or success message that includes labels and submission data for all the fields in the form, including HTML fields.
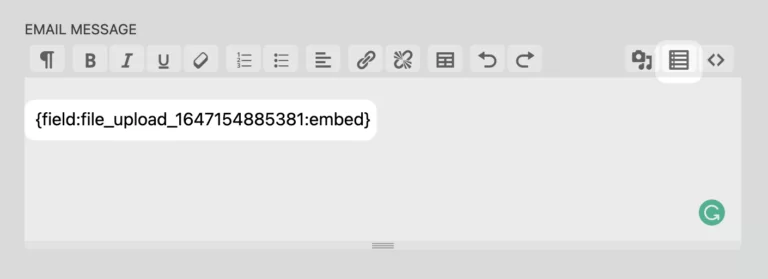
Additionally, you can also make use of merge tags to attach uploaded images to your confirmation email. To achieve this, you can select the appropriate merge tag through the merge-tag icon, navigate to the File Uploads section, and choose the File Upload Embed option. To include the uploaded image as an embedded attachment, you would insert the ":embed" modifier into the file uploads merge tag.
By leveraging merge tags effectively, you can enhance the functionality and customization of your forms, allowing you to display submitted data in emails and success messages and even attach uploaded files to confirmation emails.
Wrapping Up
Congratulations on making it all the way to the end of this article. You deserve a big shoutout for your commitment! We hope you found our exploration of WordPress form submissions informative and empowering. By now, you should feel confident in your ability to manage form submissions effectively.
When it comes to selecting a form plugin for your WordPress site, Ninja Forms is an outstanding choice. If you haven't already, we highly recommend downloading our core plugin. It offers a range of powerful free features that can greatly enhance your form-building experience. These include calculations, spam protection, the ability to create unlimited forms, and unlimited submissions, among many others.
So, go ahead and give Ninja Forms a try.


